こんにちは、ねこです。

自称プログラマのおばちゃんのブログです。いろいろあるよねぇ~。

Netlify, Gatsbyのお勉強1➡GatsbyフレームワークHelloWorldで出来合いのCMSではないよ。

2019-10-29 10:57:40 | プログラム 勉強

これから1時間ほどGatsbyの勉強をしたいと思います。https://www.gatsbyjs.org/tutorial/part-one/

必要なインストール

1.VS Code (bash設定にしておけばやりよい)

2.Node.js

3.npm

4.Git とGithub

*******************************

1.では、gatsbyをインストール

npm install -g gatsby-cli

2.hello-worldという名のプロジェクトをgithubから持ってくる。

gatsby new hello-world https://github.com/gatsbyjs/gatsby-starter-hello-world

3.一つ下の階層に2のhello-worldができているので、そこへ移る

cd hello-world

4.ライブでブラウズできるようにする。(エクステンションのGo Liveを使わなくてもこれでブラウズできます。)

 gatsby develop

【!】GatsbyはReactベースなので、コンパイルが必要!だから、イメージファイルなんか変えたら「見つかりません」のエラーが出ます。きちんとReactにそって変更しましょう。変更を保存すると同時にgatsby developが勝手にコンパイルしてくれます。

ローカルでブラウズしてみましょう。http://localhost:8000

5.エクステンションのPrettier Formatterを入れたほうがいいというので、なにかよくわかんないけどいれた。シンタックスのエラーなんかを防ぐのかな?

【!】だいたいGatsbyを始めるときには、もともとあるGatsbyのスターターGithubからコピペして始めるそうだ。

gatsby new [SITE_DIRECTORY_NAME] [URL_OF_STARTER_GITHUB_REPO]

【!】うぉっと、Gitブランチ作るの忘れてた。ここまでは、しっかり動いてくれてます。

git checkout -b hello01


*******************************

 React 知ってる人は飛ばしてねぇーって書いてますが、ねこはVue.jsしか知らないので、急がば回れです。

コンポーネントについて

『JSX』(Reactコンポーネントです)

import React from "react"

export default () => <div>Hello world!</div>

『JS』(Pure Javascript)

import React from "react"

export default () => React.createElement("div", null, "Hello world!")


『HTML』

<button class="primary-button">Click me</button>

『JSX』

<PrimaryButton>Click me</PrimaryButton>


ページ・コンポーネント

src/pages/about.jsを新しく作ります。

『JSX』

import React from "react"

export default () => (
<div style={{ color: `teal` }}>
<h1>About Gatsby</h1>
<p>Such wow. Very React.</p>
</div>
)

http://localhost:8000/about


さぶ・コンポーネントを使います。

src/components/header.jsを新しく作ります。

『JSX』header.js

import React from "react"

export default props => <h1>{props.headerText}</h1>

『JSX』about.js

import React from "react"
import Header from "../components/header"

export default () => (
<div style={{ color: `teal` }}>
<Header headerText="ここにある文字がheader.jsで設定されたレイアウトと一緒に出てくるよ!" />
<p>Such wow. Very React.</p>
</div>
)

propsってなぉーに???

使いまわしできるように作った箱ですな。この場合はaboutで出したい文字をheaderのレイアウトに沿って一緒に出すようにしたもの。だから、headerはimport で呼ばれて、propsの箱にいれる内容をもらいます。郵便局の「荷物お伺い配達」と似てますな。呼ぶ側が「お客さん(about.js)」、そして荷物を取りに来てくれるのが「郵便局(header.js)」郵便局は一日に何件もお客さん宅を回って荷物を受け取りに行きます。


リンクを使いましょう

src/pages/index.js


import React from "react"
import { Link } from "gatsby"
import Header from "../components/header"


export default () => (
<div style={{ color: `purple` }}>
<Link to="/contact/">Contact</Link>
<Header headerText="Hello Gatsby!" />
<p>What a world.</p>
<img src="https://source.unsplash.com/random/400x200" alt="" />
</div>
)


5分早いけど、おなか減ったんで、Gatsbyのお勉強はここまで。


Microsoft MCSA SQL Server 2016 (70-761) むぼーな挑戦

2019-10-28 19:45:43 | プログラム 勉強

かれこれ、もう2週間ほどむぼーな勉強を続けてます。

データベースの経験:IBM DB2 約5年、ほぼ簡単なSQLのみ、iNavigatorでDBデザインのためにマップを作ったり、テストやったりした。インデックスやクラスターなどの用語は全然知らなかった。

SQL Serverの経験:約半年、クエリを作って保存するや、マップ作ったり等のオペレーションに使った。

ストアード・プロシージャの経験:AS400でCRTSQLRPGなどをつくったり、RUNSQLSTMなんかで作ったことがあった。


なので、全然わからん。

今のところは、だんなちゃんから、CBTNuggetsで勉強させられて、一応33までのコースを網羅。全然覚えてない。。。

プレップ・テストを受ければ、30から50%しかとれないし、なんだか点数も最初とそんなかわらんかんじ。

で、ここで間違えた理由をそれぞれの間違えた問題から考察してみた。 

1.まったく聞いたことのない単語

2.問題の読み落とし

3.完璧に習ったことを忘れているが、答え見たら、「あぁ~っ」となる

4.知っている内容だが、知識の詳細が不足している

5.疲れてしまって、読むのも嫌になり、よく考えずに答えを出している

6.難しすぎて、もう諦めなければならないレベル


これらから、2番の「問題の読み落とし」は多いようだ。

疲れた。

しかし、なぜこうもMicrosoftのテストは問題が文章中心なのか。。。

英語読むの、まじ難しい。

ようわからん。。。とほほ。年だなぁ。。。

おおぅとっ!

次やるリスト忘れてた。


次やるリスト

1.フレームワークとしてのgatsbyをいじってみたい。Vue.jsとよくにてる。あたりまえか。。。

https://www.gatsbyjs.org/tutorial/

2.明日はパケットの#7

3.10問を午前中やる

4.実際と同じぐらいの40問を午後にやる


めざせ、知識のノーみそ漬け!!!


Netlify, Gatsbyのお勉強0➡NetlifyにあるGatsbyのCMS『GatsbyStarterBlog』をNetlifyへデプロイします。

2019-10-28 11:59:38 | プログラム 勉強

https://www.netlifycms.org/docs/gatsby/

1.CMSをNPMで作成します。

npm install -g gatsby-cli 
gatsby new blog https://github.com/gatsbyjs/gatsby-starter-blog 
cd blog

はい、ちゃんとはいりましたが、サイトに「Open one .md file」とあるのが、ふつーのREADME.mdしかありません。で、それって、サイトと内容があきらかに違ってます。ーーーREADME.mdには「1.  **Start developing.**」とここにあるので、とりあえず、ローカルでブラウズしてみます。

gatsby develop
 
http://localhost:8000で開けてね。ちょっと時間かかるよ。
 
これ以上README.mdではgatsbyの構成とその他、リンクなんかしかないようなので、このままサイトのほうをします。
その前に『ctl+C』でdevelopを切って。
 
2.サイトでは、NetlifyにこのCMSを登録するようです。
npm install --save netlify-cms-app gatsby-plugin-netlify-cms
これで、「config.yml」ができるそうなんですが、どうでしょう
 
…違う、自分で作れってさ。そしてコピペしろってさ。
├── static 
 ├── admin 
 │ ├── config.yml
で、コピペは以下の通り。
backend:
  name: git-gateway
  branch: master

media_folder: static/img
public_folder: /img

collections:
  - name: "blog"
    label: "Blog"
    folder: "content/blog"
    create: true
    slug: "{{year}}-{{month}}-{{day}}-{{slug}}"
    editor:
     preview: false
    fields:
      - { label: "Title", name: "title", widget: "string" }
      - { label: "Publish Date", name: "date", widget: "datetime" }
      - { label: "Description", name: "description", widget: "string" }
      - { label: "Body", name: "body", widget: "markdown" }
 
4.gatsby-config.jsを開いて、以下を足します。ヒエラルキー間違えないようにね。
plugins: [`gatsby-plugin-netlify-cms`]

5.Gitのリポジトリ名何にしようかな。
今のところ、以下のGit Addが必要。
gatsby-config.js
package-lock.jason
poackage.json
config.yml
 
最初にGithubでリポジトリつくって、そこにRemoteを追加してやります。
git add . 
git commit -m "Initial Commit" 
git remote add origin https://github.com/YOUR_USERNAME/NEW_REPO_NAME.git 
git push -u origin master
 
6.さぁて、NetlifyにこのGithubリポジトリを追加しますか。
もう、練習だからマスターからでオッケーとします。
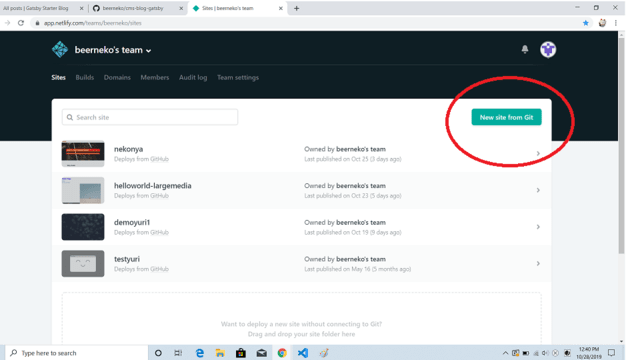
 
ついでに、名前も「https://beerneko-cms-blog-gatsby.netlify.com/」みたいに、わかりやすくしておきましょう。
Site Setting > General > Site Detail > Site Information 『Change Site name』で好きな名前にして、保存。
次にデプロイをして確認します。時間書かかるよ。
こんな感じでちゃんとドメイン名もカッコよくなります。➞『https://beerneko-cms-blog-gatsby.netlify.com/
 
7.認証や、Git Gatawayの設定をします。
ウェブサイトNetlifyのsetting画面からです。
…なんかめんどくさいので、サイトを読みましょう。https://www.netlifycms.org/docs/gatsby/#enable-identity-and-git-gateway
 
8.もうちょっと!!!では、最初のブログを公開しましょう。
サイトのログインがわからないよ。。。
おお、https://beerneko-cms-blog-gatsby.netlify.com/admin/ ってURLに入れなきゃね。リンクはないのかい、リンクはっ!!!
どこだ。。。あかねぇ。。。なんでだ。。。
ちょっとgatsby-config.jsのplug-inの場所を一番最後に変えてみよう。またコミットしてGithubをつかってNetlifyサイトからデプロイしなおして。。
。。。あらへん。。。どこだ。。。
どうやったら、『/admin/』へいけるのっ!!!
https://github.com/netlify-templates/gatsby-starter-netlify-cms/issues/32 には修正したってかいてあるけど。。。
 
もう一回
https://beerneko-cms-blog-gatsby.netlify.com/admin/ うってみる。
おぉ、あいたっ!どうやら時間差があるんだねぇ。。。もしくは、やっぱりplug-inの場所が間違ってたかだな。
 
メール認証が来るにゃ。このパスワードセキュリティーレベル何とかならんのかいな。
でもきちんとGoogle認証できてる。素晴らしい!Oauthいれずにすむから、かんちこちんです。死語!!!


終わりました。
 
はぁ~おつかれさん。
 
びーるねこ
 
 
ーーー以下はREADME.mdの内容です。--
 
1.  **Create a Gatsby site.**

    Use the Gatsby CLI to create a new site, specifying the blog starter.(1.CMSをNPMで作成します。)

    ```shell
    # create a new Gatsby site using the blog starter
    gatsby new my-blog-starter https://github.com/gatsbyjs/gatsby-starter-blog
    ```

1.  **Start developing.**

    Navigate into your new site’s directory and start it up.

    ```shell
    cd my-blog-starter/(こんなのねーぞ!で、かわりにただの「blog」はありました。サイトにはそれを見ろと書いてます。)
    gatsby develop (サイトにはかいてませんが、これでローカルの8000がブラウズできます。やってみましょう)
    ```

1.  **Open the source code and start editing!**

    Your site is now running at `http://localhost:8000`!

    _Note: You'll also see a second link: _`http://localhost:8000/___graphql`_. This is a tool you can use to experiment with querying your data. Learn more about using this tool in the [Gatsby tutorial](https://www.gatsbyjs.org/tutorial/part-five/#introducing-graphiql)._

    Open the `my-blog-starter` directory in your code editor of choice and edit `src/pages/index.js`. Save your changes and the browser will update in real time!

## 🧐 What's inside?

A quick look at the top-level files and directories you'll see in a Gatsby project.

    .
    ├── node_modules
    ├── src
    ├── .gitignore
    ├── .prettierrc
    ├── gatsby-browser.js
    ├── gatsby-config.js
    ├── gatsby-node.js
    ├── gatsby-ssr.js
    ├── LICENSE
    ├── package-lock.json
    ├── package.json
    └── README.md

1.  **`/node_modules`**: This directory contains all of the modules of code that your project depends on (npm packages) are automatically installed.

2.  **`/src`**: This directory will contain all of the code related to what you will see on the front-end of your site (what you see in the browser) such as your site header or a page template. `src` is a convention for “source code”.

3.  **`.gitignore`**: This file tells git which files it should not track / not maintain a version history for.

4.  **`.prettierrc`**: This is a configuration file for [Prettier](https://prettier.io/). Prettier is a tool to help keep the formatting of your code consistent.

5.  **`gatsby-browser.js`**: This file is where Gatsby expects to find any usage of the [Gatsby browser APIs](https://www.gatsbyjs.org/docs/browser-apis/) (if any). These allow customization/extension of default Gatsby settings affecting the browser.

6.  **`gatsby-config.js`**: This is the main configuration file for a Gatsby site. This is where you can specify information about your site (metadata) like the site title and description, which Gatsby plugins you’d like to include, etc. (Check out the [config docs](https://www.gatsbyjs.org/docs/gatsby-config/) for more detail).

7.  **`gatsby-node.js`**: This file is where Gatsby expects to find any usage of the [Gatsby Node APIs](https://www.gatsbyjs.org/docs/node-apis/) (if any). These allow customization/extension of default Gatsby settings affecting pieces of the site build process.

8.  **`gatsby-ssr.js`**: This file is where Gatsby expects to find any usage of the [Gatsby server-side rendering APIs](https://www.gatsbyjs.org/docs/ssr-apis/) (if any). These allow customization of default Gatsby settings affecting server-side rendering.

9.  **`LICENSE`**: Gatsby is licensed under the MIT license.

10. **`package-lock.json`** (See `package.json` below, first). This is an automatically generated file based on the exact versions of your npm dependencies that were installed for your project. **(You won’t change this file directly).**

11. **`package.json`**: A manifest file for Node.js projects, which includes things like metadata (the project’s name, author, etc). This manifest is how npm knows which packages to install for your project.

12. **`README.md`**: A text file containing useful reference information about your project.

## 🎓 Learning Gatsby

Looking for more guidance? Full documentation for Gatsby lives [on the website](https://www.gatsbyjs.org/). Here are some places to start:

- **For most developers, we recommend starting with our [in-depth tutorial for creating a site with Gatsby](https://www.gatsbyjs.org/tutorial/).** It starts with zero assumptions about your level of ability and walks through every step of the process.

- **To dive straight into code samples, head [to our documentation](https://www.gatsbyjs.org/docs/).** In particular, check out the _Guides_, _API Reference_, and _Advanced Tutorials_ sections in the sidebar.

## 💫 Deploy

[![Deploy to Netlify](https://www.netlify.com/img/deploy/button.svg)](https://app.netlify.com/start/deploy?repository=https://github.com/gatsbyjs/gatsby-starter-blog)

<!-- AUTO-GENERATED-CONTENT:END -->


はい、CドライブとDドライブの関係性に問題ありです。

2019-10-28 10:36:32 | プログラム 勉強

はい、問題ありです。

ねこは、主人からとっても高いゲームPCを買ってもらいました。

intel CORE i5 9th Gen, 100GB C drive,  1TB D drive.

ね、すんばらしいの!!!

これでGIMPも走り放題!って思ってたんですが、まずは、Node.js, Cドライブからインストールしてたみたいで、Dに変えてたつもりだったんだけどグローバルに(-g)にするとCの私のusersに入っちゃうみたい。で、gatsby.jsの環境を作るたんびにCドライブがパンパン!メモリーもうすでに半分になっちゃってます。

無料イメージ編集アップのGIMPもかってにCドライブに入っちゃってます。

…おぉ、vscodeもだ。。。

はじめてのゲームPC、使い方がわからん。

だれかこの宝の持ち腐れをなんとかしてくれ。

もちろん、細かいpath設定はできるだけさけたいっ!

はぁ。ぁぁ、走らせ専門のCドライブにこんなにはいってちゃぁ、いかんなぁ。

本日、やっといずれ来る日に備えて、System and Security > Bacdkup and Restore(Windows 7) のBack up or restore your filesのBack up nowをDドライブに作成しました。

こんなんで3時間も使っちまった。。。なにを学んだのやら。とほほ。

【参照サイト】

https://support.microsoft.com/ja-jp/help/17085/windows-8-restore-refresh-reset-pc

https://www.windowscentral.com/how-move-default-user-folders-new-drive-windows-10

https://stackoverflow.com/questions/18965126/install-node-js-on-a-different-hard-drive-from-c-to-d


とりあえず、このままNetlify.jsの勉強続けます。まずはCMSやってます。

https://www.netlifycms.org/docs/gatsby/


Netlify, Gatsbyのお勉強➡Large MediaとCMSで奮闘してました。CMS不可能、ただのGatsby可能

2019-10-25 15:25:21 | プログラム 勉強

Netlify を使ってGatsby で完全無料の(事実は100GBバンドワイズ以上はアクセス度によって請求されるけど、伸びしろは大きいのでほぼ無料)の使い方を考えてみる。

NetlifyはGithubなどで直接ウェブをデプロイしてくれて、とっても便利

ノート代わりに勉強したことをここに記入します。Netlifyの始め方はまた書きます。

1.Gatsbyとは何ぞや。

Gatsby is a free and open source framework based on React that helps developers build blazing fast websites and apps

知らんかった。Reactでつくったフレームワークのことやったんやな。VUE.jsはつかったことあったけど、完全に始める方向間違って、CMSのことやと思った。NetlifyさんのCMSリストにはCMSって書いてあったもん。

2.GatsbyのCMSもあります。

これはどうやら、ローカルで編集するんでなく、Netlifyさんのサイトのコンソール画面でできるようだ。でも試してないから次やるリストに追加(https://www.netlifycms.org/docs/gatsby/

3.NetlifyさんのLarge Mediaの使い方を勉強しました。もち、無料。こんな具合で教えてくれます。

CMSのイメージはどうしても変えられなかったけど、Gatsbyのまっさらから始めたTUTORIAL (STEP-BY-STEP)(こちらも次やるリストhttps://www.gatsbyjs.org/tutorial/)で構築したローカル環境ではオッケーでした。

そして、こちらから(https://docs.netlify.com/large-media/overview/#large-media-docs)気長に丁寧にNetlify Large Mediaへ接続環境を整えてやります。

必須環境

➞Git

➞GitHub など

➞Netlify CLI https://docs.netlify.com/cli/get-started/#installation

npm install netlify-cli -g
https://docs.netlify.com/site-deploys/create-deploys/#drag-and-drop

➞Git LFS 

https://git-lfs.github.com/

Netlify Large Media plugin

netlify plugins:install netlify-lm-plugin 
netlify lm:install

➞もちろん、Gatsby https://www.gatsbyjs.org/tutorial/part-zero/

node.js

npm installも忘れずに

npm install -g gatsby-cli

では、コマンド打ちます。

Netlify Login (きゅーにサイトに飛んで、権限を与えるかどうか聞かれます)

Netlify Link (すでにGitにレポジトリがあってそこでよいか、リンクの確認をしてくれます)

Netlify lm:setup

Netlify lm:info(接続を確認してね)

git lfs track "apple4.jpg" (.lfsconfigのなかに書かれます)

git lfs track (これで確認できます)

git add .

git commit -m "Added apple4.jpg to Large Media"

git lfs push origin master

Gitにはこんな感じでアップロードされているはずです。本体はNetlifyのLarge Mediaのなか。

Netlify logout (これをしないでウェブコンソールからデプロイすると、接続が切れてつながらないからPCリブートすか、なんとか接続を切らなければならない) 


4.別にGitに小っちゃいイメージファイルいれるし、Large Mediaいらねくね?

の場合は、

①CMSをダウンロード(別にフレームワークインストールして最初から作ってもよし)

②Gitにpush③NPMをリポジトリ内にインストール

④ついでにGatsbyもインストール(だいたいいらん)

⑤gatsby develop

これで、LIVE Serverも使わずに、ふつーにlocalhost:8000でブラウズできます。


次やるリスト

1.gatsbyをCMSでウェブコンソールからいじってみたい

https://www.netlifycms.org/docs/gatsby/

2.フレームワークとしてのgatsbyをいじってみたい。Vue.jsとよくにてる。あたりまえか。。。

https://www.gatsbyjs.org/tutorial/