https://www.netlifycms.org/docs/gatsby/
1.CMSをNPMで作成します。
npm install -g gatsby-cli gatsby new blog https://github.com/gatsbyjs/gatsby-starter-blog cd blogはい、ちゃんとはいりましたが、サイトに「Open one .md file」とあるのが、ふつーのREADME.mdしかありません。で、それって、サイトと内容があきらかに違ってます。ーーーREADME.mdには「1. **Start developing.**」とここにあるので、とりあえず、ローカルでブラウズしてみます。
gatsby develophttp://localhost:8000で開けてね。ちょっと時間かかるよ。

これ以上README.mdではgatsbyの構成とその他、リンクなんかしかないようなので、このままサイトのほうをします。
その前に『ctl+C』でdevelopを切って。
2.サイトでは、NetlifyにこのCMSを登録するようです。
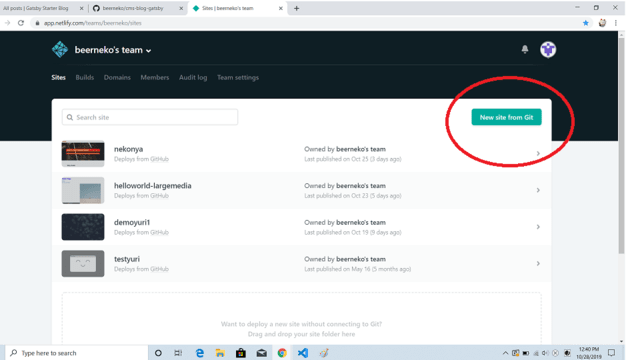
npm install --save netlify-cms-app gatsby-plugin-netlify-cmsこれで、「config.yml」ができるそうなんですが、どうでしょう3…違う、自分で作れってさ。そしてコピペしろってさ。├── static │├── admin
│ │ ├── config.ymlで、コピペは以下の通り。backend:
name: git-gateway
branch: master
media_folder: static/img
public_folder: /img
collections:
- name: "blog"
label: "Blog"
folder: "content/blog"
create: true
slug: "{{year}}-{{month}}-{{day}}-{{slug}}"
editor:
preview: false
fields:
- { label: "Title", name: "title", widget: "string" }
- { label: "Publish Date", name: "date", widget: "datetime" }
- { label: "Description", name: "description", widget: "string" }
- { label: "Body", name: "body", widget: "markdown" }
4.gatsby-config.jsを開いて、以下を足します。ヒエラルキー間違えないようにね。
plugins: [`gatsby-plugin-netlify-cms`]
5.Gitのリポジトリ名何にしようかな。今のところ、以下のGit Addが必要。
gatsby-config.js
package-lock.jason
poackage.json
config.yml
最初にGithubでリポジトリつくって、そこにRemoteを追加してやります。
git add . git commit -m "Initial Commit" git remote add origin https://github.com/YOUR_USERNAME/NEW_REPO_NAME.git git push -u origin master6.さぁて、NetlifyにこのGithubリポジトリを追加しますか。
もう、練習だからマスターからでオッケーとします。

ついでに、名前も「https://beerneko-cms-blog-gatsby.netlify.com/」みたいに、わかりやすくしておきましょう。
Site Setting > General > Site Detail > Site Information 『Change Site name』で好きな名前にして、保存。
次にデプロイをして確認します。時間書かかるよ。
こんな感じでちゃんとドメイン名もカッコよくなります。➞『https://beerneko-cms-blog-gatsby.netlify.com/』
7.認証や、Git Gatawayの設定をします。ウェブサイトNetlifyのsetting画面からです。…なんかめんどくさいので、サイトを読みましょう。https://www.netlifycms.org/docs/gatsby/#enable-identity-and-git-gateway8.もうちょっと!!!では、最初のブログを公開しましょう。
サイトのログインがわからないよ。。。
おお、https://beerneko-cms-blog-gatsby.netlify.com/admin/ ってURLに入れなきゃね。リンクはないのかい、リンクはっ!!!
どこだ。。。あかねぇ。。。なんでだ。。。
ちょっとgatsby-config.jsのplug-inの場所を一番最後に変えてみよう。またコミットしてGithubをつかってNetlifyサイトからデプロイしなおして。。
。。。あらへん。。。どこだ。。。
どうやったら、『/admin/』へいけるのっ!!!
https://github.com/netlify-templates/gatsby-starter-netlify-cms/issues/32 には修正したってかいてあるけど。。。
もう一回
https://beerneko-cms-blog-gatsby.netlify.com/admin/ うってみる。
おぉ、あいたっ!どうやら時間差があるんだねぇ。。。もしくは、やっぱりplug-inの場所が間違ってたかだな。


メール認証が来るにゃ。このパスワードセキュリティーレベル何とかならんのかいな。
でもきちんとGoogle認証できてる。素晴らしい!Oauthいれずにすむから、かんちこちんです。死語!!!


終わりました。
はぁ~おつかれさん。
びーるねこ
ーーー以下はREADME.mdの内容です。--
1. **Create a Gatsby site.**
Use the Gatsby CLI to create a new site, specifying the blog starter.(1.CMSをNPMで作成します。)
```shell
# create a new Gatsby site using the blog starter
gatsby new my-blog-starter https://github.com/gatsbyjs/gatsby-starter-blog
```
1. **Start developing.**
Navigate into your new site’s directory and start it up.
```shell
cd my-blog-starter/(こんなのねーぞ!で、かわりにただの「blog」はありました。サイトにはそれを見ろと書いてます。)
gatsby develop (サイトにはかいてませんが、これでローカルの8000がブラウズできます。やってみましょう)
```
1. **Open the source code and start editing!**
Your site is now running at `http://localhost:8000`!
_Note: You'll also see a second link: _`http://localhost:8000/___graphql`_. This is a tool you can use to experiment with querying your data. Learn more about using this tool in the [Gatsby tutorial](https://www.gatsbyjs.org/tutorial/part-five/#introducing-graphiql)._
Open the `my-blog-starter` directory in your code editor of choice and edit `src/pages/index.js`. Save your changes and the browser will update in real time!
## 🧐 What's inside?
A quick look at the top-level files and directories you'll see in a Gatsby project.
.
├── node_modules
├── src
├── .gitignore
├── .prettierrc
├── gatsby-browser.js
├── gatsby-config.js
├── gatsby-node.js
├── gatsby-ssr.js
├── LICENSE
├── package-lock.json
├── package.json
└── README.md
1. **`/node_modules`**: This directory contains all of the modules of code that your project depends on (npm packages) are automatically installed.
2. **`/src`**: This directory will contain all of the code related to what you will see on the front-end of your site (what you see in the browser) such as your site header or a page template. `src` is a convention for “source code”.
3. **`.gitignore`**: This file tells git which files it should not track / not maintain a version history for.
4. **`.prettierrc`**: This is a configuration file for [Prettier](https://prettier.io/). Prettier is a tool to help keep the formatting of your code consistent.
5. **`gatsby-browser.js`**: This file is where Gatsby expects to find any usage of the [Gatsby browser APIs](https://www.gatsbyjs.org/docs/browser-apis/) (if any). These allow customization/extension of default Gatsby settings affecting the browser.
6. **`gatsby-config.js`**: This is the main configuration file for a Gatsby site. This is where you can specify information about your site (metadata) like the site title and description, which Gatsby plugins you’d like to include, etc. (Check out the [config docs](https://www.gatsbyjs.org/docs/gatsby-config/) for more detail).
7. **`gatsby-node.js`**: This file is where Gatsby expects to find any usage of the [Gatsby Node APIs](https://www.gatsbyjs.org/docs/node-apis/) (if any). These allow customization/extension of default Gatsby settings affecting pieces of the site build process.
8. **`gatsby-ssr.js`**: This file is where Gatsby expects to find any usage of the [Gatsby server-side rendering APIs](https://www.gatsbyjs.org/docs/ssr-apis/) (if any). These allow customization of default Gatsby settings affecting server-side rendering.
9. **`LICENSE`**: Gatsby is licensed under the MIT license.
10. **`package-lock.json`** (See `package.json` below, first). This is an automatically generated file based on the exact versions of your npm dependencies that were installed for your project. **(You won’t change this file directly).**
11. **`package.json`**: A manifest file for Node.js projects, which includes things like metadata (the project’s name, author, etc). This manifest is how npm knows which packages to install for your project.
12. **`README.md`**: A text file containing useful reference information about your project.
## 🎓 Learning Gatsby
Looking for more guidance? Full documentation for Gatsby lives [on the website](https://www.gatsbyjs.org/). Here are some places to start:
- **For most developers, we recommend starting with our [in-depth tutorial for creating a site with Gatsby](https://www.gatsbyjs.org/tutorial/).** It starts with zero assumptions about your level of ability and walks through every step of the process.
- **To dive straight into code samples, head [to our documentation](https://www.gatsbyjs.org/docs/).** In particular, check out the _Guides_, _API Reference_, and _Advanced Tutorials_ sections in the sidebar.
## 💫 Deploy
[](https://app.netlify.com/start/deploy?repository=https://github.com/gatsbyjs/gatsby-starter-blog)
<!-- AUTO-GENERATED-CONTENT:END -->




※コメント投稿者のブログIDはブログ作成者のみに通知されます