Cell Phone spare parts online - ETrade Supply

https://www.etradesupply.com/

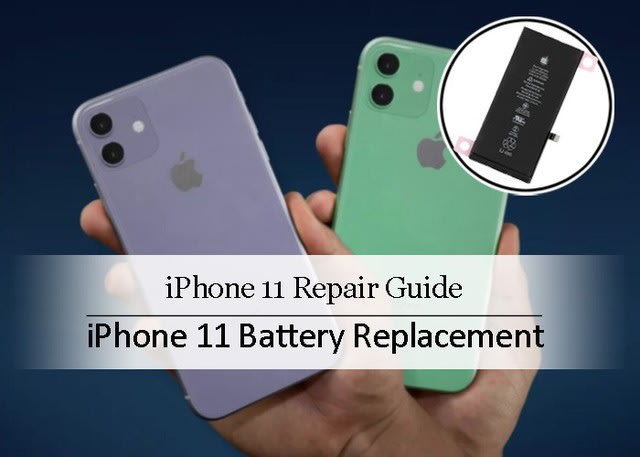
How to Replace iPhone 11 battery

2019-10-30 15:40:40 | iPhone

Tools required:

Screwdrivers: pentalobe, Y-type

Suction cup

Hard plastic plectrum

Ultra-thin sheet

Spudger

Tweezers

Steel pry tool

Hot air gun


Step 1: Teardown iPhone 11 display screen

1.1   Power off the phone, loosen the two pentalobe screws on the bottom

1.2   Use hot air gun blowing the edge of the display screen to soften the frame adhesive glue for easy teardown, use the suction cup and hard plastic plectrum to separate the display screen, use an ultra-thin sheet to slice around for easy separation

 1.4 Gently pry up the screen after it is separate from the frame, use a stable object to hold the display. Just be careful don’t break the flexes

 1.5 Loosen the five Y-type screws on the metal bracket which is for fixing the screen flex cables, then remove the bracket with tweezers

 1.6 Disconnect the screen flex cables with spudger, then the display screen can be totally removed from the back frame


Step 2: Replace the iPhone 11 battery

 2.1 Loosen the three Y-type screws on the small metal plate which is for fixing the battery flex cable, remove the metal plate with tweezers, and then disconnect the battery flex cable

 2.2 Carefully pull out the battery sticker with tweezers, just be careful because the stickers are easily broken

 2.3 Get the new battery ready, attach the new battery sticker on it

 2.4 Take out the original battery and replace it with the new battery, connect the battery flex cable

 2.5 Connect the display screen flex cables, turn on the phone and test the new battery’s condition, plug the USB charger to see if it is well for charging, then turn off the phone and disconnect the flex cables  


Step 3: Reinstall the display screen to iPhone 11

 3.1 Place back the metal plate and fasten the three Y-type screws for fixing the plate

 3.2 Clean up the black adhesive glue on the frame, and attach the new frame adhesive on it

 3.3 Connect the display screen flex cables back, and cover the metal bracket back, fasten the five Y-type screws for fixing the flex cables

 3.4 Install the display screen back, gently press around the edge and the four corners, make sure the gaps are tightly sealed

 3.5 Screw back the two pentalobe screws on the bottom, all process done


Parts for iPhone 11 battery replacement related:

For iPhone 11 battery replacement

For iPhone battery sticker replacement

For iPhone 11 Frame adhesive replacement

For iPhone 11 LCD screen and digitizer assembly replacement

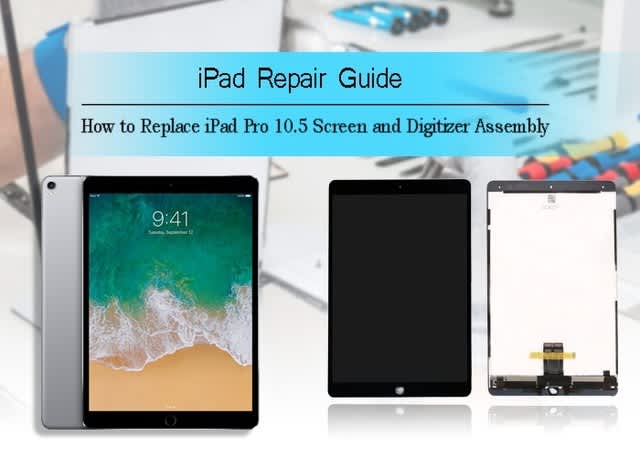
How to Replace iPad Pro 10.5” Touch Screen and Digitizer Assembly

2019-10-25 09:22:18 | iPad

Tools required:

Phillips screwdriver

Hard plastic triangle plectrum

Spudger

Tweezers

Steel pry tool

Hot air gun


Step 1: Tear down and separate the iPad Pro 10.5 touch screen and digitizer assembly

 1.1 Turn off the iPad, hot air gun blowing on the screen edge to soften the frame adhesive glue, then use a thin steel pry tool to make a gap between the screen and the frame

 1.2 Use hard plastic triangle plectrum to slice around the gap slowly, you may need three or more plectrums here

 1.3 When the display screen is separated, slowly pry up it from the frame on the top side

 1.4 Hold the screen with a hand, loosen the two screws on the metal bracket, and then remove the metal bracket which covered on the flex cables with tweezers

 1.5 Disconnect the four flex cables when the bracket is away, and then you may take down the display screen assembly


Step 2: Replace iPad Pro 10.5 LCD touch screen and digitizer assembly

 2.1 Take down the home button from the old display screen

2.11 Tear up the small piece of black tape on the home button with tweezers

2.12 Release the connector by slicing out the flex cable with spudger

2.13 Disconnect the two adhesive gobs with spudger which is for holding the home button and touch ID, pry it up from the front panel. Be careful and don’t damage the flex  

2.14 Remove the home button and the touch ID assembly from the screen with spudger   

 2.2 Install the home button and Touch ID assembly on the new screen, connect the bracket back to fix the home button

 2.3 Connect back the home button flex cable with tweezers and paste the small piece of black adhesive back


Step 3: Reinstall the iPad Pro 10.5 screen and reassemble the device

 3.1 Attach a new black adhesive frame sticker around the new iPad screen and digitizer assembly

 3.2 Connect the four screen flex cables back

 3.3 Cover the metal bracket back for fixing the flex cables and screw back the two Phillips screws

 3.4 Gently and slowly attach the display screen on the frame, slightly press each corner and the edge, and make sure there are no gaps

 3.5 Turn on the device and check the new-replaced screen about the touch sensitiveness and App response. All process is done!


Note: the whole process will be a little complicated for someone who not familiar with mobile device repair. We suggest you go to the Apple authorized service center or the repair shop if you are not confident about yourself. Just be patient and careful if you are taking the process on it.


You may also be looking for:


For iPad Pro 10.5 LCD screen and digitizer assembly replacement

For iPad Pro 10.5 home button and Touch ID assembly replacement

iPad 10.5 Pro glass screen protector

iPad repair tool kit


9 Features You Should Know About iPadOS

2019-10-23 16:44:24 | iPad

The iPadOS launched in October this year. This new operating system is special developed for iPad. Just as the same features of iOS 13 to iPhone, the iPadOS provides us nine useful features to us, which might not be known for everybody. Let’s see what these features are.


1. Quick screenshots: Use iPad pencil to scrap from the left corner to center on the screen, you could make a quick screenshot.

2. Floating keyboard: Pinch in or long-press on the keyboard dismiss button to select the floating option, you can activate the floating keyboard. You can drag the floating keyboard anywhere around the iPad screen. Quick-path typing is also working on floating keyboard.

3. Overhauled home screen: Swipe over to the right and on the widget, select "Add to Home Screen." You can fit more icons on the ‌iPad‌'s Home screen, and the Today view widget can now be permanently positioned on the Home screen when the ‌iPad‌ is in landscape mode. You can also get to the option from the Edit interface of the widget, and if you pin favorites, those widgets will always display first.

4. New gesture: You can swipe up and down to view the website page as fast as you want, and move the cursor anywhere in the text paragraph freely. Double-tap is for sentence selecting, triple taps for paragraph selecting. Pinch-in is for copy and pinch-out is for paste. Three fingers swipe for undo or redo.

5. Slide over for improvement: You can drag apps into Slide Over on the left or the right side of the screen, and you can open multiple Slide Over apps. Swap between them with a swipe, and swipe up and hold to get to an interface where you can see all of your open Slide Over apps and close the ones you don't need.

6. Multiple windows: You can use two windows reparative on the screen to work or transferring documents.

7. Multitasking notifications: When the new message-in window pup-up on the screen, you can drag it to the right to open it as a reparative window side by side

8. App expose: Long press on the App and select Show All Windows, you will see all the open windows.

9. Mouse support: The iPadOS have Bluetooth mouse connection support. Go to Settings >> Accessibility >> Touch >> Turn on “Assistive Touch”


These are the 9 features about iPadOS. You will find it a handful if you have installed this new system on your iPad. Furthermore, we suggest you learn something about iPad maintenance if you are using an iPad now. You may also check some iPad parts in our store, such as for iPad 10.2 LCD screen and digitizer assembly with flex cable replacement here. Any questions about iPad parts, please feel free to contact us.


How to Replace the iPhone XR SIM Card Reader

2019-10-17 15:07:50 | iPhone

The iPhone XR SIM card reader in a small part inside the phone. There are problems on this part rarely on our daily use, but if your iPhone XR is water damaged, it will cause insensitive for SIM card reading to your phone. Here we would like to show you how to replace the iPhone XR SIM card in procedures. Remember, the whole process is not complicated if you are familiar with the iPhone XR internal structure. All you need is to get all the tools ready and your patience and carefulness as well. Without further ado, let’s get started.


1. Teardown the iPhone XR and separate the display screen

 1.1 Turn off the iPhone, loosen the two pentalobe screws on the bottom

 1.2 Use hot air gun or hairdryer blowing the edge to soften the glue adhesive for easy separation, then use a suction cup and a hard plectrum to separate the display screen

 1.3 Disconnect the battery flex cable and loosen the three Y-type screws on the cover plate, and then remove the metal plate with tweezers

 1.4 Loosen the two Y-type screws on the screen flex cables cover plate and remove the plate

 1.5 Disconnect the display flex cables with a spudger

 1.6 Loosen the three Y-type screws and two Phillips screws on another screen flex cable cover plate and then take out the metal plate with tweezers

 1.7 Disconnect the flex cable, and now the display screen is entirely separated


2. Take out the old SIM card reader and replace with the new one

 2.1 Take out the SIM card tray with the eject our tool, disconnect the SIM card reader flex cables with a spudger

 2.2 Loosen the two Phillips screws and a standoff screw on the sensor so that the old SIM card reader could be removed

 2.3 Place the new SIM card reader and screw back the screws, connect the flex cables

 2.4 Insert the SIM card tray back, clean the glue adhesive around the edge and use a new frame adhesive on it  


3.  Reinstall the display screen and reassemble the iPhone XR

 3.1 Connect the display screen flex cable back, place the metal bracket and screw back

 3.2 Connect other flex cables back, and recover the small plate and screw it back

 3.3 Connect the battery flex cable and recover the metal bracket and screw it back

 3.4 Turn on the iPhone and test the new SIM card reader

 3.5 Install the display screen and seal up the phone, screw back the two pentalobe screws on the bottom, all process done


Your iPhone XR will not be 100% waterproof after it is torn down. We suggest you go to the Apple authorized service center if you are not confident about yourself. Besides, there are so many small parts and types of screws contained, you’d better make catalogs on them and do not mess up. You may also go to our online store to look for the new iPhone XR replacement parts you need. Any questions about the process above, please leave your comments so that we could help.

replace iPhone XR SIM card reader

You may also be looking for:

For iPhone repair tools kit  

For iPhone XR SIM card reader replacement  

For iPhone XR SIM card tray replacement

For iPhone XR frame adhesive replacement


How to Replace the iPhone X Rear Camera Lens Glass

2019-10-16 16:19:46 | iPhone

The iPhone X’s rear camera lens glass is fragile, which needs extra good protection while you are using it. When the rear camera lens glass is broken unavoidably, we suggest you have it replaced. Smashing the broken glass and replacing the new one directly without tearing the phone would break the rear cameras or leave the fragments on the cameras which will affect the camera's normal working. Here we would like to show you how to replace the iPhone X rear camera lens glass in the right way.

 1. Tear down the iPhone and separate the display screen

 1.1 Power off the phone and take out the SIM card tray with an eject tool

1.2 Loosen the two pentalobe screws on the bottom, use a suction cup and triangle case opening tool to separate the screen after hot air gun blowing

 1.3 Loosen the seven tri-wing screws and remove the metal bracket on the flex cables

 1.4 Disconnect the flex cables in order, the battery flex cable first, then the screen flex cables and the earpiece flex cable

 1.5 Remove the display screen, loosen the two Phillips screws

 2. Take out the rear camera and replace the rear camera lens glass

 2.1 Pry out the small metal bracket with a steel spatula and take it out with tweezers, disconnect the rear cameras flex cables

 2.2 Pry up the rear cameras slowly with a spudger and take it out

 2.3 Destroy the broken lens glass and replace with the new one on it

 3. Connect the display and test the camera, reassemble the phone

 3.1 Install the rear cameras back and connect the flex cables

 3.2 Place the small metal bracket back and screw the two Phillips screws

3.3 Connect the flex cables back, from the earpiece flex cable, the screen flex cables and the battery cables at last

3.4 Turn on the phone and test the camera, open the camera and take video to check the clarity

Of the video

3.5   Disconnect and remove the screen again, clear out the black adhesive on the frame edge and past a new frame adhesive on it

3.6   Connect the screen again and seal up the phone, make sure each corner are tightly sealed with no gaps


The rear camera lens glass of the iPhone X’s is easy to break, which needs extra good protection. Using an iPhone X protective case is good way for lens glass protection. Anyway, the whole process above is not so complicated and you can do it yourself at home, but we suggest you go to the repair shop or Apple-authorized service center if you are not confident about yourself. Here we provide new iPhone X rear-facing camera lens for replacement in our store, just feel free to contact us via email of service@etradesupply.com if you have interests.