くっしーの徒然日記

無線、天文、修理、剣道、体調他について書いてます。修理や改造記事のマネに関してはあくまでも自己責任にてお願いします。

鷹狩山 JA/NN-171 SOTA運用

2024-05-25 | アマチュア無線
4月21日の日曜日、安曇野まで行く用事が有ったので帰りに、大町市のJA/NN-171鷹狩山1,167mによってSOTA運用を行ってきた。
On Sunday 21 April, I had to go to Azumino and on the way back I did a SOTA activation at 1,167 m on Mt Takakari, JA/NN-171 in Omachi City.


↓今日は天気が悪く、北アルプスは霞んでいる。

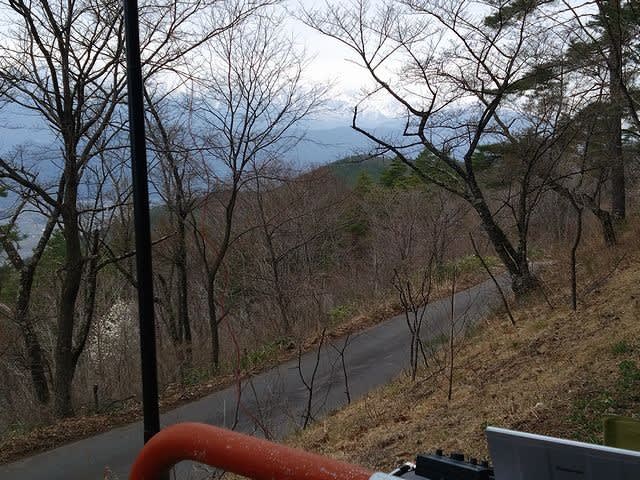
↑The weather is bad today and the Northern Alps are hazy.

ベンチの有る展望場所では途中から学生が来てバーベキューを楽しんでいた。
At the observation point with benches, students were enjoying barbecue on the way.

↓駐車場の脇にお店を展開

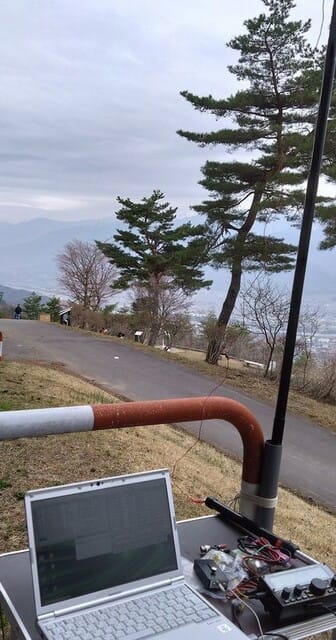
↑Shack set up by the parking lot.

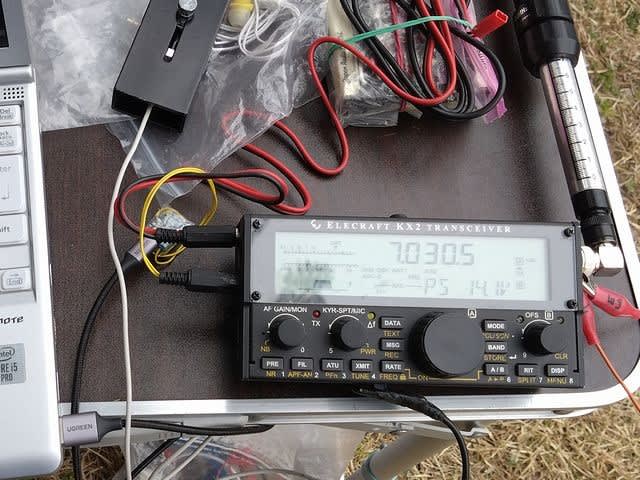
21、28、14、7MHzで短時間の運用。
Short operations on 21, 28, 14 and 7 MHz.

今日はハイバンドはあまり開けていない。
Not much open on the high band today.

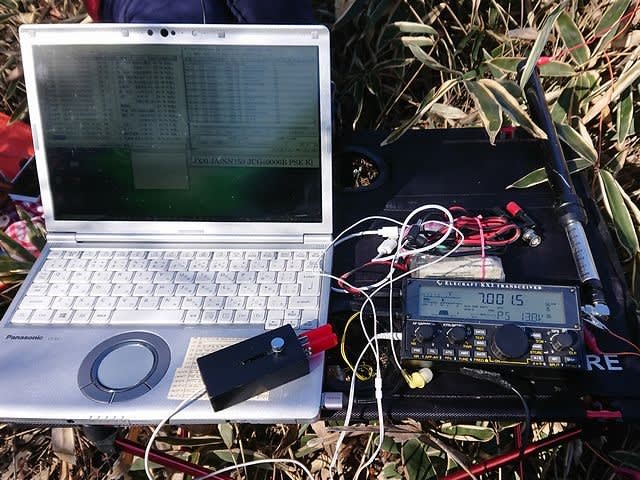
↓7MHzではまずまず国内が開けていた。

↑On 7MHz, the country was open for the first time.

今日は開始時間が遅い事も有り、残念ながらDXは無しだった。
Unfortunately there was no DX today due to the late start time.

別件の用事のついでなので、まあこんなものか。
It was just a side trip for another work, so I guess that's about the extent of it.

本日の結果 Today's result

21MHz/CW 3-QSO
28MHz/CW 2-QSO
14MHz/CW 1-QSO
7MHz/CW 15-QSO S2S=1(JA) include

合計 Total 21-QSO

本日もお相手頂いたor追いかけて頂いた各局様有難うございました。
TNX for all stations who QSO with me or searching for me!

2024.4.21 (5/25 UP)

LG 32型TV 修理 32LB5810 リモコン修理編

2024-05-22 | その他修理
バックライト交換で、光点が見えなくなったLGの32インチTVだが、ここ2年近く使ってなかったので、リモコンが動作しなくなっていた。と言う事で、リモコンをばらして整備してみた。
After replacing the backlight, the light spot was no longer visible on my LG 32” TV, but since I had not used it for almost two years, the remote controller had stopped working. So, I took the remote controller apart for maintenance.

↓32インチLGTVのリモコンAKB73756566

↑Remote controller for 32” LG TV AKB73756566

↓ボディの隙間にヘラを突っ込んで、開く。

↑Stick a spatula into the gap in the body and open it.

↓こんな感じで、全周嵌め合いで止まっている。

↑It is stopped by a full circumference fit like this.

↓ばらした所。

↑The place where it is disassembled.

↓スイッチのゴムラバーの裏側には何やらネバっとした物が付いている。

↑There is something sticky on the back side of the rubber rubber of the switch.

飲み物でもこぼしたっけ?と思ったが、表側は液漏れの跡が無いので、何だろう?
Did I spill a drink on it? I thought, but there is no sign of leakage on the front side, so what is it?

そういえば以前37インチのテレビを分解した時にスイッチ部に同じ様なのが出てたな。
I once disassembled a 37” TV and found something similar in the switch section.

↓とりあえずアルコールできれいにふき取る。

↑Anyway, I wiped it off with alcohol.

↓ゴムラバー側と基板側もきれいに拭いた所。

↑The rubber carbon side and the board side were also wiped clean.

↓元通り組付けて、カメラで動作確認。無事に点灯するようになった。

↑I assembled it back together and checked the operation with a camera. The light came on safely.

これでリモコンも復活。後は拡散版の接着剤汚れ除去のみかな?
Now the remote controller is back. I guess the only thing left to do now is to remove the adhesive stains on the diffuser plate.

2024.04.04  (5/22 UP)

① LG 32型TV 修理 32LB5810 バックライトレンズ取付失敗編
② LG 32型TV 修理 32LB5810 失敗原因確認編
③ LG 32型TV 修理 32LB5810 バックライト交換編
④ LG 32型TV 修理 32LB5810 リモコン修理編
⑤ LG 32型TV 修理 32LB5810 散光板修正編
⑥LG 32型TV 2台目修理 32LB57YM

① LG 32inch TV repair 32LB5810 Backlight lens installation failure
② LG 32inch TV repair 32LB5810 Confirm of cause of failure
③ LG 32inch TV repair 32LB5810 Backlight replacement
④ LG 32inch TV repair 32LB5810 Remote control repair
⑤ LG 32inch TV repair 32LB5810 Diffuser plate repair
⑥LG 32inch TV repair 32LB57YM

八風山 JA/NN-153 SOTA運用

2024-05-20 | アマチュア無線
少し前の話だが、2月3日土曜日に、軽井沢町の八風山に行って、SOTA運用を行った。朝一、整形外科に通院してから出発と遅いタイスケ。今年は雪が少なくて、2月でも登山口まで楽に行けた。
Some time ago, on Saturday the 3rd of February, I went to Happuyama in the town of Karuizawa for a SOTA activation.We had a late schedule, leaving in the morning after a visit to the orthopedist.There was little snow this year, so even in February, it was easy to get to the trailhead.

↓いつもの西登山口から登り始める。

↑We started climbing from the usual west trailhead.

↓北面にある登山道には少し雪が残っている。

↑There is still a little snow on the north face of the trail.

↓登り始めの急な斜面を登り切った所。この先は比較的なだらか。

↑The steep slope at the beginning of the ascent. The trail is relatively gentle after this point.

↓尾根筋にも少し雪が有った。

↑There was also a little snow on the ridge line.

↓11時半頃に山頂到着。

↑Arrived at the summit around 11:30 a.m.

↓山頂の木の間から浅間山が見える。

↑Mt. Asama can be seen through the trees at the summit.

↓早速、無線の準備をしてオンエア。

↑We quickly set up the radio and went on the air.

長時間運用は、後で腰が痛くなる為、21MHz、28MHz、7MHzで短く運用。
I used only 21MHz, 28MHz, and 7MHz because my back would be sore after long hours of operation.

↓今回は釣り竿を忘れなかったので、7m長のアンテナを立てる。

↑This time, I did not forget my fishing rod, so I set up a 7-meter-long antenna.

1時間ほどで運用を終えると、お昼にカップヌードルで腹ごしらえ。
After about an hour of operation, we had a cupnoodles for lunch.

↓山頂滞在時間3時間弱で下山。(以前は5~6時間滞在だった)

↑We descended after less than 3 hours on the summit. (I usually spend 5 to 6 hours on the summit.)

今回は特に忘れ物なく無事下山できた。
This time, we descended without forgetting anything.

本日の結果 Today's result

21MHz/CW 6-QSO ZL=1 4E=1 S2S=1(JA) include
28MHz/CW 4-QSO S2S=1(JA) include
7MHz/CW 16-QSO S2S=2(JA) include

合計 Total 26-QSO

本日もお相手頂いたor追いかけて頂いた各局様有難うございました。
TNX for all stations who QSO with me or searching for me!

2024.2.03 (5/25 UP)

LG 32型TV 修理 32LB5810 バックライト交換編

2024-05-15 | その他修理
前回のバックライト確認で、白濁したバックライトレンズを交換するべく手配していたバックライトストリップが届いた。早速、バックライトの交換をして行こう。
The backlight strip that we had arranged to replace the cloudy backlight lens at the last backlight check has arrived. Let's replace the backlight.

↓届いたバックライトストリップ。

↑Backlight strip received.

AとBが有るが、どちらも同じもので穴はA/B両対応で空いてる。
There are two types, A and B, but both are the same and have holes for both A and B.

早速バックライト迄ばらす。ばらし方は、下にある過去のブログリンク参照。
We will immediately disassemble it to the backlight. For how to disassemble the backlight, please refer to the past blog links below.

↓バックライトが外せるところまで分解。

↑Disassemble to the point where the backlight can be removed.

↓コネクタは矢印の方向から摘まんで、上側(写真手前側)に持ち上げて外す。

↑Remove the connector by picking it up from the direction of the arrow and lifting it upward (toward the front in the photo).

実は、他の人の動画等を見ても、コネクタの外し方が判らず、摘まんで、リード線側(写真左側)へ引っ張ったが外れず。
Actually, I couldn't figure out how to remove the connector even after watching other people's videos, etc. I picked it up and pulled it toward the lead wire side (left side in the photo), but it didn't come off.

結局、ストリップを剥がしてから、コネクタの下側の隙間にカッターの刃を入れて持ち上げて外す事が出来た。
After peeling off the strips, I was able to remove the connector by inserting the cutter blade into the gap on the underside of the connector and lifting it up.

↓ストリップをヘラで外す。

↑Remove the strips with a spatula.

↓裏から見たコネクタの構造。摘まむと下の爪がロックから外れる構造だった。

↑Structure of the connector seen from the back. The bottom pawl is released from the lock when it is picked up.

↓LEDバックライトストリップを交換した所。

↑The LED backlight strip has been replaced.

ここで一旦点灯試験をしてみるが、なんと点灯しない!初期不良か?!
I tried a lighting test once here, but to my surprise, it does not light up! Is it an early failure?

古いストリップで点くかと1番下のストリップのコネクタを差替えると無事に点灯。
I replaced the connector on the bottom strip to see if the old strip would light up, and it did.

↓新しいのに戻して、色々と触ってみると、コネクタ部分に触ると点灯した。

↑I put it back in the new one and touched it in various ways, and it lit up when I touched the connector part.

↓コネクタ部分を良く見ると新旧で、中のピンの長さが違う。(上が旧、下が新)

↑When I looked closely at the connector part, I found that the length of the pins inside the old one and the new one are different (the top is the old one, the bottom is the new one).

どうやら外す時にリード方向に引っ張ったりしたので少しコンタクトもずれていた様で、リードをコネクタ側に押し込んでやると、問題なさそうだ。
It seems that the contacts were also slightly misaligned because of pulling in the direction of the leads when removing the connector, and after pushing the leads toward the connector, it looks fine.

↓散光板は接着剤の汚れが付いたままだが、取り敢えず組み上げる事にする。

↑The diffuser plate is still covered with glue stains, but I decided to assemble it anyway.

↓一通り組み上げて動作試験。無事に光の点は無くなった。

↑I assembled it and tested the operation. No more light spots.

ただ、散光板の接着剤の汚れによるムラは、テレビを見てる分にはあまり気に成らないが、ここにあると認識した後だと、その箇所がやっぱり気に成る感じだ。
However, the unevenness caused by the stain of the glue on the diffuser plate does not bother me so much when I am watching TV, but after I recognized that it was here, I was still bothered by the spot.

何とか散光板の接着剤汚れも対処しなければ、、、、
I have to deal with the glue stains on the diffuser somehow. 、、、、

2024.04.11 (5/15 UP)

① LG 32型TV 修理 ① LG 32型TV 修理 32LB5810 バックライトレンズ取付失敗編
② LG 32型TV 修理 32LB5810 失敗原因確認編
③ LG 32型TV 修理 32LB5810 バックライト交換編
④ LG 32型TV 修理 32LB5810 リモコン修理編
⑤ LG 32型TV 修理 32LB5810 散光板修正編
⑥LG 32型TV 2台目修理 32LB57YM

① LG 32inch TV repair 32LB5810 Backlight lens installation failure
② LG 32inch TV repair 32LB5810 Confirm of cause of failure
③ LG 32inch TV repair 32LB5810 Backlight replacement
④ LG 32inch TV repair 32LB5810 Remote control repair
⑤ LG 32inch TV repair 32LB5810 Diffuser plate repair
⑥LG 32inch TV repair 32LB57YM

リモコン ゲット SONY KJ-32W500C

2024-05-10 | その他修理
前回110円で手に入れたジャンク詐欺のテレビであるが、リモコンがないと、詳細な設定が出来ないので、リモコンを探しに行く。
普通に考えて、行き当たりばったりのハードオフで今回のテレビに合う物が直ぐに見つかるとは考え難かった。案の定、近所のハードオフ2軒とも該当品無し。
と言う事で、このテレビを買ったハードオフに行ってみる。予想通り、買取時に一緒に買い取ったと思われる、今回のテレビ用のリモコンが、リモコンジャンク箱の中に転がっていた。

I went looking for a remote controller for the junk TV I got for 110 yen last time, because without one, I could not set up the TV in detail.
It was hard to imagine that we could find a suitable remote controller for this TV at a random Hard-Off store. Sure enough, two nearby Hard-Off stores had nothing.
So, I went to Hard-Off where I bought this TV. As expected, I found a remote controller for this TV lying in a junk box.

↓KJ-32W500C用リモコンRMT-TX103Jの互換品のSN-TX103J

↑SN-TX103J, a compatible remote controller for KJ-32W500C RMT-TX103J

↓こちらは330円。本体より高い!

↑This one is 330 yen. It is more expensive than the main unit!

↓少し爪が折れているのか、先端が少し開き気味。

↑The latch is a little broken, or the tip is a little open.

↓取り敢えずバラしてアルコールで接点洗浄。

↑I took it apart and cleaned the contacts with alcohol.

↓元通り組付けて動作試験。特に問題なし。

↑I put it back together and tested the operation. No problem.

これで、無事に詳細な設定もできる様になった。
Now, detailed settings are available without any problems.

2024.04.10 (5/10UP)

ジャンク詐欺?110円テレビ SONY KJ-32W500C
リモコン ゲット SONY KJ-32W500C
なんと冠水ジャンク! SONY KJ-32W500C リモコン受光部修理

Junk fraud? 110yen TV SONY KJ-32W500C
Get remote controller for SONY KJ-32W500C
What a water damaged junk! SONY KJ-32W500C Remote control receiver repair