All that remains is to remove the adhesive from the light diffuser. I found a 32LB57YM junk TV, almost the same model, for 0 yen on the Jimoty bulletin board.I thought I could use the light diffuser, so I got it.
↓我が家のとはフレームの色が異なる。

↑The frame is a different color than ours.
↓電源を入れると一部表示が見えるのでバックライト切れの様だ。

↑When turned on, some letters were visible, so seems the backlight is NG.
↓取り敢えずお目当ての散光板の所迄ばらす。

↑I took it apart down to the light diffuser.
↓取り出した散光板。

↑The light diffuser I removed.
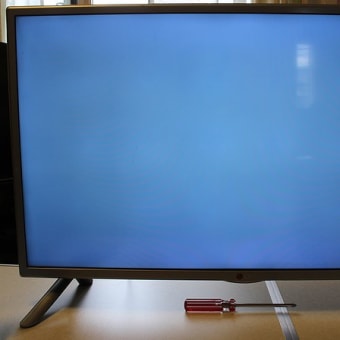
↓接着剤の付いた散光板と入れ替えて表示試験。

↑I replaced the light diffuser and tested the display.
写真では濃淡が現れているが、実際にはフラットに写っている。
In the photo, there are shadings, but in reality it is flat.
取り敢えずこれで我が家のLG32インチテレビの修理は完了。
For now, the repair of my LG 32-inch TV is complete.
↓残ったテレビの方であるが、こちらもレンズが全て取れている。

↑The remaining TV also has all of its lenses removed.
↓ちなみに2台の主な違いは、リモコン受光部の右にwifiユニットの有/無だ。

↑The difference of two model is a wifi unit on the right side of the photo.
↓貰って来たテレビのバックライトの切れ具合。3個ほど点かない。

↑The backlight of the TV I got. About three of them don't work.
↓うちのテレビから外したLEDストリップを使い、奥と真ん中列を入れ替える。

↑I changed the two line strips with the old LEDs I removed from my TV.
取り敢えず一通りLEDは点く様になった。
For now, all the LEDs seem to work.
↓エポキシ接着剤で落ちてるレンズをくっつける。

↑Attach the fallen lenses with epoxy glue.
↓こんな感じで黒い部分に接着剤を塗って一通り取り付ける。

↑Apply glue to the black parts like this and attach everything.
↓なんとなく見た目ではちゃんと付いた様に見える。

↑At first glance, it looks like it's attached properly.
↓組み立てて点灯させてみると、かなり光点が出ている。なんで??
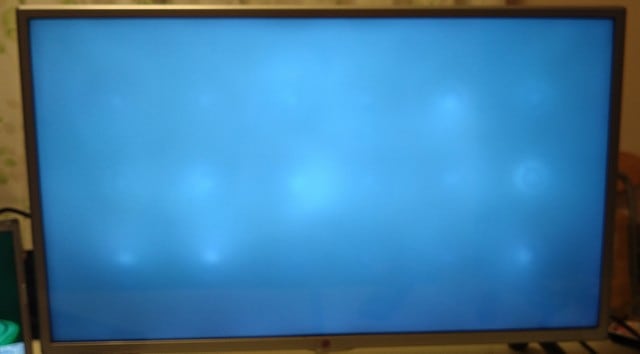
↑When I assembled and turned on, there were a few light spots. Why??
レンズをくっつける時に、接着剤が硬化してしまいそうなので、慌てて付けたので、レンズのでっぱりを黒い穴に合わせたが、ちゃんと中に入らず少し浮いたり、位置がずれたりしたかもしれない。
When I attached the lenses, I was worried the glue would harden, so I attached them in a hurry, so I aligned the protrusions on the lenses with the black holes, but they didn't go in properly and may have floated a little or been out of position.
一旦くっつけちゃったから、また外して付け直しても黒い穴は埋まってるだろうから、ダメだな。これだとLEDを買ってストリップで交換するしかないかもしれない。
Since I'd already stuck them in, even if I removed them and put them back on, the black holes would probably be filled, so it wouldn't work. I might have to buy new LEDs and replace them with strips.
なんだかジャンクループに陥っている様な、、、、
It seems like I'm stuck in a junk loop...
2024.04.23 (8/12 UP)
① LG 32型TV 修理 32LB5810 バックライトレンズ取付失敗編
② LG 32型TV 修理 32LB5810 失敗原因確認編
③ LG 32型TV 修理 32LB5810 バックライト交換編
④ LG 32型TV 修理 32LB5810 リモコン修理編
⑤ LG 32型TV 修理 32LB5810 散光板修正編
⑥LG 32型TV 2台目修理 32LB57YM
① LG 32inch TV repair 32LB5810 Backlight lens installation failure
② LG 32inch TV repair 32LB5810 Confirm of cause of failure
③ LG 32inch TV repair 32LB5810 Backlight replacement
④ LG 32inch TV repair 32LB5810 Remote control repair
⑤ LG 32inch TV repair 32LB5810 Diffuser plate repair
⑥LG 32inch TV repair 32LB57YM