


レイアウト術
【開発環境】
OS:Win11(64ビット)
VSCode1.72.2、
クロム
jquery-3.7.1.min.js CDN
及び
1.13.3/jquery-ui.min.js
【丸ボタンのレイアウトHP】
HP画面は下図のようになり、動作は、ボタンの上にマウスを乘せると、徐々に黄色に変わる。
以上
1.フォルダとファイルを用意する
2.img
3.3フォルダに「index.html」ファイルを作る
この部分で、CSS・jQuery・jsなどを読み込んでいる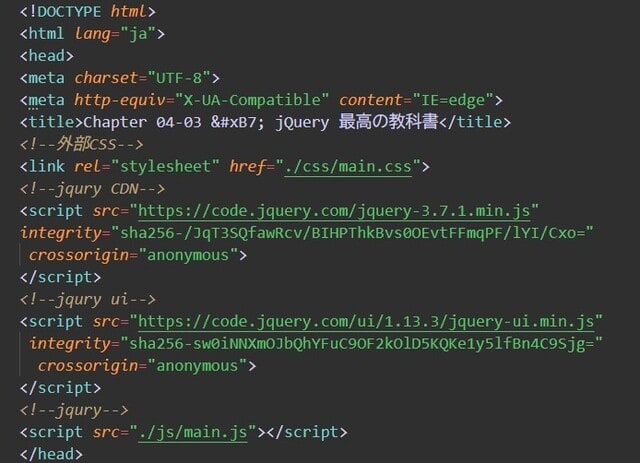
ヘッダーの設定
本体の設定
本体とフッターの設定
4.css/main.cssファイルのコードを書く
/*
* Base
*/
html {
font-family: "Helvetica Neue", "Arial", "Hiragino Kaku Gothic ProN",
"Meiryo", sans-serif;
font-size: 16px;
line-height: 1.5;
}
body {
background-color: #656565;
}
img {
vertical-align: middle;
}
button {
outline: none;
}
::-moz-selection {
background: #b3d4fc;
text-shadow: none;
}
::selection {
background: #b3d4fc;
text-shadow: none;
}
.page-header {
background-color: #fff;
}
.page-header h1 {
width: 976px;
height: 80px;
margin: 0 auto;
padding-left: 10px;
font-size: 20px;
font-weight: normal;
line-height: 80px;
letter-spacing: 0.1em;
}
.page-main {
position: relative;
}
.page-main > div {
padding: 50px 0 100px;
}
.page-main > div h2 {
color: #fff;
text-align: center;
margin: 0 0 50px;
font-weight: normal;
letter-spacing: 0.15em;
}
#buttons2 {
background-color: #43a2f0;
height: 340px;
}
#buttons2 .inner {
position: relative;
width: 976px;
margin: 0 auto;
}
#buttons2 button {
display: block;
position: absolute;
/*円の設定*/
width: 224px;
height: 224px;
/*角を丸くする事で円になる*/
border-radius: 50%;
/*はみ出した分部を消す*/
overflow: hidden;
padding: 0 0 35px;
font-size: 16px;
letter-spacing: 1px;
color: #01b169;
background-color: #fff;
border: none;
}
/*各ボタンの横の位置
*:nth-child(n)は疑似クラス
*/
#buttons2 button:nth-child(1) {
left: 10px;
}
#buttons2 button:nth-child(2) {
left: 254px;
}
#buttons2 button:nth-child(3) {
left: 498px;
}
#buttons2 button:nth-child(4) {
left: 742px;
}
.page-footer {
background-color: #8109eb;
}
.page-footer small {
display: block;
color: #fff;
font-size: 18px;
text-align: right;
width: 976px;
margin: 0 auto;
height: 100px;
line-height: 100px;
letter-spacing: 0.15em;
}
.page-footer a {
color: #fff;
text-decoration: none;
}
/*
* Helpers
*/
/* Clearfix
* float設定に依って、下への周り込を防ぐ方法
*/
.clearfix:before,
.clearfix:after {
content: " ";
/*テーブルの様に横並びにする*/
display: table;
}
.clearfix:after {
clear: both;
}
/* #button2
*疑似クラスのfirst-childプロパティは、1番目の要素を指定する
*普通に表示される画面
*/
#buttons2 button img:first-child {
/*絶対値にする*/
position: absolute;
}
/*疑似クラスのnth-child(2)プロパティは、2番目の要素を指定する
*マウスオーバー用の画面
*/
#buttons2 button img:nth-child(2) {
/*非表示にする*/
opacity: 0;
}
5,js/main.jsファイルのコードを書く$(function(){
//
var duration = 1000;
// buttons2 ----------------------------------------
//立ち上げ時、each()メソッドを実行
$('#buttons2 button').each(function(index){
var pos = index * 40 - 40;
//ボタンごとのtopの値を決めている
$(this).css('top', pos);
})
//マウスオーバー時
.on('mouseover', function(){
var $btn = $(this).stop(true).animate({
backgroundColor: '#faee00',
color: '#000'
}, duration);
$btn.find('img:first-child').stop(true).animate({opacity: 0}, duration);
$btn.find('img:nth-child(2)').stop(true).animate({opacity: 1}, duration);
})
//マウスアウト時
.on('mouseout', function(){
var $btn = $(this).stop(true).animate({
backgroundColor: '#fff',
color: '#01b169',
}, duration);
$btn.find('img:first-child').stop(true).animate({opacity: 1}, duration);
$btn.find('img:nth-child(2)').stop(true).animate({opacity: 0}, duration);
});
});


※コメント投稿者のブログIDはブログ作成者のみに通知されます