


◆LENOVO G50-80 に Windows 10 Insider Preview (x64) Build 10130 をクリーンインストールする手順
1.準備
●PC : LENOVO G50-80E5019PJP
●OS : Windows 10 Insider Preview (x64) Build 10130日本語版インストールDVD
※2015年6月17日現在、ここでダウンロードしてインストールDVDを作成
●HDD : 120GB以上
※フォーマットやパーティションされてない事
2.BIOS設定
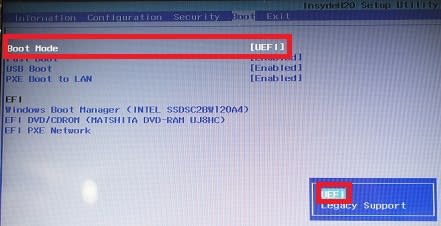
Boot → Boot Mode → UEFI に設定
3.DVD起動

Boot Manager → EFI DVD/CDROM を選択
4.インストール

メーカロゴが約3分程度表示されたままになる
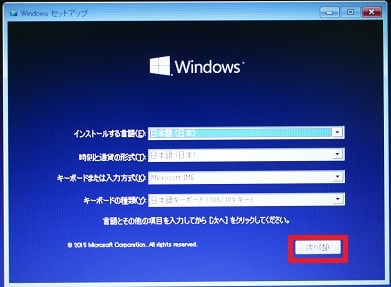
《 次へ 》を実行

《 今すぐインストール 》を実行


《 同意します 》をチェック
《 次へ 》を実行

《 カスタム 》を選択

《 次へ 》を実行
この後、しばらく自動的にインストール作業が続く

※有線LANが接続されている事
《 次へ 》を実行

《 簡単設定を使う 》を実行

《 私の個人所有です 》を選択
《 次へ 》を実行

※Microsoftアカウント取得している事
《 アカウント 》《 パスワード 》を入力
《 サインイン 》を実行

《 PINを使用します 》を実行

PINを入力
《 OK 》を実行

《 次へ 》を実行
サインインしてWindowsを起動

設定 → 更新とセキュリティ
《 更新プログラムのチェック 》を実行
─以上─
1.準備
●PC : LENOVO G50-80E5019PJP
●OS : Windows 10 Insider Preview (x64) Build 10130日本語版インストールDVD
※2015年6月17日現在、ここでダウンロードしてインストールDVDを作成
●HDD : 120GB以上
※フォーマットやパーティションされてない事
2.BIOS設定
Boot → Boot Mode → UEFI に設定
3.DVD起動
Boot Manager → EFI DVD/CDROM を選択
4.インストール
メーカロゴが約3分程度表示されたままになる
《 次へ 》を実行
《 今すぐインストール 》を実行
《 同意します 》をチェック
《 次へ 》を実行
《 カスタム 》を選択
《 次へ 》を実行
この後、しばらく自動的にインストール作業が続く
※有線LANが接続されている事
《 次へ 》を実行
《 簡単設定を使う 》を実行
《 私の個人所有です 》を選択
《 次へ 》を実行
※Microsoftアカウント取得している事
《 アカウント 》《 パスワード 》を入力
《 サインイン 》を実行
《 PINを使用します 》を実行
PINを入力
《 OK 》を実行
《 次へ 》を実行
サインインしてWindowsを起動
設定 → 更新とセキュリティ
《 更新プログラムのチェック 》を実行
─以上─