SD : SDSQXNE-032G-GN6MA [SANDISK]
AD : AD-PD6001A 5V/3A [Akizuki]
Case : Rspberry Pi 5 Case Red/White [SC1159]
Fan : Active Cooler [SC1148]
Camera : Raspberry Pi HQ Camera [SC0818]
Cable : RPI 5 Camera Cable 500mm [SC1130]
Lens : CGL 16mm Tele-photo Lens [SC0123]
PC : Windows10 Pro 64bit Version 22H2
$ uname -a
Linux raspberrypi 6.6.20+rpt-rpi-2712 #1 SMP PREEMPT Debian 1:6.6.20-1+rpt1 (2024-03-07) aarch64 GNU/Linux
$ lsb_release -a
No LSB modules are available.
Distributor ID: Debian
Description: Debian GNU/Linux 12 (bookworm)
Release: 12
Codename: bookworm
$ sudo nano /sbin/dphys-swapfile
$ sudo nano /etc/dphys-swapfile
$ sudo reboot
$ free -m
               total        used        free      shared  buff/cache   available
Mem:            8052         593        6846          36         745        7459
Swap:           4095           0        4095
$ wget https://github.com/Qengineering/Install-OpenCV-Raspberry-Pi-64-bits/raw/main/OpenCV-4-9-0.sh
$ sudo chmod 755 ./OpenCV-4-9-0.sh
$ ./OpenCV-4-9-0.sh
# Bookworm
$ sudo apt-get install qtbase5-dev
$ cd ~
$ git clone --depth=1 https://github.com/opencv/opencv.git
$ git clone --depth=1 https://github.com/opencv/opencv_contrib.git
$ cd ~/opencv
$ mkdir build
$ cd build
$ cmake -D CMAKE_BUILD_TYPE=RELEASE \
-D CMAKE_INSTALL_PREFIX=/usr/local \
-D OPENCV_EXTRA_MODULES_PATH=~/opencv_contrib/modules \
-D ENABLE_NEON=ON \
-D WITH_OPENMP=ON \
-D WITH_OPENCL=OFF \
-D BUILD_TIFF=ON \
-D WITH_FFMPEG=ON \
-D WITH_TBB=ON \
-D BUILD_TBB=ON \
-D WITH_GSTREAMER=ON \
-D BUILD_TESTS=OFF \
-D WITH_EIGEN=OFF \
-D WITH_V4L=ON \
-D WITH_LIBV4L=ON \
-D WITH_VTK=OFF \
-D WITH_QT=OFF \
-D WITH_PROTOBUF=ON \
-D OPENCV_ENABLE_NONFREE=ON \
-D INSTALL_C_EXAMPLES=OFF \
-D INSTALL_PYTHON_EXAMPLES=OFF \
-D PYTHON3_PACKAGES_PATH=/usr/lib/python3/dist-packages \
-D OPENCV_GENERATE_PKGCONFIG=ON \
-D BUILD_EXAMPLES=OFF ..
$ make -j4
$ sudo make install
$ sudo ldconfig
$ make clean
$ sudo apt-get update
$ sudo apt-get upgrade
$ python
>>> import cv2
>>> print( cv2.getBuildInformation() )
General configuration for OpenCV 4.9.0-dev =====================================
  Version control:               52f3f5a

  Extra modules:
    Location (extra):            /home/pi/opencv_contrib/modules
    Version control (extra):     9373b72

  Platform:
    Timestamp:                   2024-03-25T04:33:16Z
    Host:                        Linux 6.6.20+rpt-rpi-2712 aarch64
    CMake:                       3.25.1
    CMake generator:             Unix Makefiles
    CMake build tool:            /usr/bin/gmake
    Configuration:               RELEASE

  CPU/HW features:
    Baseline:                    NEON FP16
      required:                  NEON
    Dispatched code generation:  NEON_DOTPROD NEON_FP16 NEON_BF16
      requested:                 NEON_FP16 NEON_BF16 NEON_DOTPROD
      NEON_DOTPROD (1 files):    + NEON_DOTPROD
      NEON_FP16 (2 files):       + NEON_FP16
      NEON_BF16 (0 files):       + NEON_BF16

  C/C++:
    Built as dynamic libs?:      YES
    C++ standard:                11
    C++ Compiler:                /usr/bin/c++  (ver 12.2.0)
    C++ flags (Release):         -fsigned-char -W -Wall -Wreturn-type -Wnon-virtual-dtor -Waddress -Wsequence-point -Wformat -Wformat-security -Wmissing-declarations -Wundef -Winit-self -Wpointer-arith -Wshadow -Wsign-promo -Wuninitialized -Wsuggest-override -Wno-delete-non-virtual-dtor -Wno-comment -Wimplicit-fallthrough=3 -Wno-strict-overflow -fdiagnostics-show-option -pthread -fomit-frame-pointer -ffunction-sections -fdata-sections    -fvisibility=hidden -fvisibility-inlines-hidden -fopenmp -O3 -DNDEBUG  -DNDEBUG
    C++ flags (Debug):           -fsigned-char -W -Wall -Wreturn-type -Wnon-virtual-dtor -Waddress -Wsequence-point -Wformat -Wformat-security -Wmissing-declarations -Wundef -Winit-self -Wpointer-arith -Wshadow -Wsign-promo -Wuninitialized -Wsuggest-override -Wno-delete-non-virtual-dtor -Wno-comment -Wimplicit-fallthrough=3 -Wno-strict-overflow -fdiagnostics-show-option -pthread -fomit-frame-pointer -ffunction-sections -fdata-sections    -fvisibility=hidden -fvisibility-inlines-hidden -fopenmp -g  -O0 -DDEBUG -D_DEBUG
    C Compiler:                  /usr/bin/cc
    C flags (Release):           -fsigned-char -W -Wall -Wreturn-type -Waddress -Wsequence-point -Wformat -Wformat-security -Wmissing-declarations -Wmissing-prototypes -Wstrict-prototypes -Wundef -Winit-self -Wpointer-arith -Wshadow -Wuninitialized -Wno-comment -Wimplicit-fallthrough=3 -Wno-strict-overflow -fdiagnostics-show-option -pthread -fomit-frame-pointer -ffunction-sections -fdata-sections    -fvisibility=hidden -fopenmp -O3 -DNDEBUG  -DNDEBUG
    C flags (Debug):             -fsigned-char -W -Wall -Wreturn-type -Waddress -Wsequence-point -Wformat -Wformat-security -Wmissing-declarations -Wmissing-prototypes -Wstrict-prototypes -Wundef -Winit-self -Wpointer-arith -Wshadow -Wuninitialized -Wno-comment -Wimplicit-fallthrough=3 -Wno-strict-overflow -fdiagnostics-show-option -pthread -fomit-frame-pointer -ffunction-sections -fdata-sections    -fvisibility=hidden -fopenmp -g  -O0 -DDEBUG -D_DEBUG
    Linker flags (Release):      -Wl,--gc-sections -Wl,--as-needed -Wl,--no-undefined
    Linker flags (Debug):        -Wl,--gc-sections -Wl,--as-needed -Wl,--no-undefined
    ccache:                      NO
    Precompiled headers:         NO
    Extra dependencies:          dl m pthread rt
    3rdparty dependencies:

  OpenCV modules:
    To be built:                 aruco bgsegm bioinspired calib3d ccalib core datasets dnn dnn_objdetect dnn_superres dpm face features2d flann freetype fuzzy gapi hdf hfs highgui img_hash imgcodecs imgproc intensity_transform line_descriptor mcc ml objdetect optflow phase_unwrapping photo plot python3 quality rapid reg rgbd saliency shape signal stereo stitching structured_light superres surface_matching text tracking ts video videoio videostab wechat_qrcode xfeatures2d ximgproc xobjdetect xphoto
    Disabled:                    world
    Disabled by dependency:      -
    Unavailable:                 alphamat cannops cudaarithm cudabgsegm cudacodec cudafeatures2d cudafilters cudaimgproc cudalegacy cudaobjdetect cudaoptflow cudastereo cudawarping cudev cvv java julia matlab ovis python2 sfm viz
    Applications:                perf_tests apps
    Documentation:               NO
    Non-free algorithms:         YES

  GUI:                           GTK3
    GTK+:                        YES (ver 3.24.38)
      GThread :                  YES (ver 2.74.6)
      GtkGlExt:                  NO

  Media I/O:
    ZLib:                        /usr/lib/aarch64-linux-gnu/libz.so (ver 1.2.13)
    JPEG:                        /usr/lib/aarch64-linux-gnu/libjpeg.so (ver 62)
    WEBP:                        /usr/lib/aarch64-linux-gnu/libwebp.so (ver encoder: 0x020f)
    PNG:                         /usr/lib/aarch64-linux-gnu/libpng.so (ver 1.6.39)
    TIFF:                        build (ver 42 - )
    JPEG 2000:                   build (ver 2.5.0)
    OpenEXR:                     build (ver 2.3.0)
    HDR:                         YES
    SUNRASTER:                   YES
    PXM:                         YES
    PFM:                         YES

  Video I/O:
    DC1394:                      NO
    FFMPEG:                      YES
      avcodec:                   YES (59.37.100)
      avformat:                  YES (59.27.100)
      avutil:                    YES (57.28.100)
      swscale:                   YES (6.7.100)
      avresample:                NO
    GStreamer:                   YES (1.22.0)
    v4l/v4l2:                    YES (linux/videodev2.h)

  Parallel framework:            TBB (ver 2021.11 interface 12110)

  Trace:                         YES (with Intel ITT)

  Other third-party libraries:
    Lapack:                      NO
    Custom HAL:                  YES (carotene (ver 0.0.1, Auto detected))
    Protobuf:                    build (3.19.1)
    Flatbuffers:                 builtin/3rdparty (23.5.9)

  Python 3:
    Interpreter:                 /usr/bin/python3 (ver 3.11.2)
    Libraries:                   /usr/lib/aarch64-linux-gnu/libpython3.11.so (ver 3.11.2)
    Limited API:                 NO
    numpy:                       /usr/lib/python3/dist-packages/numpy/core/include (ver 1.24.2)
    install path:                /usr/lib/python3/dist-packages/cv2/python-3.11

  Python (for build):            /usr/bin/python3

  Java:
    ant:                         NO
    Java:                        NO
    JNI:                         NO
    Java wrappers:               NO
    Java tests:                  NO

  Install to:                    /usr/local
-----------------------------------------------------------------
import cv2
from picamera2 import Picamera2

camera = Picamera2()
camera.configure(camera.create_preview_configuration(main={
    "format": 'XRGB8888',
    "size": (640, 480)
}))
camera.start()
#camera.set_controls({'AfMode': controls.AfModeEnum.Continuous})

image = camera.capture_array()

channels = 1 if len(image.shape) == 2 else image.shape[2]
if channels == 1:
    image = cv2.cvtColor(image, cv2.COLOR_GRAY2BGR)
if channels == 4:
    image = cv2.cvtColor(image, cv2.COLOR_BGRA2BGR)

cv2.imwrite('test.jpg', image)
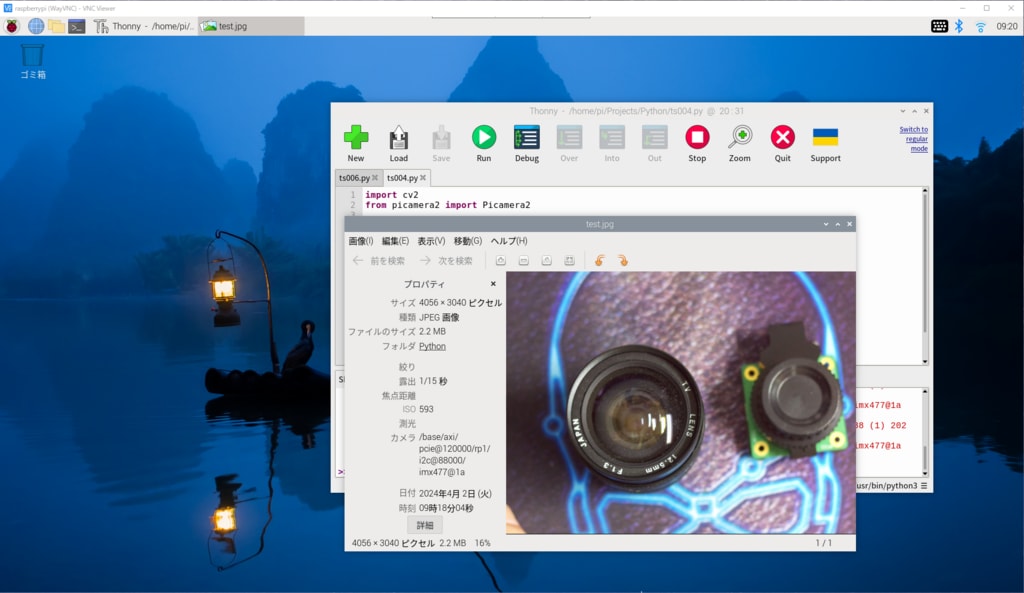
◆Raspberry Pi用のローリングシャッターとグローバルシャッターカメラ比較
1.準備RP : Raspberry Pi 5 8GB
SD : SDSQXNE-032G-GN6MA [SANDISK]
AD : AD-PD6001A 5V/3A [Akizuki]
Case : Rspberry Pi 5 Case Red/White [SC1159]
Fan : Active Cooler [SC1148]
Camera 1 : Raspberry Pi HQ Camera [SC0818]
Camera 2 : Raspberry Pi Global Shutter Cam [SC0715]
Cable : RPI 5 Camera Cable 500mm [SC1130]
Lens : CGL 16mm Tele-photo Lens [SC0123]
PC : Windows10 Pro 64bit Version 22H2
2.カメラ接続

3.Raspberry Pi HQ Cameraサンプル画像


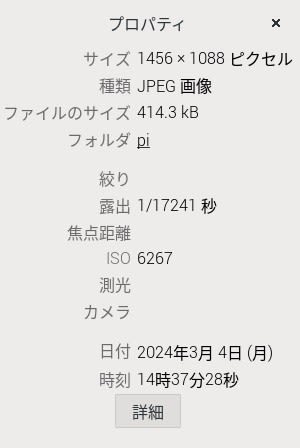
4.Raspberry Pi Global Shutter Cameraサンプル画像

─以上─
◆Raspberry Pi 5 にOSをインストールする。初期設定はSSH, VNC接続で進める手順。
1.準備
RP: Raspberry Pi 5 8GB
SD: SDSQXNE-032G-GN6MA [SANDISK]
AD:AD-PD6001A 5V/3A [Akizuki]
PC: Windows10 Pro 64bit Version 22H2
Tool:
SD Card Formatter 5.0.2
Raspberry Pi Imager 1.8.5
TeraTerm Version 4.106(SVN# 9298)
VNC Viwer 6.21.1109(r45988)x64(Nov 9 2021 13:14:09)
2.Raspberry Pi Imagerダウンロードインストール
ダウンロード先
imager_1.8.5.exeを起動して、インストール
3.SDカード書込み
PCにフォーマット済みのmicroSDカードを接続
SDカードのスペックは64GB以上,Class10,UHS-I U3, V30, A2が理想
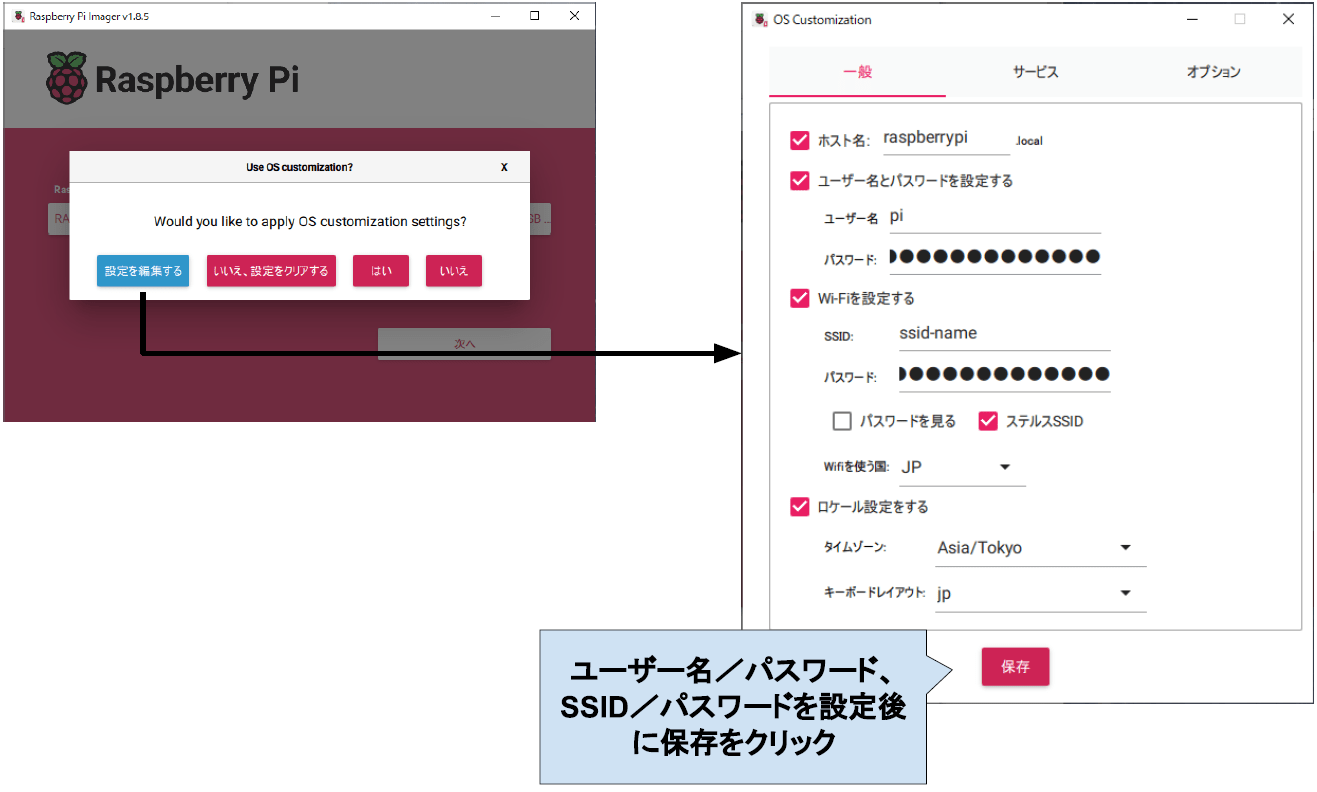
Raspberry Pi Imagerを起動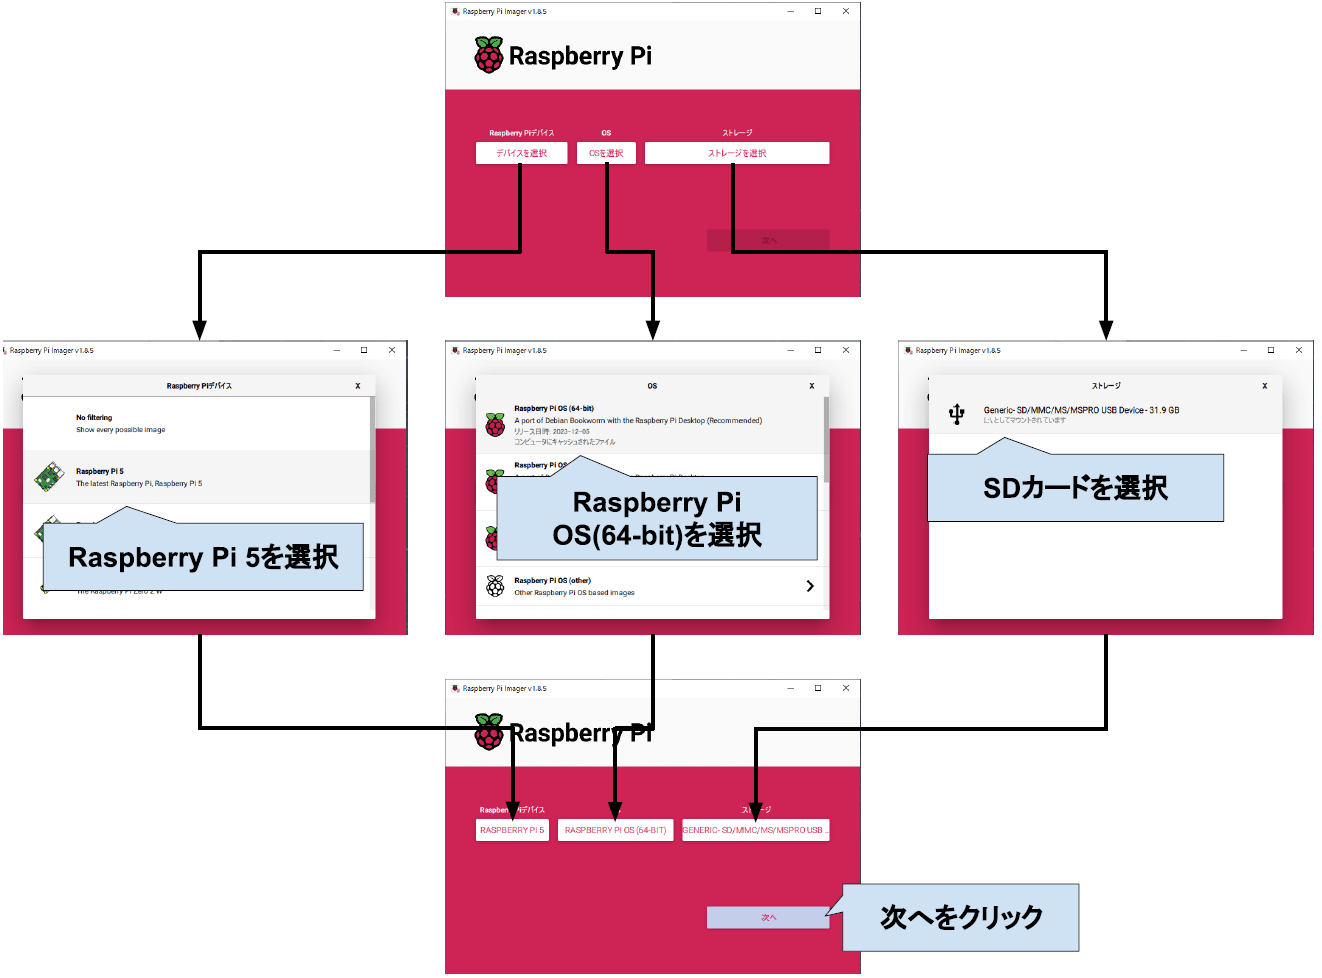
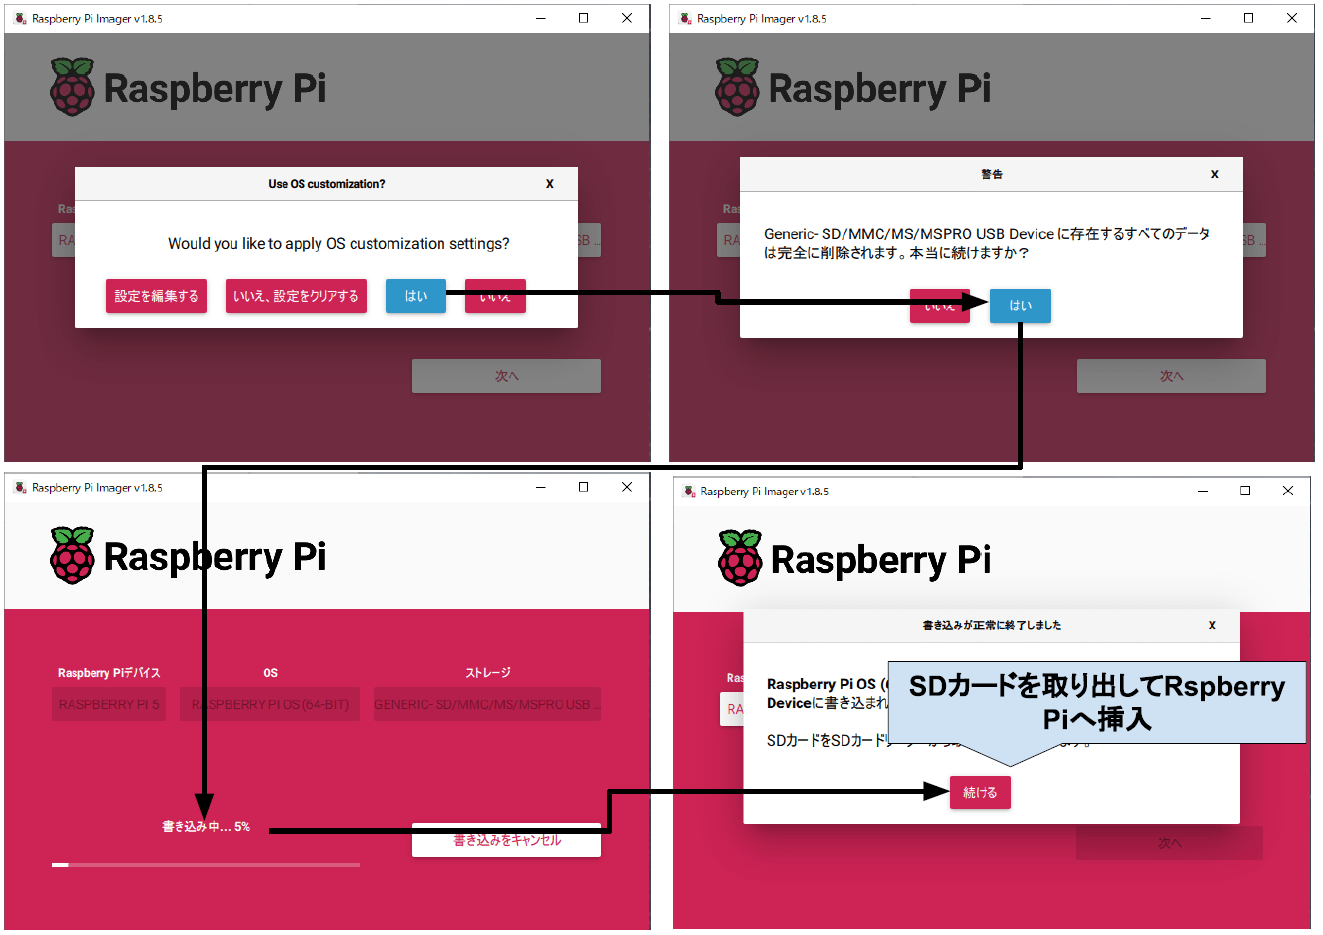
4.通電
Raspberry PiにSDカードを挿入
Raspberry PiにUSB-C対応ACアダプターを接続
※2024年2月現在、国内で5V/5A出力できるUSB-C対応ACアダプターは存在しない
PCは、Raspberry Piと同じWiFiに接続
5.SSH接続
PCからRaspberry Piの設定を実行
Tera Termを起動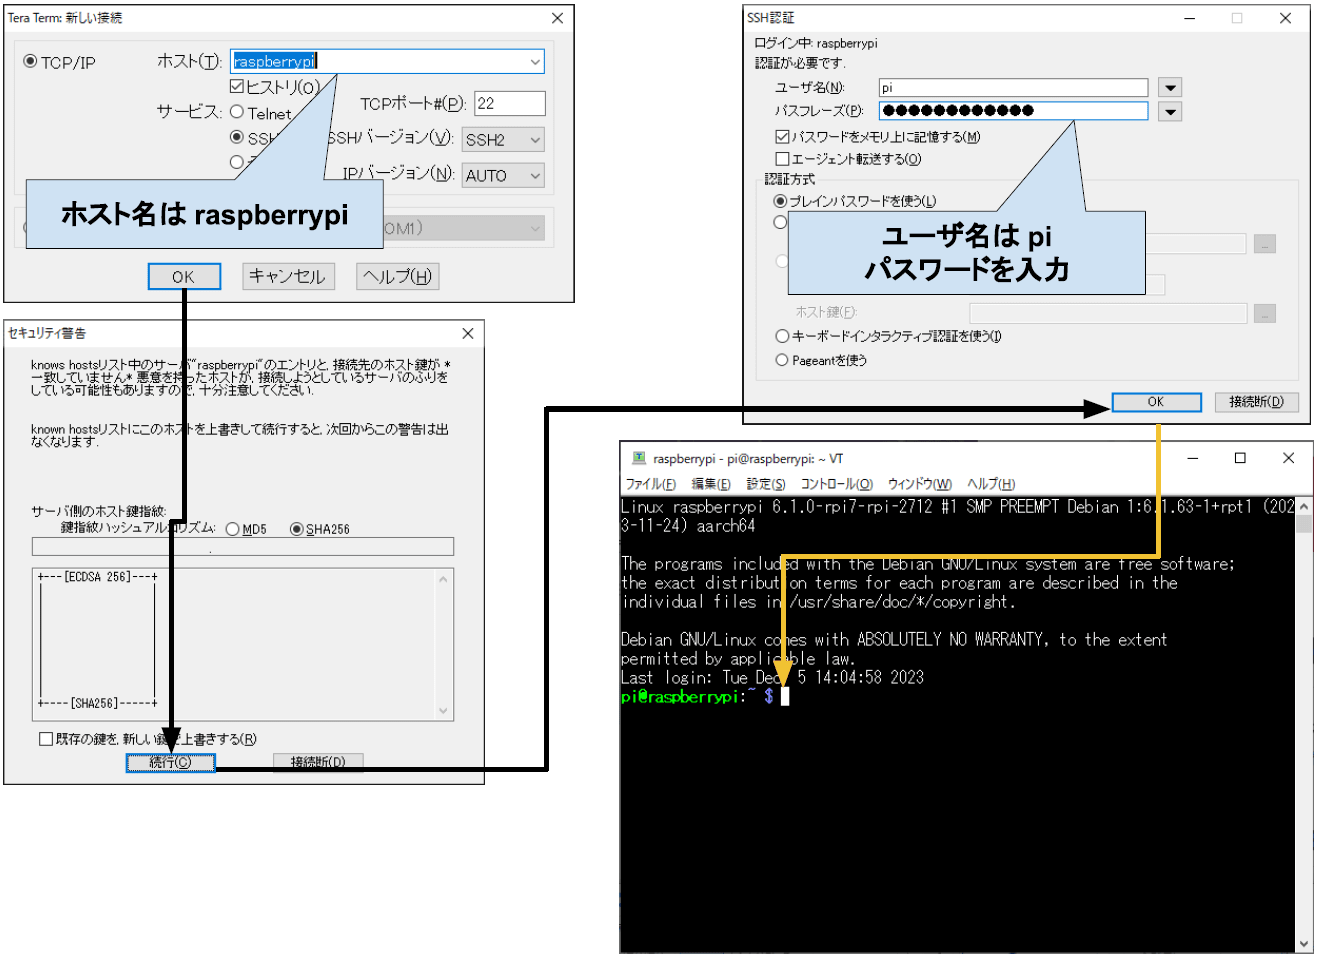
6.アップデート
$sudo apt update && sudo apt upgrade -y
※自分の環境では、30分弱必要
7.基本設定
$sudo raspi-config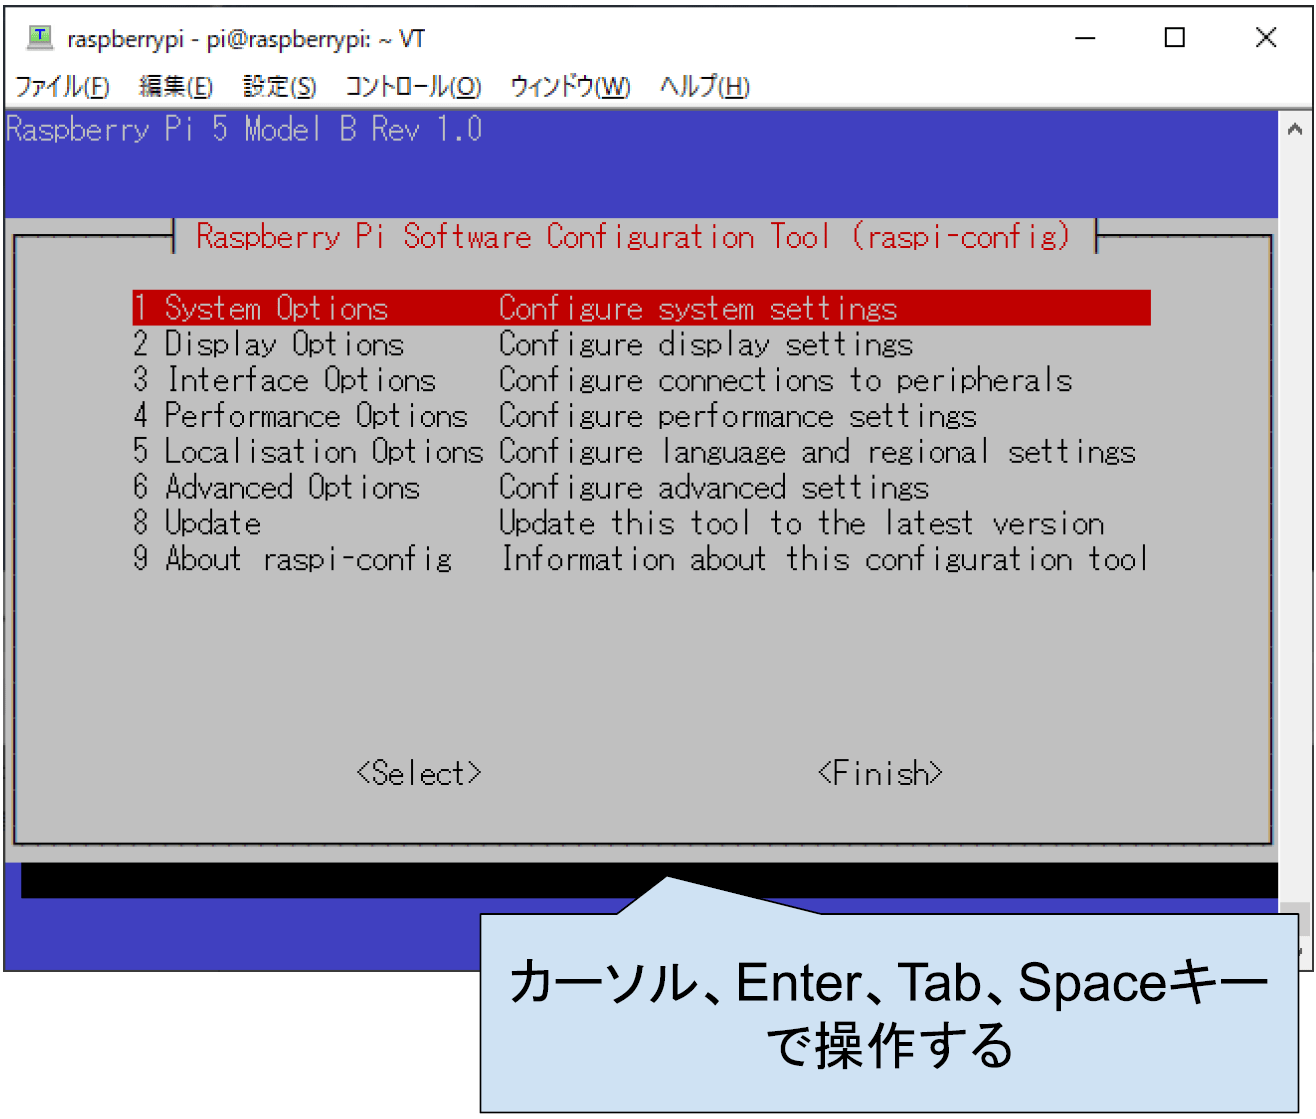
1 System Options → S5 Boot / Auto Login → B4 Desktop Autologin
2 Display Options → D3 VNC Resolution → 1920x1080
3 Interface Options → I2 VNC →
5 Localisation Options
→ L1 Locale → ja_JP.UTF-8 UTF-8 → ja_JP,UTF-8
→ L2 Timezone → Asia → Tokyo
→ L3 Keyboard → Generic 105-key PC → Japanese(OADG 109A) →
The default for the keyboard layout → No compose key
→ L4 WLAN Country → JP Japanese
再起動を実行
Tera Termにて再度、SSH接続
$ip address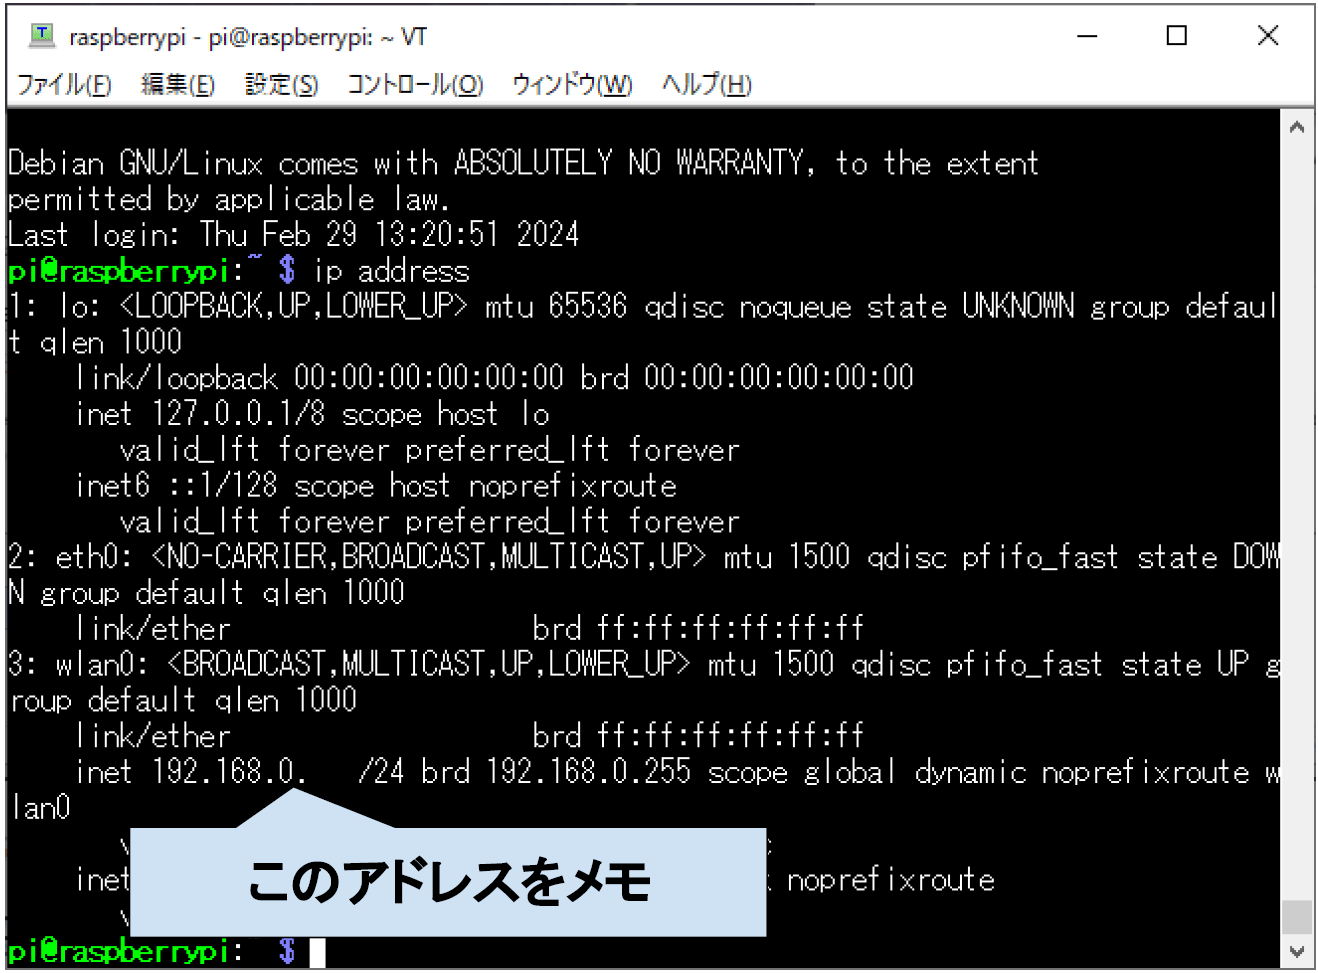
PCで、VNC Viwer を起動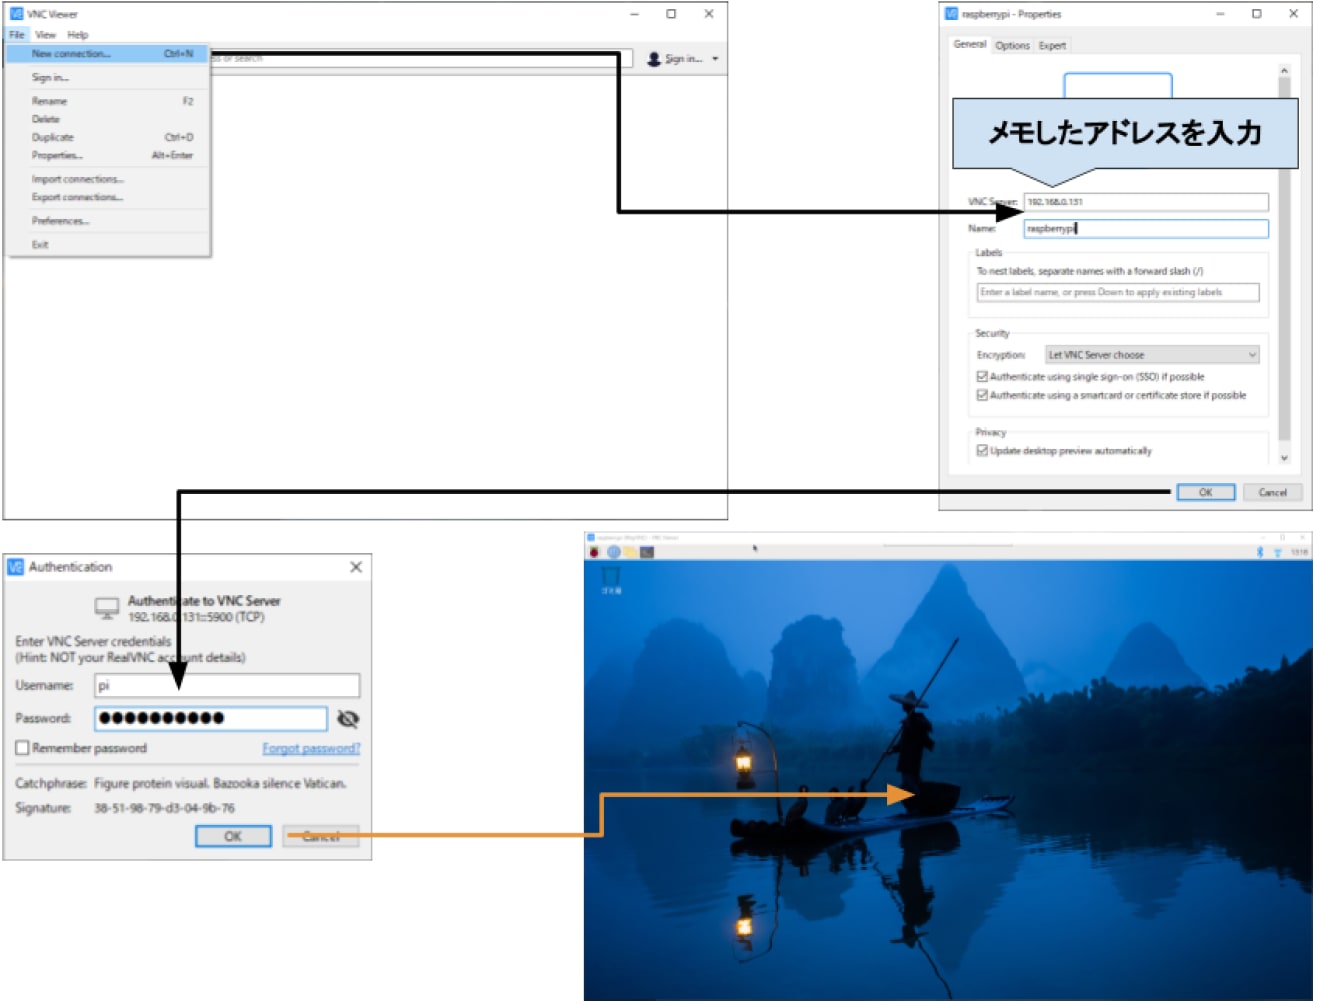
8.日本語入力
ターミナルを開く
$sudo apt install fcitx5-mozc
$im-config -n fcitx5
$sudo apt install fonts-noto-cjk
$reboot
VNC Viweにて再度接続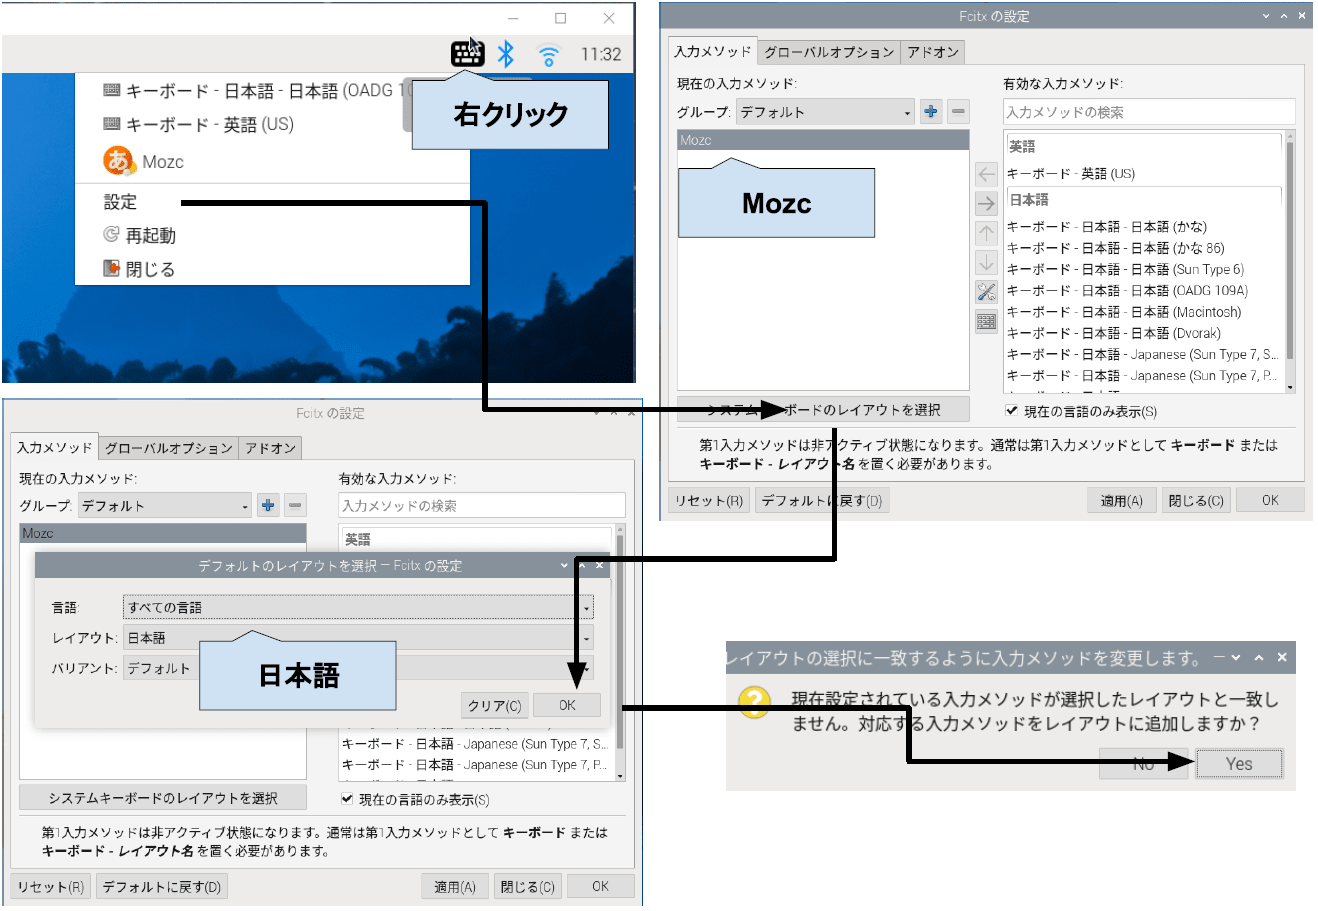
$reboot
VNC Viewを再接続
ターミナルで日本語入力できることを確認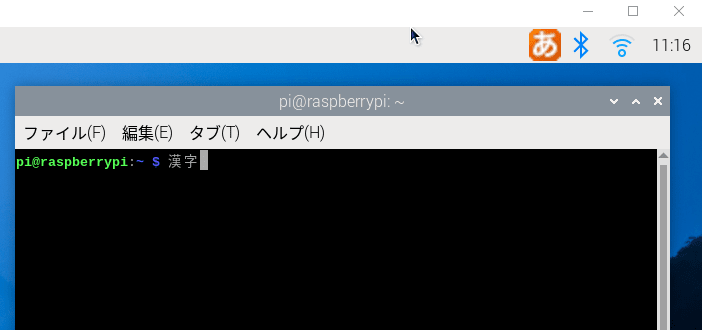
9.samba設定
ターミナルを開く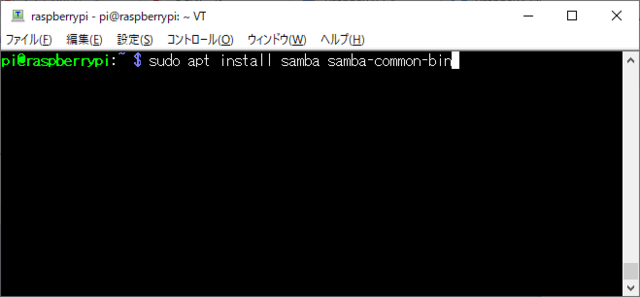
$sudo apt install samba samba-common-bin
$sudo smbpasswd -a pi
$sudo systemctl restart smbd
PCでエクスプローラを開く
メモしたアドレスに接続、Raspberryとの接続を確認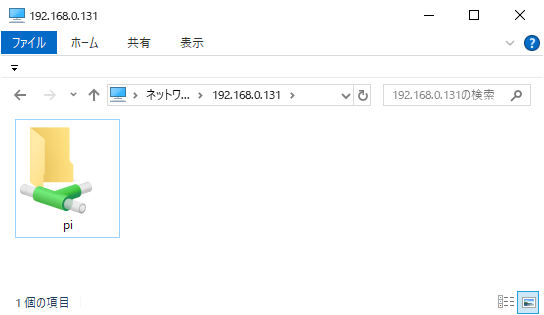
─以上─
◆Raspberry Pi Pico W と PC をWIFI接続して、センサ測定値を取得する手順。Raspberry Pi は Arudino IDE、PC は Visual C# でプログラムを開発。Raspberry Pi はサンプルスケッチの HelloServer を改変。Visual C# は HttpClient() で通信。
1.準備
●MPU:Raspberry Pi Pico W
●IDE(Raspberry Pi):Arduino IDE 2.2.1
●Language(Raspberry Pi):C++
●PC:Windows 10 Pro 64bit Version 22H2
●IDE(PC):Visual Studio Community 2022 Version 17.8.3
●Language(PC):VIsual C#
●Framewaork: .NET 8.0
2.HelloServer ソースコードの改変
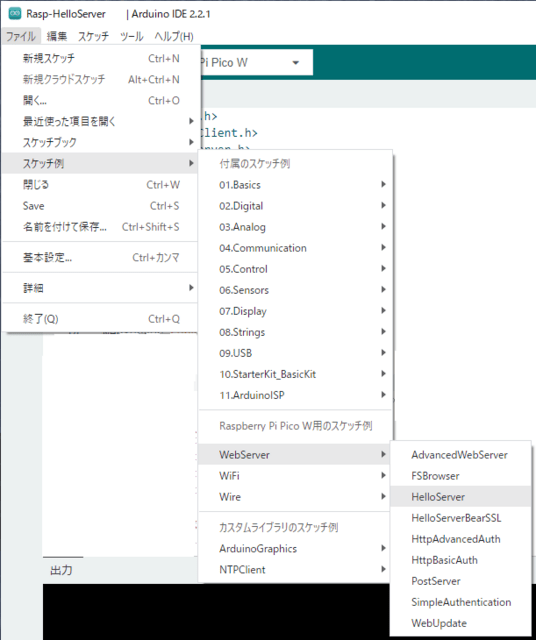
<ファイル>→<スケッチ例>→<WebServer>→<HelloServer>
・・・
#define STASSID "your-ssid" // PCと同じ2.4GHzのSSIDに変更
#define STAPSK "your-password" // SSIDのパスワードを入力

String strMeasurementData = String(12); // センサ測定値(グローバル変数)

・・・
void setup(void) {
  ・・・
  server.on("/Measurement", []() {
    server.send(200, "text/plain", strMeasurementData);
  });
  ・・・
}
void loop(void) {
  ・・・
  Measurement_act = センサ測定値取得関数();  // センサ測定値を取得
  strMeasurementData = String(Measurement_act, 2);
  ・・・
}
センサ測定値取得関数() は使用するセンサに合わせて作成
必ずSTASSID、STAPSK は自分のWIFI環境に書き換える
3.Visual C#ソースコード
MainWindow.xaml
<Window x:Class="Simple_Raspi_HttpClient.MainWindow"
        xmlns="http://schemas.microsoft.com/winfx/2006/xaml/presentation"
        xmlns:x="http://schemas.microsoft.com/winfx/2006/xaml"
        xmlns:d="http://schemas.microsoft.com/expression/blend/2008"
        xmlns:mc="http://schemas.openxmlformats.org/markup-compatibility/2006"
        xmlns:local="clr-namespace:Simple_Raspi_HttpClient"
        mc:Ignorable="d"
        Title="MainWindow" Height="450" Width="800">
    <Grid>
        <TextBlock x:Name="MeasuarmentDataReceive"
            HorizontalAlignment="Left"
            VerticalAlignment="Top"
            TextWrapping="Wrap"
            ScrollViewer.VerticalScrollBarVisibility="Auto" />
    </Grid>
</Window>
MainWindow.xaml.cs
using System.ComponentModel;
using System.Diagnostics;
using System.Net.Http;
using System.Windows;
using System.Windows.Threading;

namespace Simple_Raspi_HttpClient
{
    ///
    /// Interaction logic for MainWindow.xaml
    ///
    public partial class MainWindow : Window
    {
        private DispatcherTimer timer1 = new DispatcherTimer(DispatcherPriority.Normal)
        {   // タイマーインターバル = 1秒
            Interval = TimeSpan.FromMilliseconds(1000),
        };
        string iotDeviceUrl = "http://your-iot-device-api-endpoint";
        public MainWindow()
        {
            InitializeComponent();

            timer1.Tick += new EventHandler(RunTimer1);
            timer1.Start();
            this.Closing += new CancelEventHandler(StopTimer1);
            MeasuarmentDataReceive.Text = string.Empty;
        }

        private async void RunTimer1(object sender, EventArgs e)
        {
            string MeasurementData = await ReadMeasurementData(iotDeviceUrl);
            MeasuarmentDataReceive.Text += MeasurementData + "\r\n";
        }

        private void StopTimer1(object sender, EventArgs e)
        {
            timer1.Stop();
        }

        private async Task ReadMeasurementData(string _url)
        {
            using (HttpClient client = new HttpClient())
            {
                try
                {
                    // HTTP GETリクエストを送信
                    HttpResponseMessage response = await client.GetAsync(_url);

                    // 応答が成功した場合は、データを取得して返す
                    if (response.IsSuccessStatusCode)
                    {
                        string data = await response.Content.ReadAsStringAsync();
                        return data;
                    }
                    else
                    {
                        // エラーメッセージを表示
                        Console.WriteLine("Error: " + response.StatusCode);
                        return null;
                    }
                }
                catch (Exception _ex)
                {
                    Trace.WriteLine($"URL:{_url}:{_ex}");
                    return null;
                }
            }
        }
    }
}
http://your-iot-device-api-endpoint は Raspberry Pi のアドレスが 192.168.0.123 の場合
http://192.168.0.123/Measurement に変更
4.実行
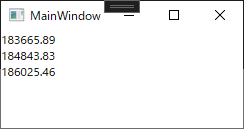
Raspberry Pi のプログラムをスタート
PC のプログラムをスタート
1秒ごとにセンサ測定値が表示されることを確認
─以上─
◆Raspberry Pi Pico W を Bluetooth で Androidスマホに接続する手順
1.準備
●MPU:Raspberry Pi Pico W
●Phone:Google Pixel 8 pro
●PC:Windows 10 Pro 64bit Version 22H2
●Language:MicroPython(RPI_PICO_W-20231005-v1.21.0)
●IDE:Thonny 4.1.3
2.スマホアプリインストール
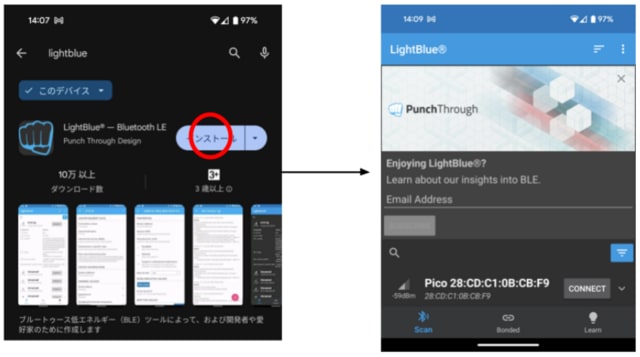
Google Play で [LightBlue] を検索して、インストールする。アプリを開く
3.Pythonサンプルコード
ここのサンプルコードを参照
(ble_advertising.py , picow_ble_temp_sensor.py)
# This example demonstrates a simple temperature sensor peripheral.
#
# The sensor's local value is updated, and it will notify
# any connected central every 10 seconds.

import bluetooth
import random
import struct
import time
import machine
import ubinascii
# from ble_advertising import advertising_payload
from micropython import const
from machine import Pin

_ADV_TYPE_FLAGS = const(0x01)
_ADV_TYPE_NAME = const(0x09)
_ADV_TYPE_UUID16_COMPLETE = const(0x3)
_ADV_TYPE_UUID32_COMPLETE = const(0x5)
_ADV_TYPE_UUID128_COMPLETE = const(0x7)
_ADV_TYPE_UUID16_MORE = const(0x2)
_ADV_TYPE_UUID32_MORE = const(0x4)
_ADV_TYPE_UUID128_MORE = const(0x6)
_ADV_TYPE_APPEARANCE = const(0x19)

_IRQ_CENTRAL_CONNECT = const(1)
_IRQ_CENTRAL_DISCONNECT = const(2)
_IRQ_GATTS_INDICATE_DONE = const(20)

_FLAG_READ = const(0x0002)
_FLAG_NOTIFY = const(0x0010)
_FLAG_INDICATE = const(0x0020)

# org.bluetooth.service.environmental_sensing
_ENV_SENSE_UUID = bluetooth.UUID(0x181A)
# org.bluetooth.characteristic.temperature
_TEMP_CHAR = (
    bluetooth.UUID(0x2A6E),
    _FLAG_READ | _FLAG_NOTIFY | _FLAG_INDICATE,
)
_ENV_SENSE_SERVICE = (
    _ENV_SENSE_UUID,
    (_TEMP_CHAR,),
)

# org.bluetooth.characteristic.gap.appearance.xml
_ADV_APPEARANCE_GENERIC_THERMOMETER = const(768)

class BLETemperature:
    def __init__(self, ble, name=""):
        self._sensor_temp = machine.ADC(4)
        self._ble = ble
        self._ble.active(True)
        self._ble.irq(self._irq)
        ((self._handle,),) = self._ble.gatts_register_services((_ENV_SENSE_SERVICE,))
        self._connections = set()
        if len(name) == 0:
            name = 'Pico %s' % ubinascii.hexlify(self._ble.config('mac')[1],':').decode().upper()
        print('Sensor name %s' % name)
        self._payload = advertising_payload(
            name=name, services=[_ENV_SENSE_UUID]
        )
        self._advertise()

    def _irq(self, event, data):
        # Track connections so we can send notifications.
        if event == _IRQ_CENTRAL_CONNECT:
            conn_handle, _, _ = data
            self._connections.add(conn_handle)
        elif event == _IRQ_CENTRAL_DISCONNECT:
            conn_handle, _, _ = data
            self._connections.remove(conn_handle)
            # Start advertising again to allow a new connection.
            self._advertise()
        elif event == _IRQ_GATTS_INDICATE_DONE:
            conn_handle, value_handle, status = data

    def update_temperature(self, notify=False, indicate=False):
        # Write the local value, ready for a central to read.
        temp_deg_c = self._get_temp()
        print("write temp %.2f degc" % temp_deg_c);
        self._ble.gatts_write(self._handle, struct.pack("〈h", int(temp_deg_c * 100)))
        if notify or indicate:
            for conn_handle in self._connections:
                if notify:
                    # Notify connected centrals.
                    self._ble.gatts_notify(conn_handle, self._handle)
                if indicate:
                    # Indicate connected centrals.
                    self._ble.gatts_indicate(conn_handle, self._handle)

    def _advertise(self, interval_us=500000):
        self._ble.gap_advertise(interval_us, adv_data=self._payload)

    # ref https://github.com/raspberrypi/pico-micropython-examples/blob/master/adc/temperature.py
    def _get_temp(self):
        conversion_factor = 3.3 / (65535)
        reading = self._sensor_temp.read_u16() * conversion_factor

        # The temperature sensor measures the Vbe voltage of a biased bipolar diode, connected to the fifth ADC channel
        # Typically, Vbe = 0.706V at 27 degrees C, with a slope of -1.721mV (0.001721) per degree.
        return 27 - (reading - 0.706) / 0.001721

# Generate a payload to be passed to gap_advertise(adv_data=...).
def advertising_payload(limited_disc=False, br_edr=False, name=None, services=None, appearance=0):
    payload = bytearray()

    def _append(adv_type, value):
        nonlocal payload
        payload += struct.pack("BB", len(value) + 1, adv_type) + value

    _append(
        _ADV_TYPE_FLAGS,
        struct.pack("B", (0x01 if limited_disc else 0x02) + (0x18 if br_edr else 0x04)),
    )

    if name:
        _append(_ADV_TYPE_NAME, name)

    if services:
        for uuid in services:
            b = bytes(uuid)
            if len(b) == 2:
                _append(_ADV_TYPE_UUID16_COMPLETE, b)
            elif len(b) == 4:
                _append(_ADV_TYPE_UUID32_COMPLETE, b)
            elif len(b) == 16:
                _append(_ADV_TYPE_UUID128_COMPLETE, b)

    # See org.bluetooth.characteristic.gap.appearance.xml
    if appearance:
        _append(_ADV_TYPE_APPEARANCE, struct.pack("〈h", appearance))

    return payload

def decode_field(payload, adv_type):
    i = 0
    result = []
    while i + 1 〈 len(payload):
        if payload[i + 1] == adv_type:
            result.append(payload[i + 2 : i + payload[i] + 1])
        i += 1 + payload[i]
    return result

def decode_name(payload):
    n = decode_field(payload, _ADV_TYPE_NAME)
    return str(n[0], "utf-8") if n else ""

def decode_services(payload):
    services = []
    for u in decode_field(payload, _ADV_TYPE_UUID16_COMPLETE):
        services.append(bluetooth.UUID(struct.unpack("〈h", u)[0]))
    for u in decode_field(payload, _ADV_TYPE_UUID32_COMPLETE):
        services.append(bluetooth.UUID(struct.unpack("〈d", u)[0]))
    for u in decode_field(payload, _ADV_TYPE_UUID128_COMPLETE):
        services.append(bluetooth.UUID(u))
    return services

def demo():
    ble = bluetooth.BLE()
    temp = BLETemperature(ble)
    counter = 0
    led = Pin('LED', Pin.OUT)
    while True:
        if counter % 10 == 0:
            temp.update_temperature(notify=True, indicate=False)
        led.toggle()
        time.sleep_ms(1000)
        counter += 1

if __name__ == "__main__":
    demo()
4.測定した温度をスマフォに表示
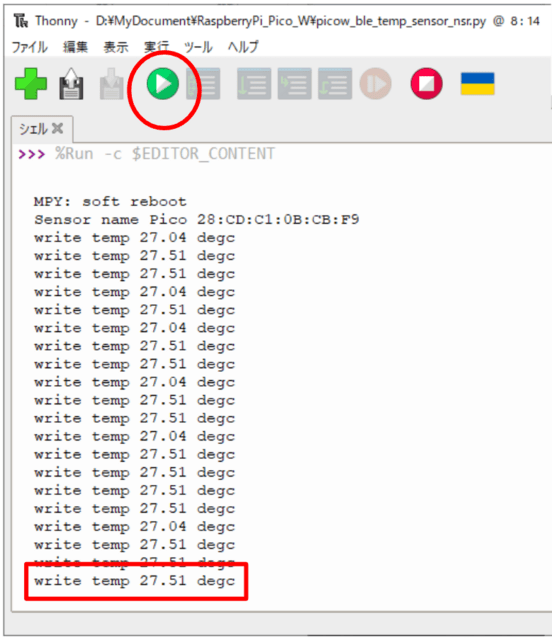
Thonny でプログラムを実行
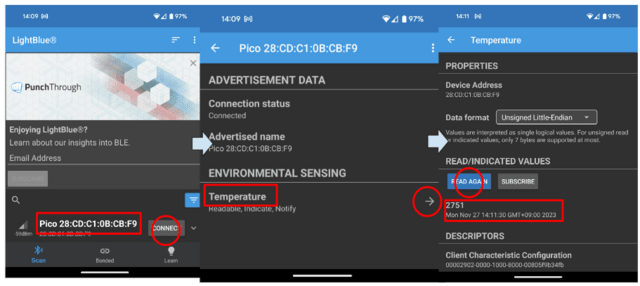
Raspberry Pi Pico W を探して、接続
Temperature を選択
Thonny のシェルと比較して100倍の数値であることを確認
─以上─


