◆Raspberry Pi Pico W を Bluetooth で Androidスマホに接続する手順
1.準備
●MPU:Raspberry Pi Pico W
●Phone:Google Pixel 8 pro
●PC:Windows 10 Pro 64bit Version 22H2
●Language:MicroPython(RPI_PICO_W-20231005-v1.21.0)
●IDE:Thonny 4.1.3
2.スマホアプリインストール
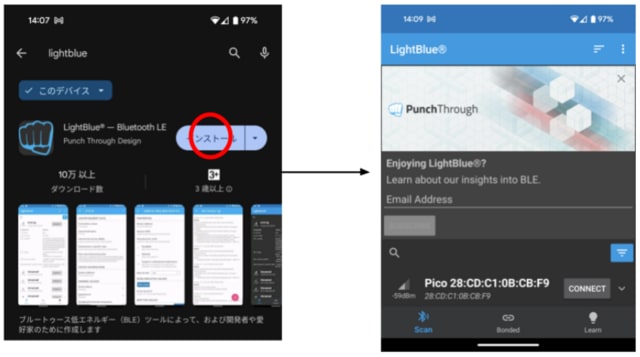
Google Play で [LightBlue] を検索して、インストールする。アプリを開く
3.Pythonサンプルコード
ここのサンプルコードを参照
(ble_advertising.py , picow_ble_temp_sensor.py)
# This example demonstrates a simple temperature sensor peripheral.
#
# The sensor's local value is updated, and it will notify
# any connected central every 10 seconds.

import bluetooth
import random
import struct
import time
import machine
import ubinascii
# from ble_advertising import advertising_payload
from micropython import const
from machine import Pin

_ADV_TYPE_FLAGS = const(0x01)
_ADV_TYPE_NAME = const(0x09)
_ADV_TYPE_UUID16_COMPLETE = const(0x3)
_ADV_TYPE_UUID32_COMPLETE = const(0x5)
_ADV_TYPE_UUID128_COMPLETE = const(0x7)
_ADV_TYPE_UUID16_MORE = const(0x2)
_ADV_TYPE_UUID32_MORE = const(0x4)
_ADV_TYPE_UUID128_MORE = const(0x6)
_ADV_TYPE_APPEARANCE = const(0x19)

_IRQ_CENTRAL_CONNECT = const(1)
_IRQ_CENTRAL_DISCONNECT = const(2)
_IRQ_GATTS_INDICATE_DONE = const(20)

_FLAG_READ = const(0x0002)
_FLAG_NOTIFY = const(0x0010)
_FLAG_INDICATE = const(0x0020)

# org.bluetooth.service.environmental_sensing
_ENV_SENSE_UUID = bluetooth.UUID(0x181A)
# org.bluetooth.characteristic.temperature
_TEMP_CHAR = (
    bluetooth.UUID(0x2A6E),
    _FLAG_READ | _FLAG_NOTIFY | _FLAG_INDICATE,
)
_ENV_SENSE_SERVICE = (
    _ENV_SENSE_UUID,
    (_TEMP_CHAR,),
)

# org.bluetooth.characteristic.gap.appearance.xml
_ADV_APPEARANCE_GENERIC_THERMOMETER = const(768)

class BLETemperature:
    def __init__(self, ble, name=""):
        self._sensor_temp = machine.ADC(4)
        self._ble = ble
        self._ble.active(True)
        self._ble.irq(self._irq)
        ((self._handle,),) = self._ble.gatts_register_services((_ENV_SENSE_SERVICE,))
        self._connections = set()
        if len(name) == 0:
            name = 'Pico %s' % ubinascii.hexlify(self._ble.config('mac')[1],':').decode().upper()
        print('Sensor name %s' % name)
        self._payload = advertising_payload(
            name=name, services=[_ENV_SENSE_UUID]
        )
        self._advertise()

    def _irq(self, event, data):
        # Track connections so we can send notifications.
        if event == _IRQ_CENTRAL_CONNECT:
            conn_handle, _, _ = data
            self._connections.add(conn_handle)
        elif event == _IRQ_CENTRAL_DISCONNECT:
            conn_handle, _, _ = data
            self._connections.remove(conn_handle)
            # Start advertising again to allow a new connection.
            self._advertise()
        elif event == _IRQ_GATTS_INDICATE_DONE:
            conn_handle, value_handle, status = data

    def update_temperature(self, notify=False, indicate=False):
        # Write the local value, ready for a central to read.
        temp_deg_c = self._get_temp()
        print("write temp %.2f degc" % temp_deg_c);
        self._ble.gatts_write(self._handle, struct.pack("〈h", int(temp_deg_c * 100)))
        if notify or indicate:
            for conn_handle in self._connections:
                if notify:
                    # Notify connected centrals.
                    self._ble.gatts_notify(conn_handle, self._handle)
                if indicate:
                    # Indicate connected centrals.
                    self._ble.gatts_indicate(conn_handle, self._handle)

    def _advertise(self, interval_us=500000):
        self._ble.gap_advertise(interval_us, adv_data=self._payload)

    # ref https://github.com/raspberrypi/pico-micropython-examples/blob/master/adc/temperature.py
    def _get_temp(self):
        conversion_factor = 3.3 / (65535)
        reading = self._sensor_temp.read_u16() * conversion_factor

        # The temperature sensor measures the Vbe voltage of a biased bipolar diode, connected to the fifth ADC channel
        # Typically, Vbe = 0.706V at 27 degrees C, with a slope of -1.721mV (0.001721) per degree.
        return 27 - (reading - 0.706) / 0.001721

# Generate a payload to be passed to gap_advertise(adv_data=...).
def advertising_payload(limited_disc=False, br_edr=False, name=None, services=None, appearance=0):
    payload = bytearray()

    def _append(adv_type, value):
        nonlocal payload
        payload += struct.pack("BB", len(value) + 1, adv_type) + value

    _append(
        _ADV_TYPE_FLAGS,
        struct.pack("B", (0x01 if limited_disc else 0x02) + (0x18 if br_edr else 0x04)),
    )

    if name:
        _append(_ADV_TYPE_NAME, name)

    if services:
        for uuid in services:
            b = bytes(uuid)
            if len(b) == 2:
                _append(_ADV_TYPE_UUID16_COMPLETE, b)
            elif len(b) == 4:
                _append(_ADV_TYPE_UUID32_COMPLETE, b)
            elif len(b) == 16:
                _append(_ADV_TYPE_UUID128_COMPLETE, b)

    # See org.bluetooth.characteristic.gap.appearance.xml
    if appearance:
        _append(_ADV_TYPE_APPEARANCE, struct.pack("〈h", appearance))

    return payload

def decode_field(payload, adv_type):
    i = 0
    result = []
    while i + 1 〈 len(payload):
        if payload[i + 1] == adv_type:
            result.append(payload[i + 2 : i + payload[i] + 1])
        i += 1 + payload[i]
    return result

def decode_name(payload):
    n = decode_field(payload, _ADV_TYPE_NAME)
    return str(n[0], "utf-8") if n else ""

def decode_services(payload):
    services = []
    for u in decode_field(payload, _ADV_TYPE_UUID16_COMPLETE):
        services.append(bluetooth.UUID(struct.unpack("〈h", u)[0]))
    for u in decode_field(payload, _ADV_TYPE_UUID32_COMPLETE):
        services.append(bluetooth.UUID(struct.unpack("〈d", u)[0]))
    for u in decode_field(payload, _ADV_TYPE_UUID128_COMPLETE):
        services.append(bluetooth.UUID(u))
    return services

def demo():
    ble = bluetooth.BLE()
    temp = BLETemperature(ble)
    counter = 0
    led = Pin('LED', Pin.OUT)
    while True:
        if counter % 10 == 0:
            temp.update_temperature(notify=True, indicate=False)
        led.toggle()
        time.sleep_ms(1000)
        counter += 1

if __name__ == "__main__":
    demo()
4.測定した温度をスマフォに表示
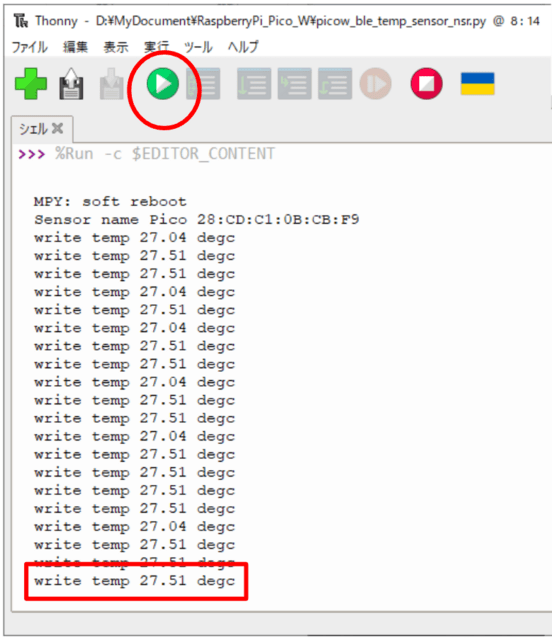
Thonny でプログラムを実行
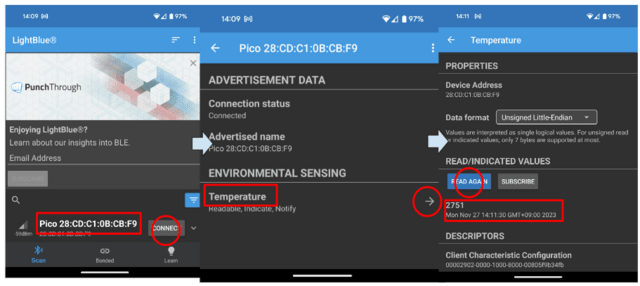
Raspberry Pi Pico W を探して、接続
Temperature を選択
Thonny のシェルと比較して100倍の数値であることを確認
─以上─


