X-431 GDS

Launch X431 GDS , Launch GDS ,X-431 GDS

BMW X5 E53 LCM3 Mileage Correctionn by Pasoft, Xprog, UPA or Digiprog3

2021-01-26 15:39:31 | 日記


Customers Question:


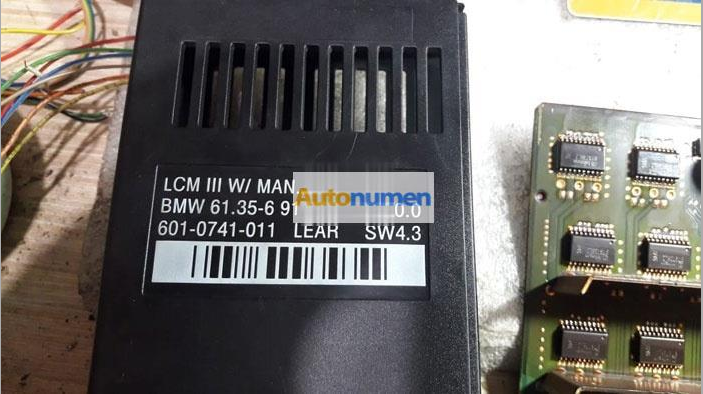
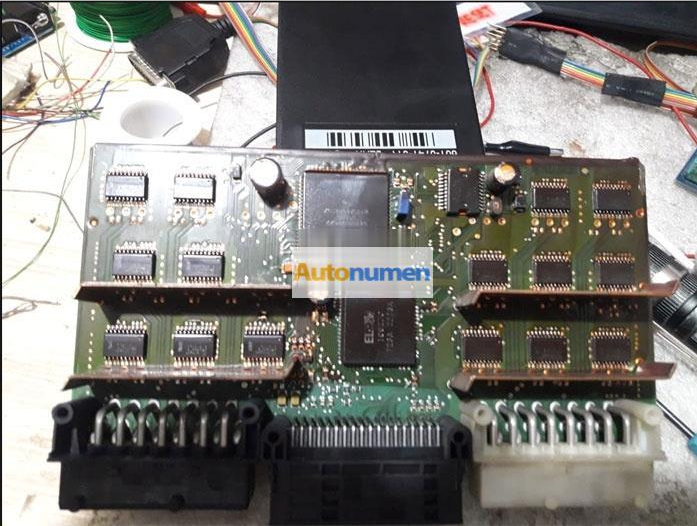
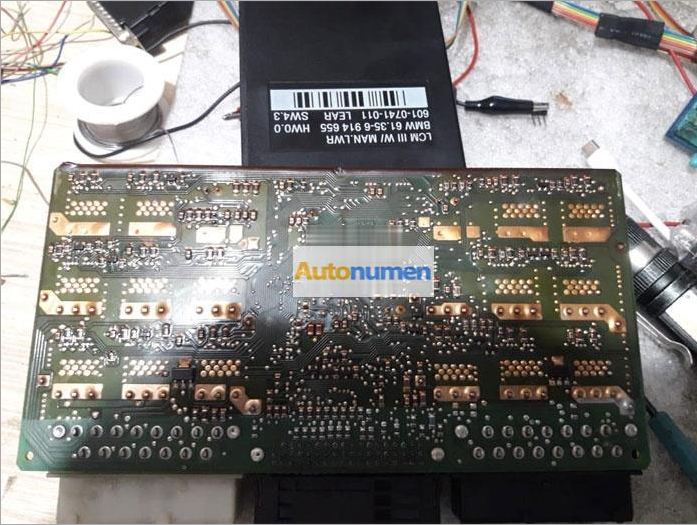
I have a BMW X5 E53 2006 (should be CAS3). Anyone has a pinout for this LCM3 and how to read using Digiprog3 or other device that can read? any suggestions which tool can do the mileage correction of all BMW model 2006 below?
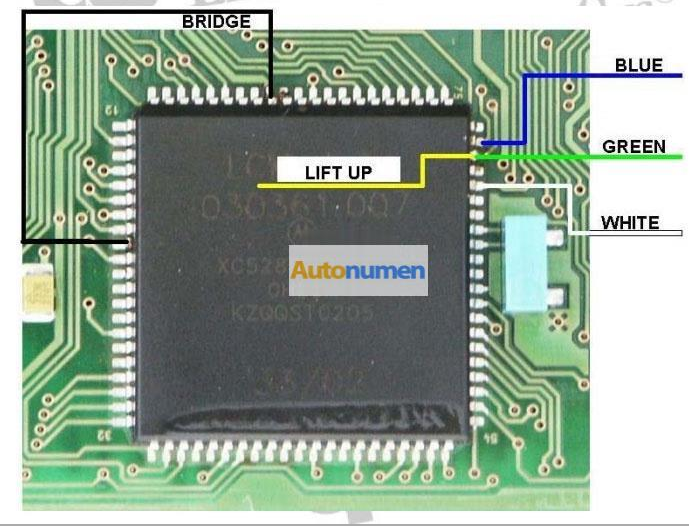
*this LCM MCU is motorola (XC528647CFN4 0H30R)


BMW-X5-E53-LCM3-Mileage-Correctionn-by-Pasoft-Xprog-UPA-or-Digiprog3-1
BMW-X5-E53-LCM3-Mileage-Correctionn-by-Pasoft-Xprog-UPA-or-Digiprog3-2
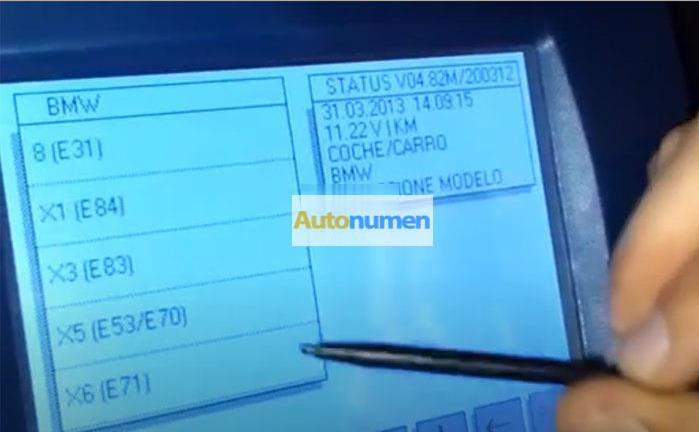
BMW-X5-E53-LCM3-Mileage-Correctionn-by-Pasoft-Xprog-UPA-or-Digiprog3-3


Suggestion:


This version work via OBDII.


MC68HC11PH8(0H30R ), use XProg, UPA, BMW scan ect.


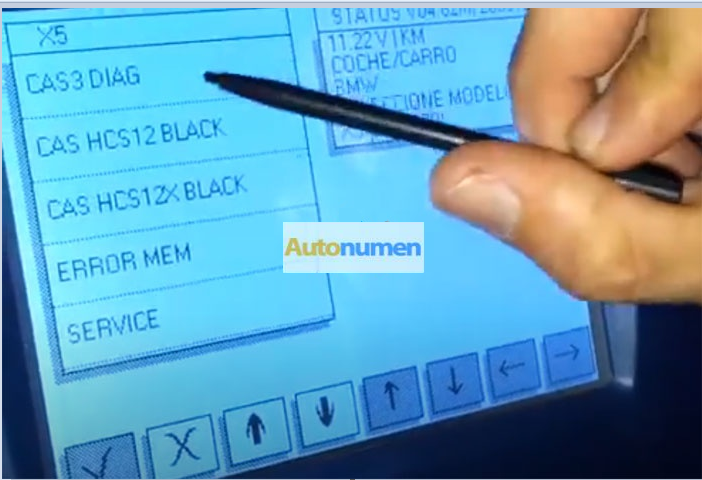
BMW-X5-E53-LCM3-Mileage-Correctionn-by-Pasoft-Xprog-UPA-or-Digiprog3-4
BMW-X5-E53-LCM3-Mileage-Correctionn-by-Pasoft-Xprog-UPA-or-Digiprog3-5


Digiprog 3 will correct mileage on this model via OBDII using standard OBD-16 Plug Digiprog3 BMW X5 E53 1


BMW-X5-E53-LCM3-Mileage-Correctionn-by-Pasoft-Xprog-UPA-or-Digiprog3-6
BMW-X5-E53-LCM3-Mileage-Correctionn-by-Pasoft-Xprog-UPA-or-Digiprog3-7
BMW-X5-E53-LCM3-Mileage-Correctionn-by-Pasoft-Xprog-UPA-or-Digiprog3-8


E53 goes easly with bmw scanner PAsoft.


Requirements


*  BMW Scanner
*  Cluster made in 09/2001 or newer (edit: not 100% sure about this date
cutoff after looking at some NCS Expert files. Might even be as late as
03.5)
*  Some common sense


After studying M and non-M EEPROM files, here’s what I found — there
is a function deliberately designed to increase the speed by a certain
ratio. In the non-M, the displayed speed is the real speed + 5.7%.


So here’s what you do.


1. Start up the PASoft software and load your IKE. Read off the EEPROM.


2. Now, in the built in hex editor, look for the following hex string
(pick the appropriate one for your model). In my cluster, it was
located at offset 0x339 Code:


BMW-X5-E53-LCM3-Mileage-Correctionn-by-Pasoft-Xprog-UPA-or-Digiprog3-9


3. Change it to the following Code:


BMW-X5-E53-LCM3-Mileage-Correctionn-by-Pasoft-Xprog-UPA-or-Digiprog3-10


4. Save the file, and flash the EEPROM back to your cluster.


Done. If you have stock diameter tires, your speedometer should be almost 100% accurate


If you’re curious as to how the change works, the bytes I change are
used as a ratio. 0x25 = 37; 0x23 = 35. 37/35 = 1.057, or a 5.7% error. I
am not sure what the 0xC8 (200) value represents; I think it might be
an upper limit to the allowed error (5.7% until the error reaches 20
km/h). That last byte is simply a checksum (XOR all the values together,
and then XOR with 1)


If you have a 99-01 cluster, please send me your EEPROM. I can’t
promise I’ll figure out how to do the change there, but I’ll try. Also,
if there are any Japanese fanatics here, please send me a dump of your
cluster. In the E39, the Japanese values for the cluster are 100%
accurate; I suspect the same holds true for the E46. It would be
interesting to see how BMW configured the cluster.


How to connect BMW ENET Cable with BMW ISTA Rheingold

2021-01-26 15:36:53 | 日記

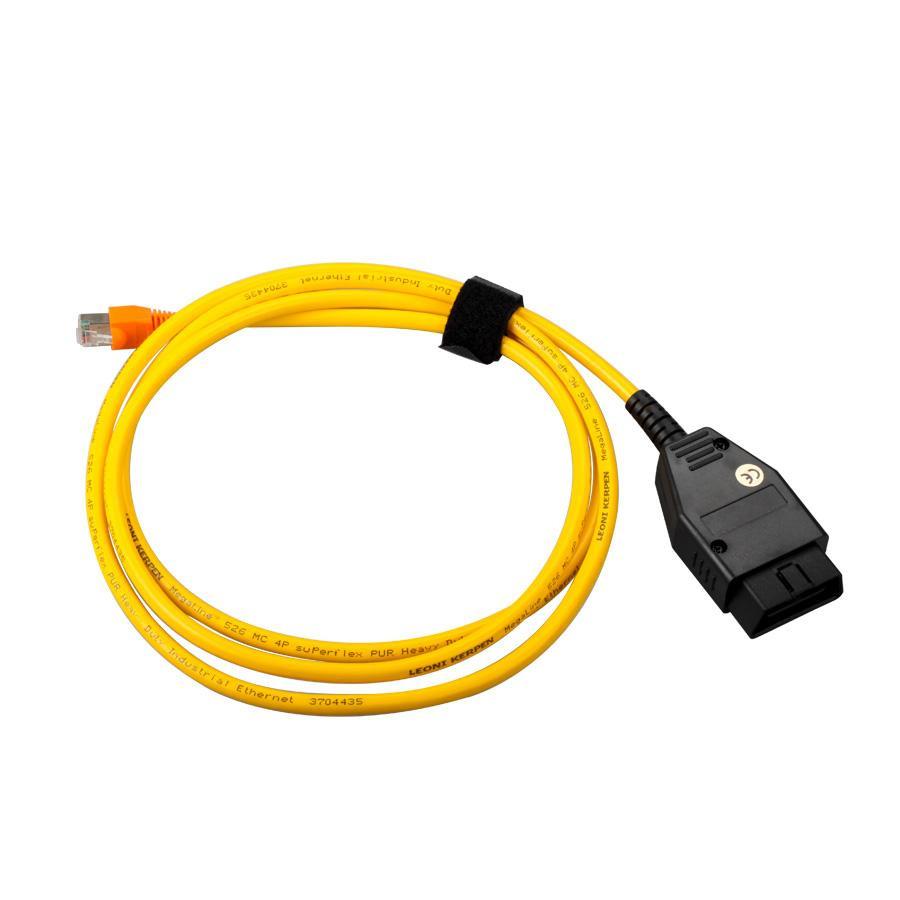
Here is a guide to show you how correctly connect and set up BMW ENET Cable with BMW ISTA Rheingold software! It is the first step to use this cheap BMW F Series coding cable instead of BMW ICOM!


And here is a collection about BMW Coding/Programming,check it here:BMW Coding/Programming
How-to-connect-BMW-ENET-Cable-with-BMW-ISTA-Rheingold-1 (2)


Step 1


Connect your laptop/PC with vehicle using the ENET cable.


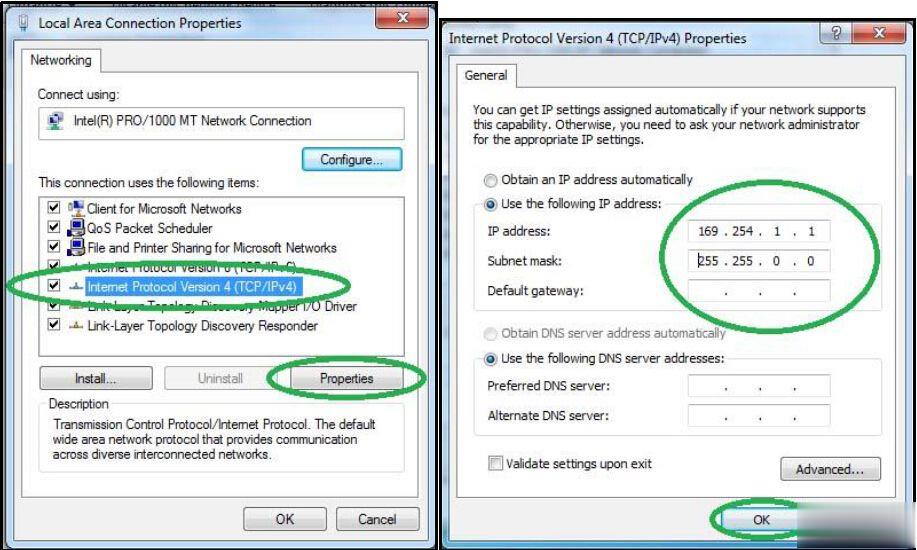
After that, go to Control Panel→ Network and Internet→ Network Connections.


Select the Ethernet that is connected to the vehicle and open the Properties screen.


Select Internet Protocol Version 4 (TCP / IP) and click the Properties button.


Enter 169.254.1.1 for the IP address and 255.255.0.0 for the subnet mask then press the OK button.


How-to-connect-BMW-ENET-Cable-with-BMW-ISTA-Rheingold-2 (2)
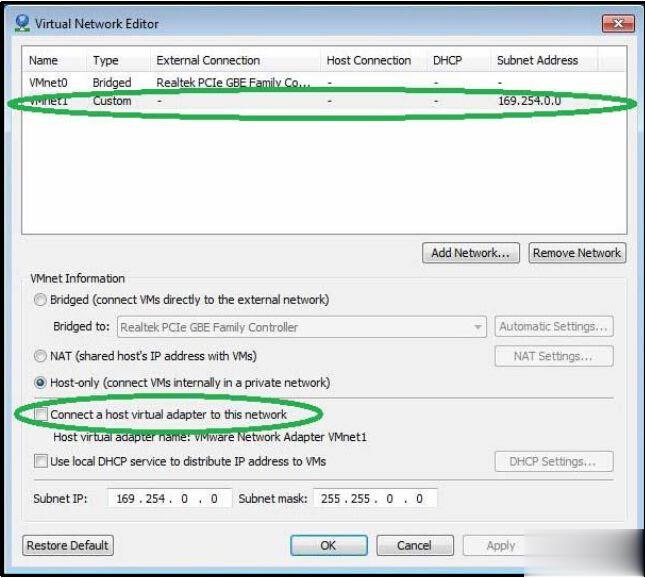
Or if you install ISTA in VMWare, try this way:


Open Virtual Network Editor and disconnect form the host all adapters with Subnet Address 169.254.0.0. Uncheck the box “Connect a host virtual adapter to this network”.


How-to-connect-BMW-ENET-Cable-with-BMW-ISTA-Rheingold-3 (2)


Step 2


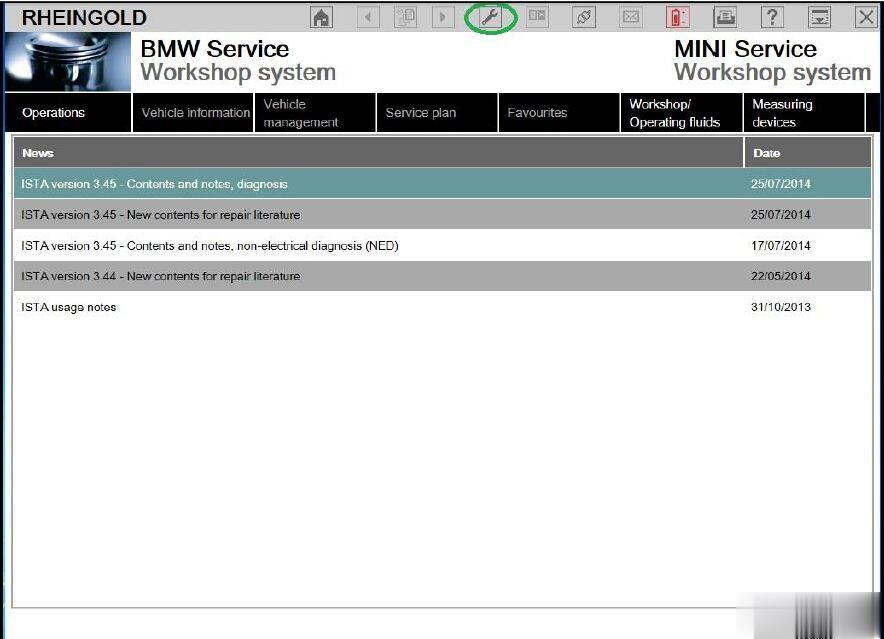
Turn on car ignition and run BMW ISTA Rheingold.


Click the Setting button as below:


How-to-connect-BMW-ENET-Cable-with-BMW-ISTA-Rheingold-4 (2)


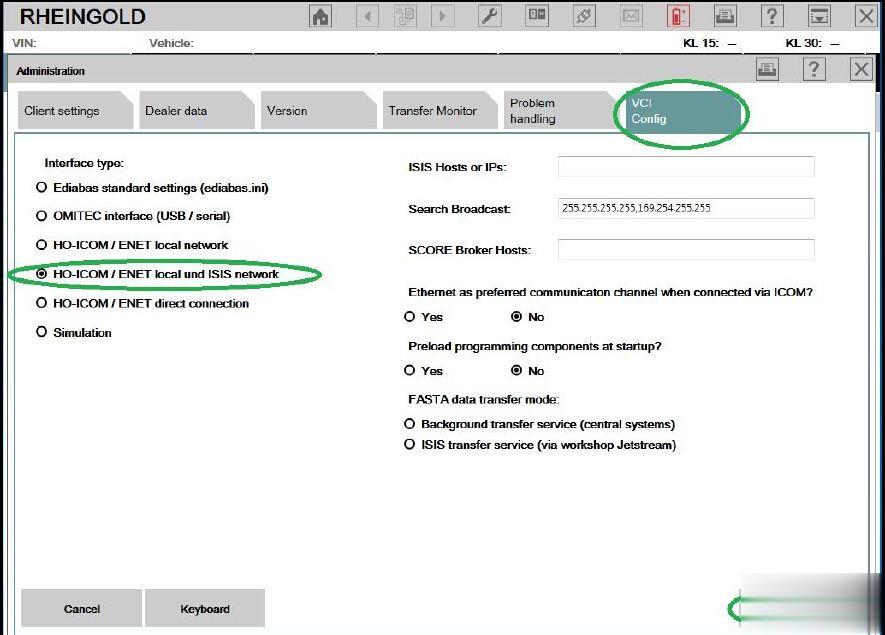
Select “VCI Config” tab and “HO-ICOM ENET local and ISIS network” option, click the OK button.


How-to-connect-BMW-ENET-Cable-with-BMW-ISTA-Rheingold-5 (2)


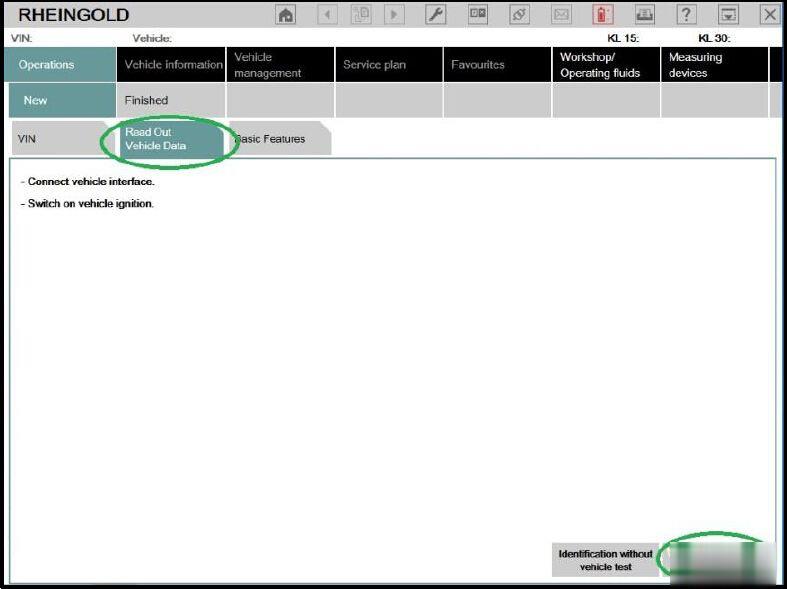
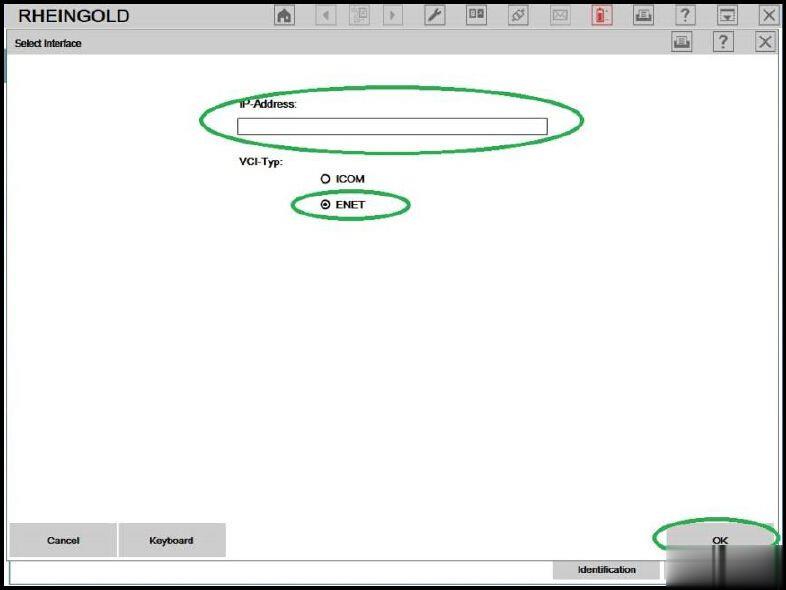
Back to main menu and click the Operations button. Select “Read out Vehicle Data” tab and click “Complete Identification”.


How-to-connect-BMW-ENET-Cable-with-BMW-ISTA-Rheingold-6 (2)


Step 3


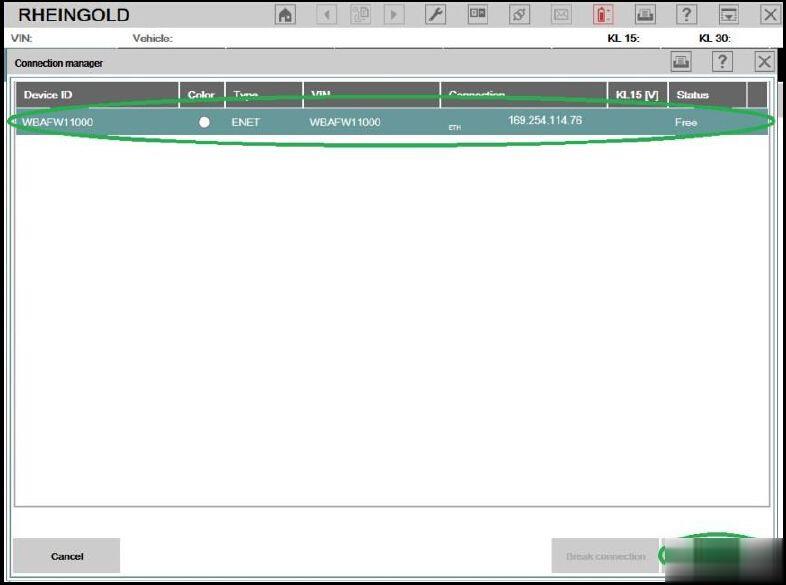
Select your ENET connection from the list and click “Set up connection”.


How-to-connect-BMW-ENET-Cable-with-BMW-ISTA-Rheingold-7 (2)


And just wait the vehicle identification process complete!


How-to-connect-BMW-ENET-Cable-with-BMW-ISTA-Rheingold-8 (2)


Or here is another alternative way after you click the Setting button and select “VCI Config” tab:


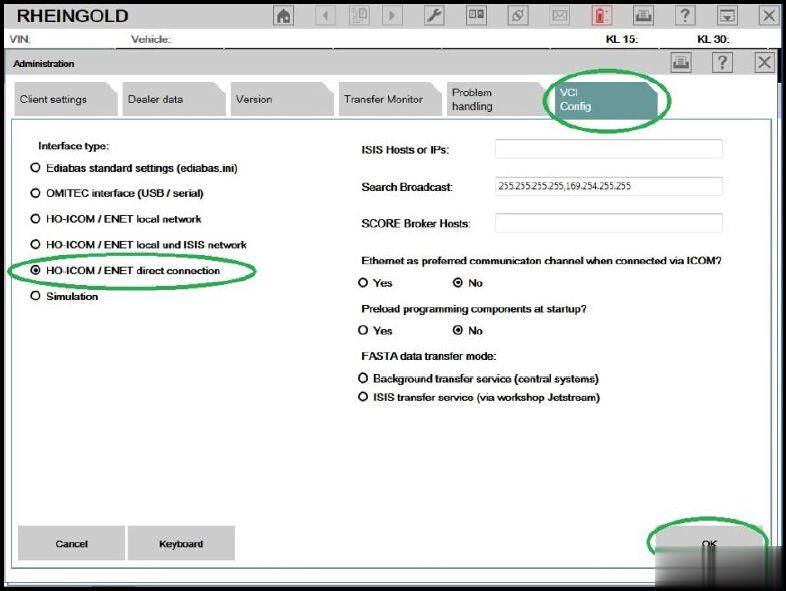
Choose “HO-ICOM ENET direct connection” option and set ENET mode with empty IP-Address.


How-to-connect-BMW-ENET-Cable-with-BMW-ISTA-Rheingold-9 (2)
How-to-connect-BMW-ENET-Cable-with-BMW-ISTA-Rheingold-10 (2)


That’s all about how to set up BMW ENET cable with BMW ISTA. This guide is tested OK but not responsible for any potential lose or damage!


OBDSTAR X300 Pro4 vsX300 DP Plus OBDSTAR Key Programmer Buying Guide

2021-01-04 21:19:17 | 日記
OBDSTAR X300 Pro4 is auto key programmer dedicated key programmer only, covers same immo function as OBDSTAR X300 DP Plus. Supports free update online one year while OBDSTAR X300 DP Plus not only support immo functions but also cluster calibration, ECU clone/programming, oil service reset ect. if you are a locksmith, X300 Pro4 will be a perfect choice for you at reasionalble price.
OBDSTAR X300 Pro4 vs OBDSTAR X300 DP Plus

Conclusion:

x300 pro4 is only for locksmith, covers functions below:
– Program keys for all makes, except Lamborghini/Maserati/Ferrari/Bentley/Alfa Romeo/Abarth.
– Erase keys
– Program remote
– Read Key Number
– Read pincode
– Read EEPROM Chip

obdstar x300 pro4 IMMO vehicle coverage, check here
x300 pro4 doesn’t support:
OBDII diagnosis
Mileage programming
ECU clone and ECU programming
Special functions

Besides, from the outlook / specification, obdstar x300 pro4 is the lite version of OBDSTAR DP PLUS.
x300 pro4 comes with smaller LCD, owns the same Android5.1.1 operation system and Wifi function etc.
In one word, x300 pro4 is a dedicated key programmer, it must be much cheaper than DP Plus.
you may be interested in x300 pro3 software update

Nissan Consult 3 Plus Data Monitor Recording Function

2021-01-04 21:19:17 | 日記

This article show a guide on how to use Nissan Consult 3 Plus to perform data monitor recording function to record engine ECU data.Hope it is helpful to your work,and if you want to know more about Nissan Consult 3 Plus,check:Nissan Consult 3 Plus Projects.


Related Contents:


Nissan Consult 3 Plus Software Download
How to Install Nissan Consult 3 III Plus Diagnostic Software
How to choose a decent auto diagnostic tool to reprogram Nissan


Procedures:


1.Recording Data:


From the “All DTC” screen, select the system you need to monitor operational data from.


-In this example we will be looking at the Engine ECU.
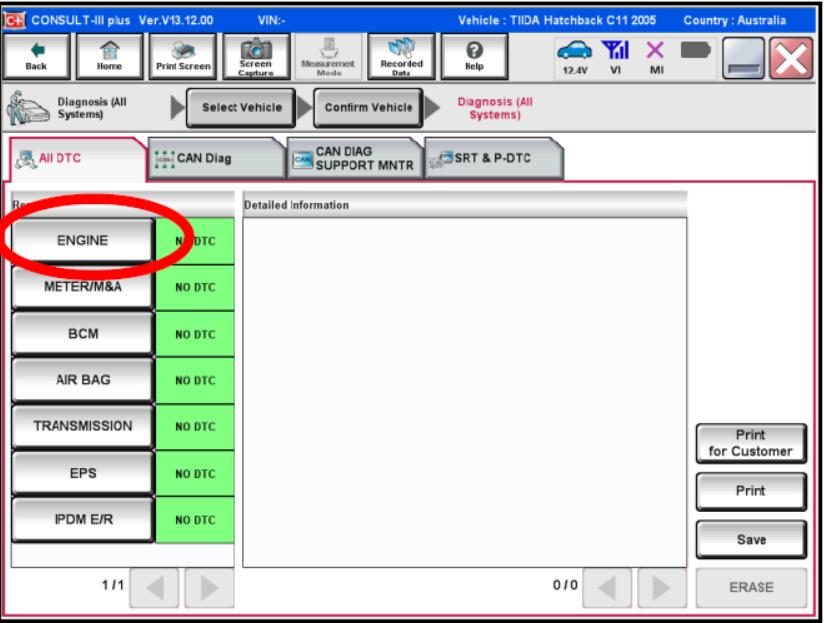

Nissan-Consult-3-Plus-Data-Monitor-Recording-Function-1


2.From the “Self Diagnostic Result” screen, select the “Data Monitor”tab.
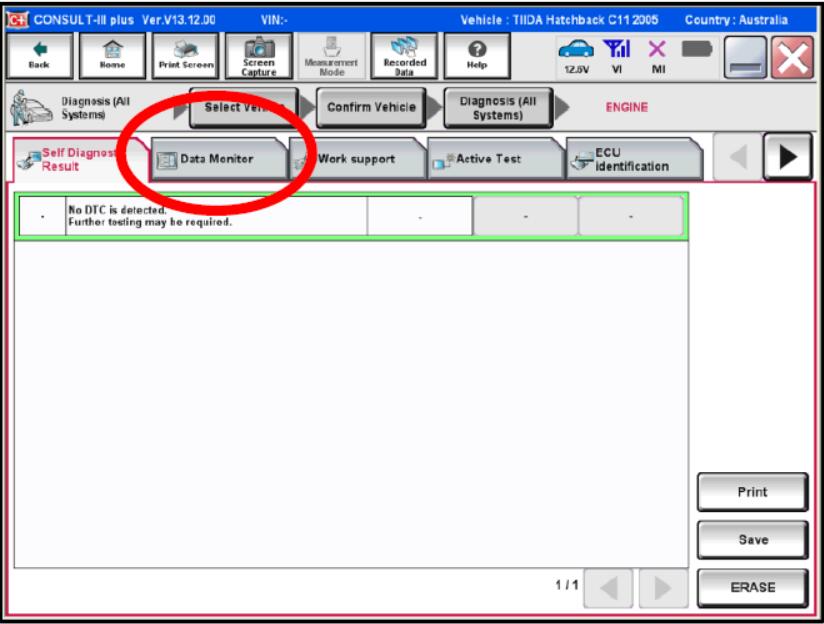

Nissan-Consult-3-Plus-Data-Monitor-Recording-Function-2


3.Selecting Data:


(i) Clear the pre selected Main Signals items by touching “Clear Monitor Item”.


(ii) Highlight the desired items from the list on the screen. Select these examples:


ENG SPEED
MAS A/F SE-B1
BATTERY VOLT
ACCEL SEN 1
T P SEN 1
START SIGNAL
INJ PULSE B1
IGN TIMING
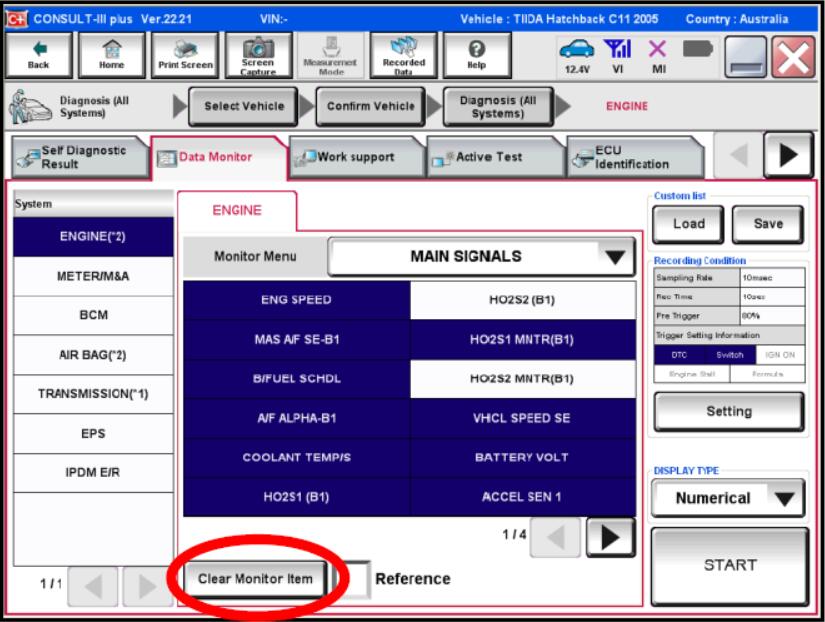

Nissan-Consult-3-Plus-Data-Monitor-Recording-Function-3


4.Setting Recording Parameters:


In some cases, the default settings may be all that are required.(i) Touch the “Setting”tab (circled right).
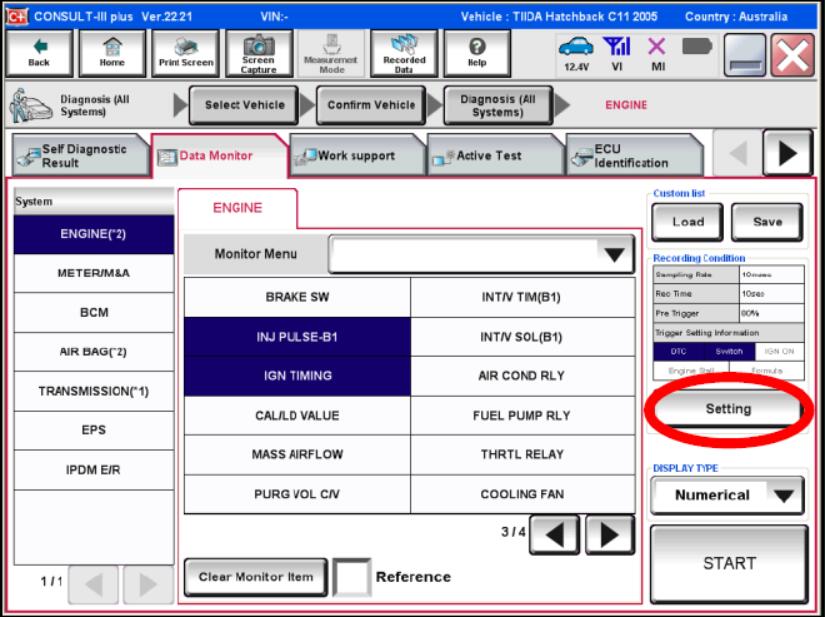

Nissan-Consult-3-Plus-Data-Monitor-Recording-Function-4


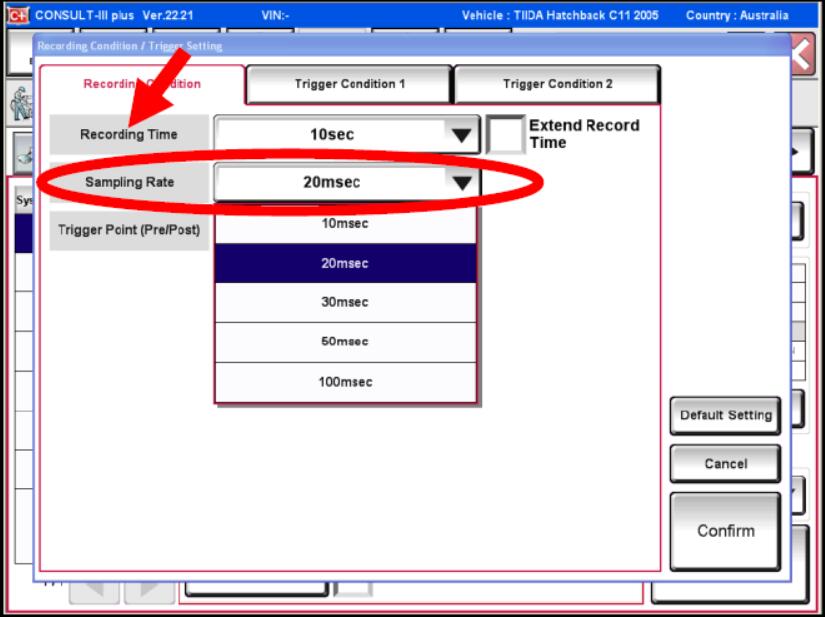
(ii) Sampling Rate:Slow down the “Sampling Rate” from every 10ms to every 20ms.This can be done by selecting the drop down icon. (circled). (iii) Recording Time:There maybe cases where the recording time needs to be extended beyond the 10 sec. default.For this exercise, set the “Recording Time”to 20 seconds(arrow at right) so as not to make the graphs too large.

Nissan-Consult-3-Plus-Data-Monitor-Recording-Function-5


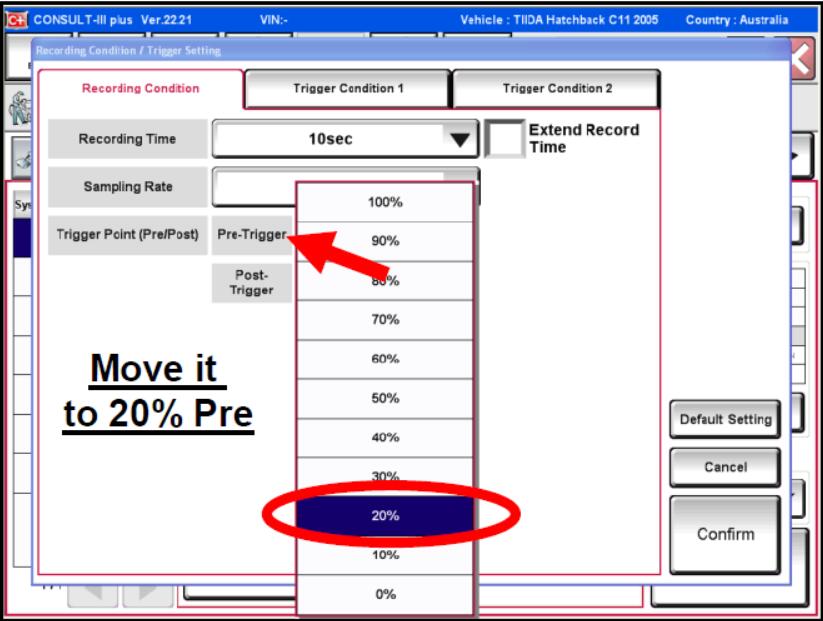
(iv) Trigger Point:Adjust the “Trigger Point” (arrow at right). Move it to 20% Preand 80% Post (circled).
Nissan-Consult-3-Plus-Data-Monitor-Recording-Function-6


5.Setting Trigger Conditions:


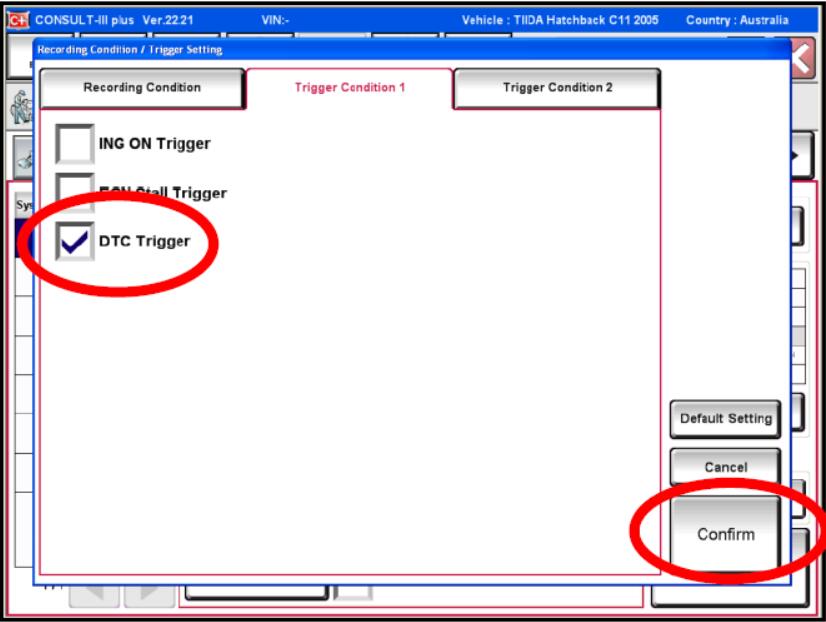
(i) Select the second tab “Trigger Condition 1”.This provides access to trigger condition settings.Un-select the “DTC Trigger”box if the ECM has a permanent DTC in it. Otherwise, the recording will start automatically as soon as a DTC is detected.


(ii) Select “Confirm” on the bottom right of the screen.

Nissan-Consult-3-Plus-Data-Monitor-Recording-Function-7 Nissan-Consult-3-Plus-Data-Monitor-Recording-Function-8


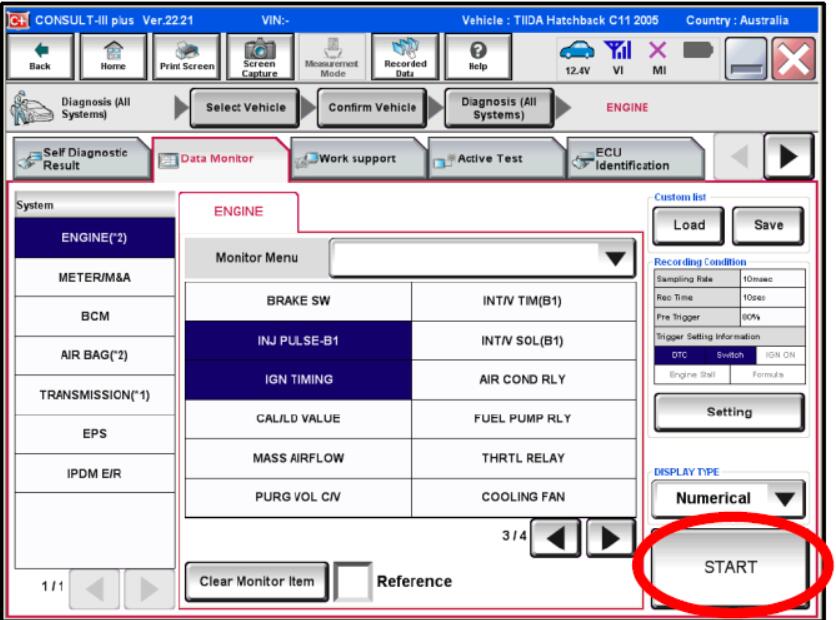
(iii) Touch “Start” once the screen returns to the“Monitor Menu” screen.

Nissan-Consult-3-Plus-Data-Monitor-Recording-Function-9


6.Data Recording outline:


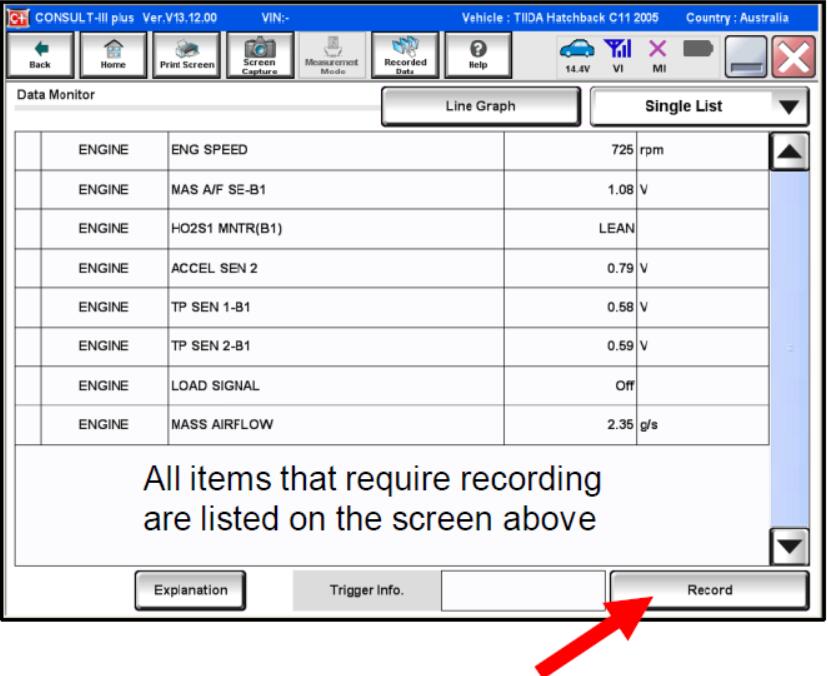
The recording activityis basically as follows;(i) Touch record.(ii) Immediately start Engine & allow to idle for 2 seconds max.(iii) Race engine twice & allow to idle again until the end of recording.The above must be carried out as quickly as possible in order to maximise the recorded data on the graphs.


Nissan-Consult-3-Plus-Data-Monitor-Recording-Function-10


7.Start the Recording:


(i)Once prepared, touch “RECORD”on the bottom right of the screen to capture the activity of the engine as described above in step #6.Watch the recording time bar graph (circled at right). Recording stops at 100%.


Nissan Consult 3 Plus Data Monitor Recording Function (10)


NOTE:


DO NOT PRESS THE “Stop” BUTTON DURING THE RECORDING OR THE DATA WILL BE LOST.


Nissan-Consult-3-Plus-Data-Monitor-Recording-Function-11


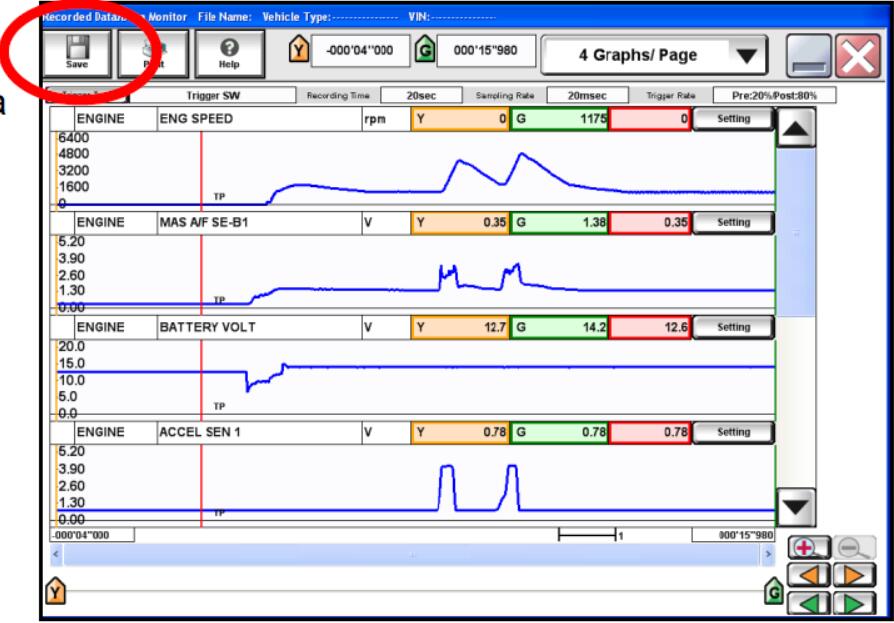
(ii) Once the recording has stopped, the graph of data is automatically displayed.


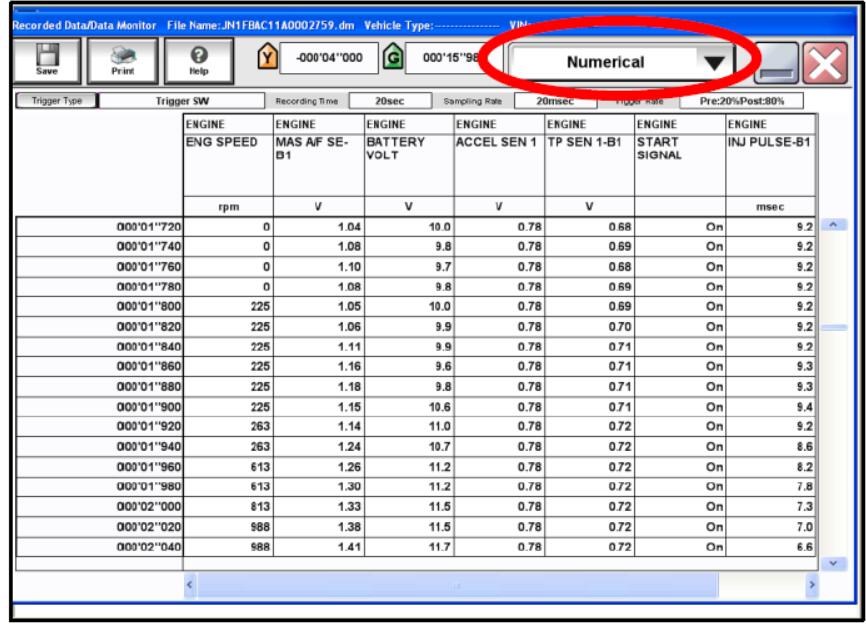
Data can be viewed as required in either graphical or numerical form.


8.Saving the Recording:


The recorded file should now be saved so it is not accidently lost before it can be reviewed in detail.


(i)Select the “Save” button (circled) at the top left of the screen.

Nissan-Consult-3-Plus-Data-Monitor-Recording-Function-12


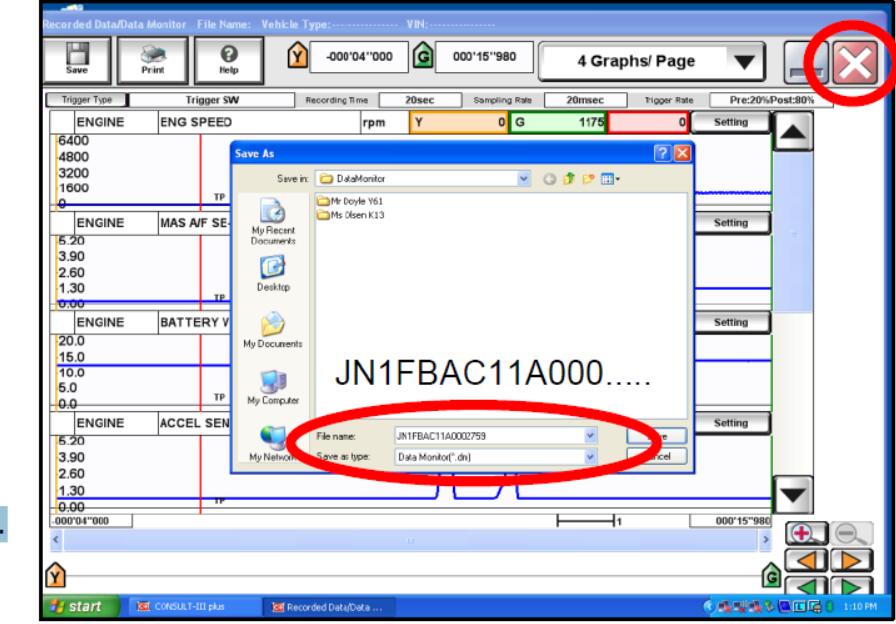
(ii) This opens the “Data Monitor” dialogue box. Enter the vehicle’s VIN as the “File name” to make the file easy to find later.


The file is now safely stored on the Toughbook in the CONSULT-III plus “Data Folders”.


(iii) Close the recording by selecting the red “X” Close button at the top right of the screen (circled at top right).

Nissan-Consult-3-Plus-Data-Monitor-Recording-Function-13


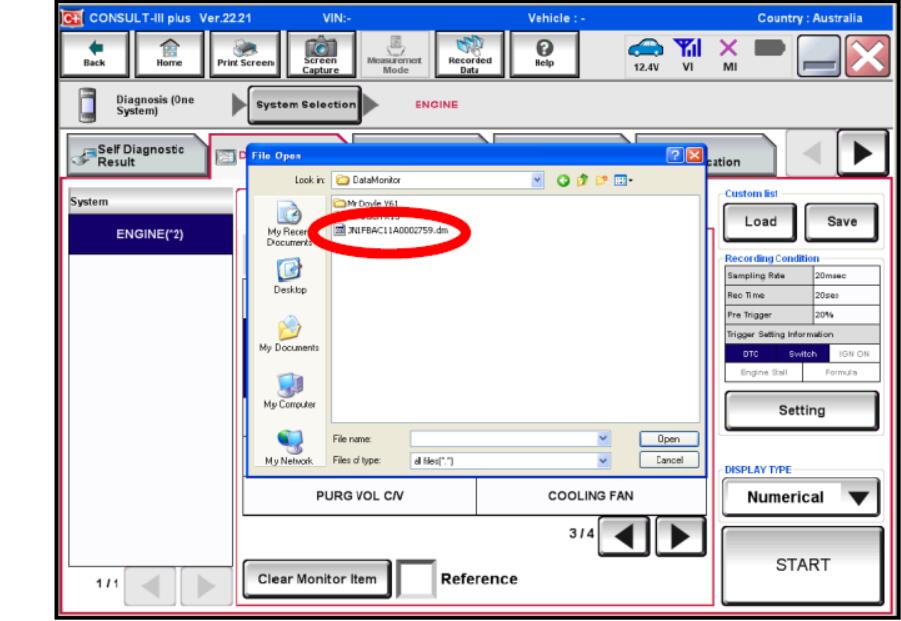
9.Accessing and Reviewing Recorded Data:


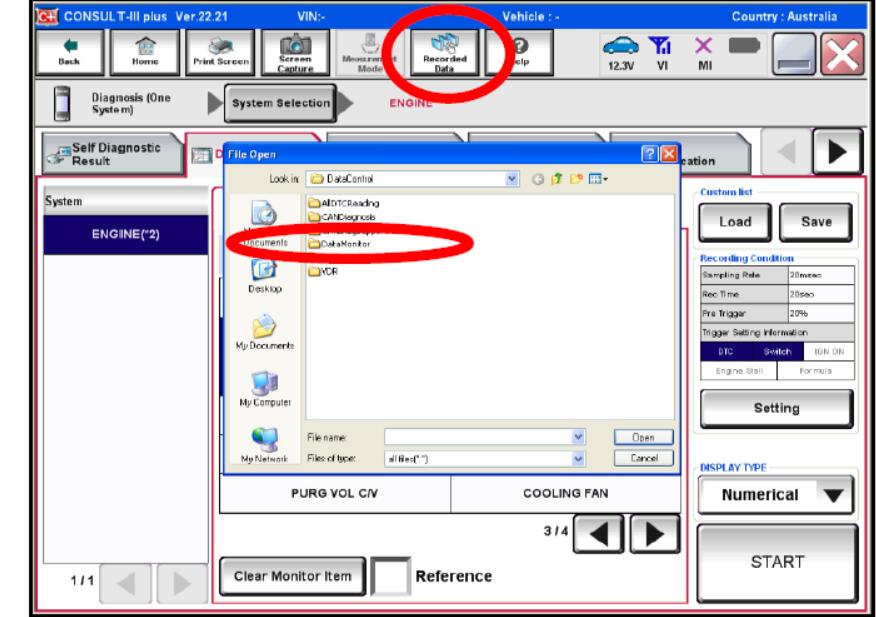
(i) Click on the “Recorded Data” icon at the top of the screen (circled).


(ii) Since this is a Data Monitor recording, select the “DataMonitor” folder.

Nissan-Consult-3-Plus-Data-Monitor-Recording-Function-14


(iii) Select and Open the previously saved file (JN1FBAC11A000…..).

Nissan-Consult-3-Plus-Data-Monitor-Recording-Function-15


10.Reviewing Data File:


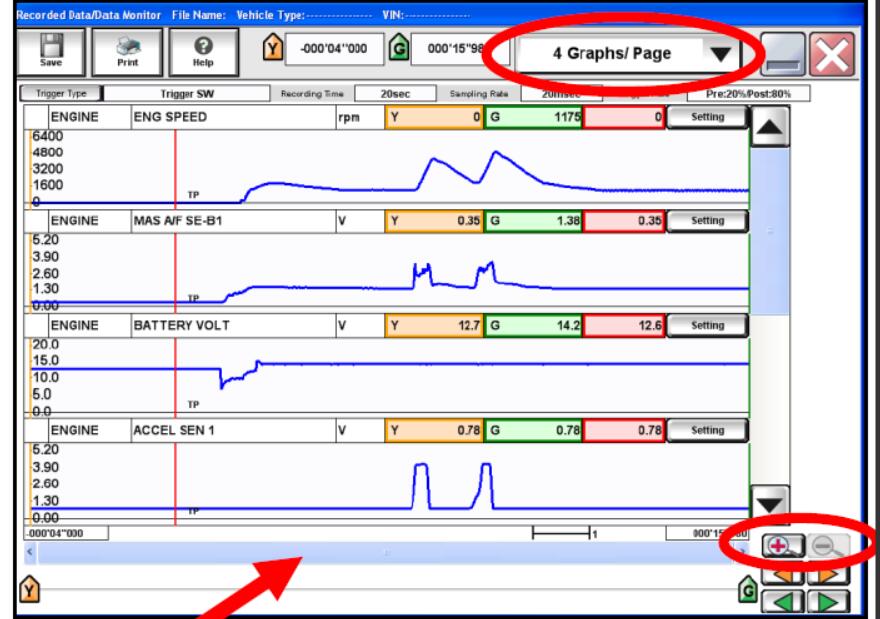
The file can be displayed in graphical or numerical formats as required.


(i) In graphical display, one graph can be “dragged” from its current position in the screen order to be located alongside any other signal for a direct comparison.


(ii) If so desired, you can compress more data into the same field. Select the “+” or “-” symbol (circled).

Nissan-Consult-3-Plus-Data-Monitor-Recording-Function-16


(iii) It‟s possible to slide the data back in time to catch activity well before “RECORD” was touched (represented by vertical red line near left of screen).


Use the bottom blue slider tab on the screen to do so (arrowed).

Nissan-Consult-3-Plus-Data-Monitor-Recording-Function-17


11.Sending Recorded Files to TechLine:


Once a recording has been saved, it can be readily accessed and attached to a TechLine Contact.


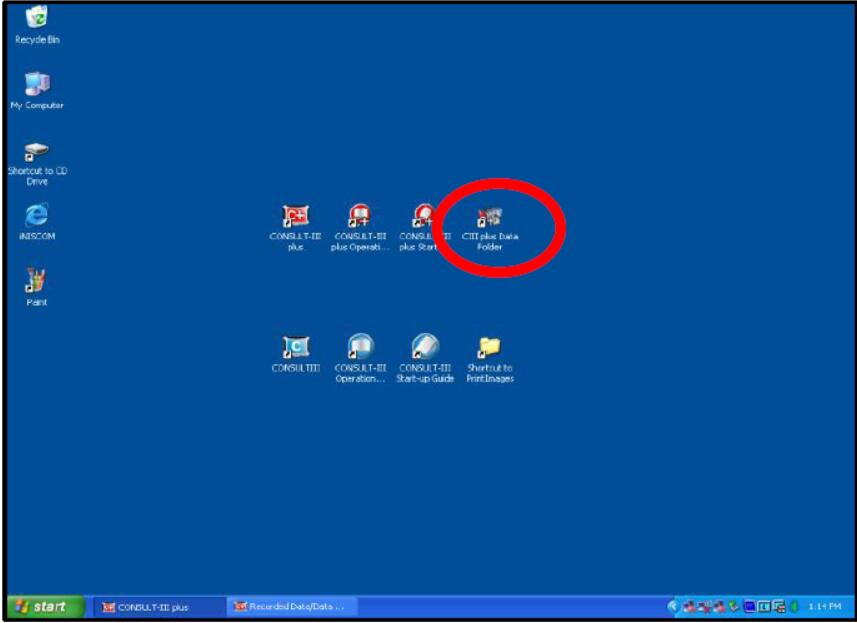
(i) Minimise CONSULT and click on the “CIII plus Data Folder” icon on the desktop.


Nissan-Consult-3-Plus-Data-Monitor-Recording-Function-17 Nissan-Consult-3-Plus-Data-Monitor-Recording-Function-18


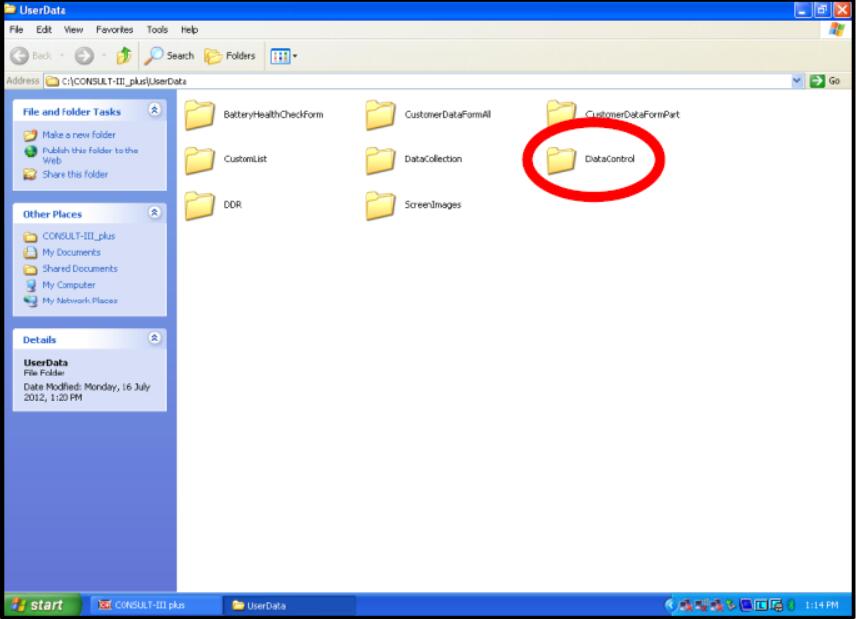
These files are saved in a specific folder within the CONSULT application files:


C:\CONSULT-III_plus\UserData\DataControl\DataMonitor


(ii) Select the “DataControl” folder.

Nissan-Consult-3-Plus-Data-Monitor-Recording-Function-19


This is where all saved data of any kind is located.


(iii) Select the “Data Monitor” folder.


Since you were using Data Monitor, it is in this folder that your saved file will be stored.
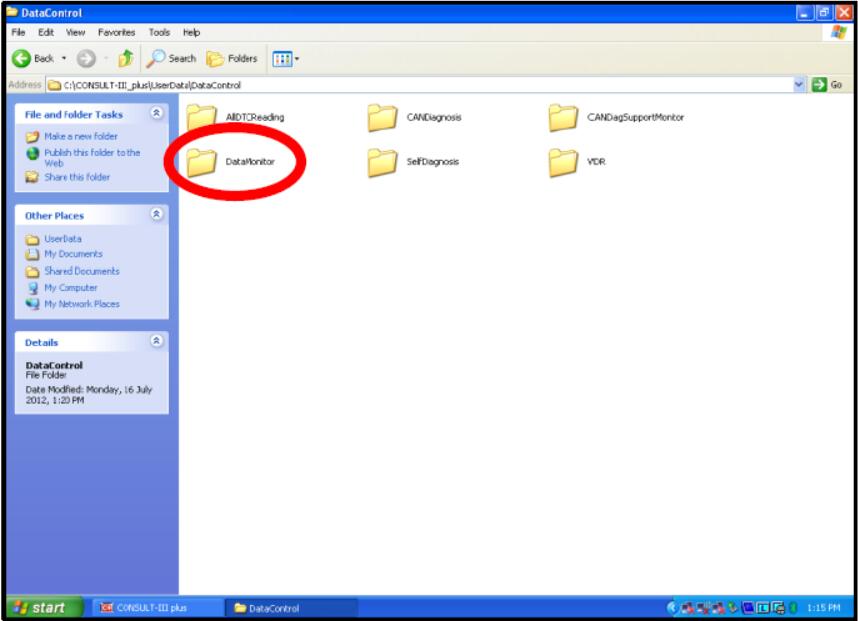

Nissan-Consult-3-Plus-Data-Monitor-Recording-Function-20


(iv) Your recorded file identified by the VIN is found.
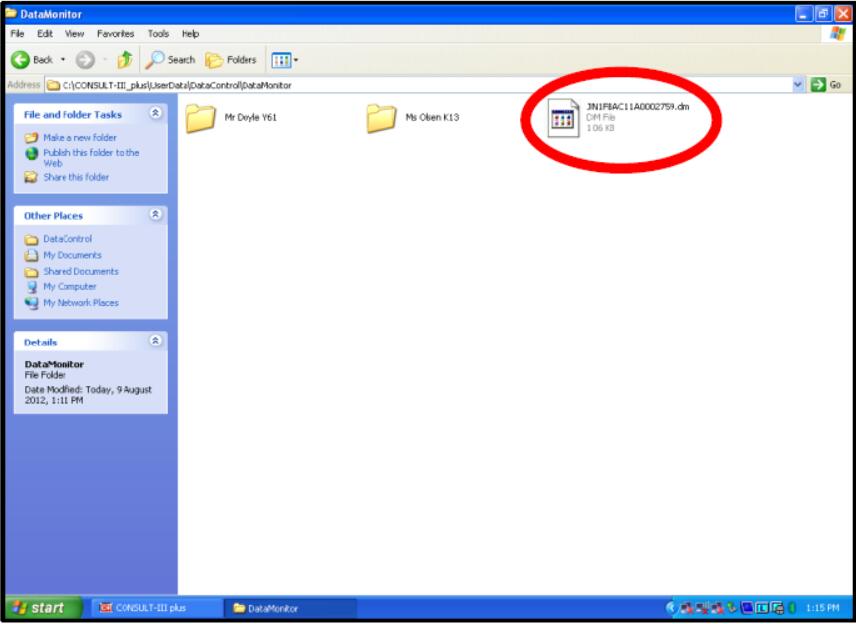

Nissan-Consult-3-Plus-Data-Monitor-Recording-Function-21


NOTE: Since this is a CONSULT embedded “DM” file, it cannot be opened outside of CONSULT-III plus.Simply attach this file to your TechLine contact.It is important that the VIN is used as the file name to enable easy identification and access in the future.If there is more than one file, it will help TechLine if they are identified by the same VIN with an alphabetical suffix, i.e.


JN1FBAC11A0001234_A
JN1FBAC11A0001234_B
JN1FBAC11A0001234_C … etc