X-431 GDS

Launch X431 GDS , Launch GDS ,X-431 GDS

2015 Chrysler 200 Fobik All Keys Lost Done by Micropod 2 clone

2019-01-25 19:34:54 | 日記


Confirmed! Chrysler wiTech MicroPod 2 clone is able to do online programming to Chrysler including ECU programming and key adding even when all keys are lost. Here you go.


Purpose: Micropod 2 clone programs new key fobik to Chrysler 200 when all keys are lost


Car: 2015 Chrysler 200 (The 2015 Chrysler 200, along with other Fiat-based models like the Jeep Renegade, Jeep Cherokee, and Ram Promaster, are all equipped with a rolling PIN Code.)


What you need:
Locksmith Identification Number (LSID through NASTF)
Proper keys to be programmed
PIN Code
Laptop
MicroPOD II good quality clone or the genuine
wiTECH diagnostic application


Before you begin the programming process, you should the Key Code (key cut code) and Authorized PIN (key programming).


VERY VERY VERY IMPORTANT:
You must be online to program the key with Micropod 2 clone.
You can pull the PIN Code with OBDSTAR F104 key tool.
If you input the wrong code for 3 times, it locks the BCM and you cannot service the vehicle for 24 hours.
The key is one-time programmable. Once married to the vehicle it is locked to the car forever. The key can be erased from the car and put back into the same car, but can’t be switched to another car.
The placement of the key during initialization is important. It needs to be placed either behind the shifter or in the center console.


Step 1:
Plug the MicroPOD II adapter into the OBD port and connect the USB cable from the device to your laptop. This wakes the BUS on the car.


Step 2:


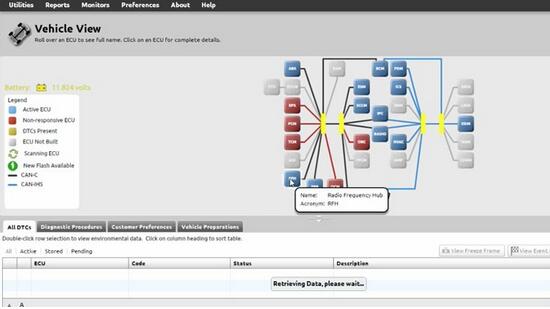
MicroPOD-2-all-keys-losy-1


Manually enter the VIN of the vehicle. This gives you access to the module list. Select the RFH (Radio Frequency Hub) module. This is the module where the key is registered.


Step 3:


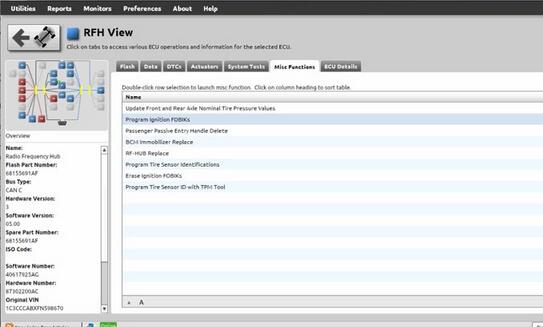
MicroPOD-2-all-keys-losy-2


Next select “Miscellaneous Functions,” then “Program Ignition Fobiks.” At this point, you are prompted to enter the VIN again, followed by the four-digit PIN Code.


Step 4:


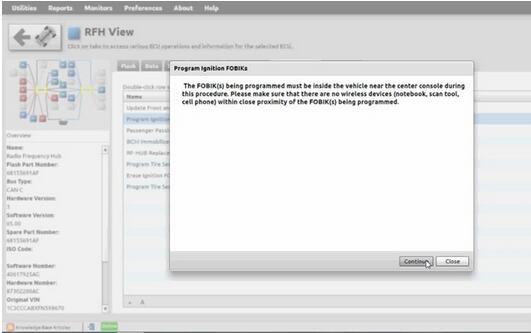
MicroPOD-2-all-keys-losy-3


After the four-digit pin is entered you are prompted to hit continue to “Program Ignition FOBIK.” Once you hit continue you must press the UNLOCK button on the FOBIK within 30 seconds (the FOBIK needs to be located near the center console during this procedure).


Step 5:


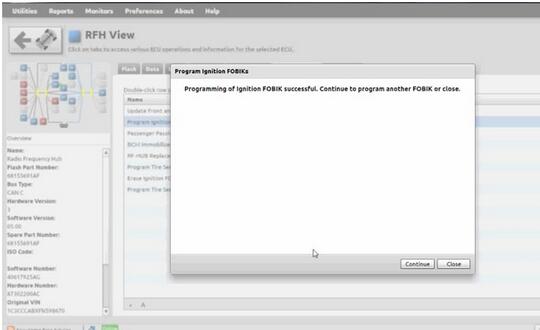
MicroPOD-2-all-keys-losy-4


Programming of the Ignition FOBIK is now successful. The new key key is accepted into the car, and the ignition will now turn on and start the car. At this point, you also have the option to program a second key with wiTech application.


BMW E-sys Software Function for BMW Features

2019-01-25 19:29:24 | 日記


What is BMW E-sys?


BMW E-sys is a BMW coding software application distributed by BMW
Group for BMW F series coding.And with BMW E-sys software you can active
or disable the BMW features by yourself.


BMW E-sys Software Function for BMW Features:


1.Lock unlock sound confirmation


2.Can operate the navigation menu including watching dvd when driving


3.Display engine output and torque meter ( purely fun, look engine output )


4.Cancel confirmation screen big screen boot delay


5.Open the voice recognition function


6.Three kind of bluetooth phone ringtones ( personality only )


7.Increasing the cic memory address to 50


8.The glass automatically rise to the top process is not terminated by the car door


9.The digital speed display ( fun only )


10.Air-conditioned memory of the last off state


11.Indoor cycling memories of the last time the state when engine off


……


More coding feature for BMW,please check:


Do you know 25 kinds of DIY BMW Coding by BMW E-SYS?


BMW E-sys Support BMW Vehicle List:


BMW F series , the new 1 Series, 3 Series, 5 Series, 7 Series , GT, X3


BMW E-sys Compatible Interface:


BMW ENET (Ethernet to OBD) Interface (Recommend)


BMW ICOM A2


BMW ICOM Next


Note:BMW ICOM A2 and BMW ICOM NEXT is a dealer level diagnostic tool
for BMW group,it can not only run BMW E-sys,but also for other BMW
diagnostic tool:BMW ISTA,WinKFP,Expert,BMW Diagnostic Tool….And
if you just a BMW user and DIY for BMW hidden feature,here recommend to
get BMW ENET,and for enthusiast DIYers,check this article to make a BMW
ENET cable by yourself:How Build a BMW ENET Coding Cable by Yourself


BMW E-sys vs BMW Carly vs BimmerCode


BMW Esys vs Carly vs BimmerCode


Esys vs Carly


Carly: not for coding; E sys: coding success


I have been using Carly on my F30 for over a year, but not for
coding, as that’s still not supported on Android. Carly can read and
clear diagnostic codes and a host of other things that E-Sys isn’t meant
to do. I recommend going to their website and checking on its
capabilities there. From what they’ve told me, their F-chassis coding
will probably be limited to the KOMBI module (dashboard items), but it
may expand to include HU-ENTRY/CIC/NBT/NBT2 and FEM_BODY in the future.


It’s a simple connect (via their BT adapter), read coding data,
select features to activate or deactivate (or change values), then push
back into the module. Same as E-Sys but with a much more simplified
interface. It allows you to save the module coding data as a backup,
just like E-Sys. It worked great for coding on E-chassis cars, so I’m
hoping it will be the same for F-Chassis, although they’ve had quite a
bit of time to get things working and so far, coding with Android still
isn’t fully tested yet. I’ve since used E-Sys for coding my F30 and the
wife’s F23.


BMW E-Sys works better than Carly app in Fxx coding


I used Carly for my wife’s previous E88 128 convertible and it worked
great – no having to do one item at a time, etc. Not quite sure what
the problem is with the F-cars, because the principle is the same – read
coding data, modify, write coding data. Apparently the new “network”
and whatever read/write protocol that implies is far different than the
CANbus of the E-series cars.


By comparison, E-Sys has improved vastly over the past year or two
and coding both my F30 and the wife’s new F23 was relatively easy,
particularly since you can save the coding data, disconnect, take the
computer inside to do the modifications on a copy of the saved data,
then reconnect and push the data back using the modified file. No more
sitting in the car searching for the feature to be coded while the
engine’s idling.


Carly adapter– Bluetooth; E sys ENET cable– Ethernet to OBD


Actually, the Carly adapter is Bluetooth. E-Sys looks for a
connection via the ethernet port on your laptop. It won’t recognize BT
at all – at least, I’ve not been able to make it do so. If your laptop
doesn’t have an ethernet/RJ45 connector, you’ll need to find a device
that does. Pretty sure that you can’t use a USB-to-ethernet adapter,
either.


BimmerCode vs Esys


Bimmercode plus vgate = £50 (roughly)
E-sys + pro launcher = $50 for 2.5 years


BimmerCode for quick convenience
ESys for fully featured use.


PSdZData is for use with E_Sys, which is for F/G/I Series cars only.
For E-Series cars, the tools are all different, different software, and
different cable.


BMW E-sys Coding for BMW Tutorial:


How to do BMW F15 X5 FDL Coding by E-Sys and ENET Cable?


BMW VO Coding steps with E-Sys and ENET Cable


How to program BMW F series FA via E-SYS?


E-sys software code KOMBI to build 6WB in BMW F10 2010


BMW Coding Tool E-SYS Errors and Solutions


E-sys ENET cable coding LED head lamps off to 2015 F80


BMW E-sys ENET Cable Reflash ZGM(solved)


BMW F30 F31 variable changes using E-sys


E-sys 3.26.1 Disable the BMW F10 LED Sidemarkers


BMW Fxx-Ixx-Gxx-series Coding Guides, Tips, & Cheat Sheets


BMW E-sys Installation Operation System Requirement:


Processor: Pentium 4-Techner with minimum 1GHz clock frequency


RAM: at least 512MB


Hardware interface: (CAN / FD, Ethernet, …)


Java version (secured with): 1.8.0.121 64 bit


Operating system: Windows 7 64 bit


Driver for HW interfaces: see ProDiaS Release notes


BMW E-sys 3.33.0 Release notes:


Version:
E-sys 3.33.0
Psdz 5.07.01
Prodias: 3.4.0


Infos – Bitte beachten:


During the vehicle programming with E-Sys, no further applications should be excuted in parallel on the flash processor


This includes, in particular, background processes, such as the
indexing service for desktop search or automatic defragmentation
services


sys is current not supported under Windows 10. Workaround for display
problems under Windows 10:
E-sys.exe->Properties->Compatibility->Override behavior at high
DPI scaling->Scaling performed by “System”


Quality Center (edited points):


14206 – certmanagement: failed to convert Json Response from CBB to internal PSdZObject


14421 – Error in seen in LOG after the import of an RSU container


14423 – FDL: Datentype yte isn’t checked


14570 – Mme-Type for Deltamap is unknown


14719 – Cermanagement: CSRs can only be read from ECU in Expert Mode


14835 – Certmanagement: Json-File is necessary although the XML-binding and SVT are located


14998 – E-sys : Load SVT file behaves differently with SVT-IST and SVT-Soll


Quality Center (open points):


12616 – Import error after KC update with RSU PDX template


14192 – Display Problems with E-sys on Windows 10


14232 – Import of corrupt containers


14382 – no OMITEC connection at E-sys 3.32.1/PSDZ 5.6.1


14770 – TAL Status Viewer: Flowchart is only displayed if filename starts with “TAL”


14954 – PSLZ created and stored TAL filters can not be loaded or edited in E-sys


12981 – Adding a own attribute at the xml-Namespace of a SVT-file


15012 – Faulty E-sys function – Create FA from short VIN


15024 – E-sys loggt User Name


Change requests and small changes:


CR3565 – Esys support forsecureECU model LSI


CR3566 – Esys support for centificate management 2021 and SEC-OC


CR3640 – Esys: SVT cannot be saved or opened with the special character “#” in the file name


CR3647 – Integration of the SVT update function into the module Tal generation


CR3681 – Esys – Adaptations resulting from modified TAL-Schema (IDR for ISTA)


CR3707 – Esys: new SVT scheme due to SFA/SecOc


KA3720 – For generated TAL files, Esys should determine the scheme version attribute from the version value of TAL xsd


CR3724 – Esys: Implementation: deal with file-based SWEn


KA3727 – In the coding verification in Esys, the selection of several FA entries should be possible


KA3735 – RSU Delta containers should be accepted when importing to Esys (writing the psdadata xml)


CR3817 – Customize Esys released notes and welcome screen for privacy, and complete Diaglog settings


CR3829 – Esys customization to create an RSU KC (changed SSK)


KA3852 – Esys-Log should write off the vehicle order used in the TAL
processing as a file name so that you can understand this later


KA3904 – Esys: Link how to se the module certmanagement at Esys Help


KA3934 – Esys: Adaptation to new SVT scheme (PSdZ-CR3907)


Exploring the MB STAR C3

2019-01-10 22:41:08 | 日記


This thread will be devoted to a thorough explanation of the Mb Star C3 system in depth, over time. Another good reference thread can be found here.


First off, some history and background about the system. The MB STAR
C3 is a diagnostic system that is provided by the factory for
dealerships and independent repair shops, and is used to interface with
the cars’ computers to diagnose systems and pull/reset codes, and even
to program certain elements of the systems on more modern cars. The
system costs upwards of $20,000 from OBD2TOOL, and is applicable for MBs from model year 1989 and newer.


Of course, cars of model year 1989 only had 2-3 computers in the car;
however all successive MBs have had an increasing number of computers,
and this is where the MB STAR C3 system really comes into its own — with
the newer cars. For the purposes of the cars that are the focus of this
forum — the 124.036 E500E — and to a lesser extent the 400E/E420 and
the later C126 coupes, the computer setups are rather crude and limited
when compared to cars starting with the W210 models, which debuted in
model year 1996 in the USA.


What I’m saying is that the MB STAR C3 systems are much more suited
and capable, coming into its own, the newer the car that it is used
with. However, the good thing is that it is able to fully exploit the
built-in computer diagnostics as found in the E500E. It does this using a
compatibility mode that emulates the Mercedes-Benz Hand-Held Tester
(HHT), which was a diagnostic tool that was used for the 1989 and up
cars, commonly until about 2001 when the MB STAR system debuted. The HHT
is literally a hand-held unit (it is actually quite a handful) that
allows the user to pull and reset codes, provides access to “live”
engine data on the M119 and M104 engines (though a larger array of live
data on the M119s), and generally pull compete diagnostics of the
computer systems.


Mercedes Hand-Held Tester (HHT)


The MB STAR system, when it made its debut, was much more capable
because it was PC-based (IBM T30 laptop), but it was also very versatile
because it incorporated a HHT emulation mode (for backward
compatibility) along with a “multiplexer” intermediate unit between the
PC and the car, which allowed the connection of a variety of different
diagnostic connection cables, depending on which diagnostic system the
car in question happened to use. For the oldest cars (i.e. the C126,
early R129 SL models, early W124s and W140s, etc.) a “four-pin”
diagnostic cable was provided. For second-generation cars, such as the
E500E, 400E/E420, middle and later R129s, middle and later W140s, the
familiar “38-pin” plug is provided. There are also OBD-2 interface
cables for model year 1996 and later cars, as well as a 14-pin cable for
European diagnostic systems. All of these cables allow the combination
of the MB STAR with the in-line multiplexer unit to fully interface with
any particular car’s computers.


As I said, the MB STAR system debuted around 10-11 years ago, in
2001. Because of its expense, it has been very much “out of reach” of
most MB owners and enthusiasts. To pull codes and get information about
the car, owners were forced to buy limited testers from companies like
Snap-On, Trisco, and others that perhaps allowed one to pull and reset
codes, and a couple of solutions provided some limited “live data” where
the car allowed it. These systems would typically run from $500 to well
over $1,000. The other option was to somehow obtain a used HHT (they
are occasionally available via eBay, and are quite expensive) or a used
MB STAR system – still a huge expense of multiple thousands of dollars
used.


In recent years, Chinese forgers, who excel at making fake copies of
everything from Louis Vuitton purses to Guess Jeans to Rolex watches,
have set their sights on the MB STAR market (and other automotive
diagnostic systems for other marques). This has resulted in a cottage
industry whereby one could purchase an MB STAR system for anywhere
between $600 and $1,200. Over the past year or so, as Chinese copies of
the MB Star C4 system have come onto the market, the prices of the MB STAR C3 system
have come down to a typical range of $250-450, depending on the vendor
and the items included in the package.


These “clone” systems are easily available on sites like eBay and
also Alibaba.com from hundreds of vendors. As with any Chinese copy of
anything, quality varies and quite often — but not always — one gets
what they pay for. The recent reduction in price of the MB STAR C3
systems has made even relatively good quality systems very very
affordable for the DIY mechanic and/or MB enthusiast — providing them
with the same diagnostic power as the dealership mechanic (but not the
same level of training and knowledge). Typical options that are
available with MB STAR C3 systems available on the Internet include: an
array of cables; a multiplexer; a hard drive containing the MB STAR
software package; and instructions on how to set up the system. The
software typically includes: MB Xentry, WIS, EPC, STAR Utilities; EWA
net; Star Browser; Star Finder; and a recent MB parts price list (which
goes out of date quickly). Quite a number of vendors also provide
Internet support, including the ability to remotely control systems over
the Internet (with the user’s permission, of course) to diagnose
installation and software problems.


There has been precious little information on the Internet about the
Chinese MB STAR C3 systems, how they operate, and in general how the
system operates. This thread will be a thorough, methodical
investigation of how the system works, what it looks like, and how it
can be used with the E500E (and by extension, the 400E/E420). It is up
to the individual owner as to whether they need or would want such a
unit. It would be overkill for many if not most owners. However, there
are a number of owners who do want to do their own maintenance and want
the tools to help them do this properly. For these owners, purchasing an
HHT or MB STAR system may be a good idea.


I will not go into the nuances and details of ordering the system.
All that should be said is that one should do their research carefully,
and pay attention to the ratings from other buyers as to the honesty of a
particular vendor. Most of these vendors are based in Hong Kong or on
Mainland China. Quite often they speak decent English and are quite
responsive and communicative when inquiries and requests are made. It
would be recommended that prospective buyers utilize an escrow service
to complete the transaction, so as to maximize honesty and
straightforwardness of the transaction from both sides.


Some vendors offer free air-mail shipping via DHL or other
international shipper. These packages can arrive in as little as three
or four days after a payment goes into escrow and the seller is notified
by the escrow company that they have received the cleared payment. Once
the package is received by the buyer, they inform the escrow company
that the package has been received in good order, and the money is then
released to the seller. Pretty seamless, and because of the escrow
service — a fairly safe transaction. Certainly better than sending off a
Western Union or Credit Card payment to an unknown party in a foreign
land.


So, the photos below illustrate what is commonly received with an MB
STAR C3 package. It is a 4.5kg (10-lb) box that is nicely packed, and
includes all of the items described in the seller’s site. A typical
package will include the cables, a USB hard drive (or internal hard
drive for an IBM or Dell computer, if specified), a multiplexer box and a
packet of adhesive stickers that are placed on the multiplexer and the
computer-to-multiplexer cable. The box is unpacked and the contents are
checked against the web site’s description to ensure that all contents
were included. Some sellers also sell individual pieces of the sets, if
they are ever needed.


Next, after the contents of the package are ascertained to be
correct, the recipient should install the software on a computer. It is
HIGHLY advisable that a standalone, separate laptop computer be used for
this, seeing as it will be used in a garage (next to the car)
environment. For versatility (and because most people don’t own the
specific IBM and Dell laptop models that are needed for the internal
drives) it is advisable that the buyer specify the external USB hard
drive model of the MB STAR C3. This way the hard drive can be plugged
into any qualified laptop and used.


Requirements for a laptop that can be used with the MB STAR C3 system are generally as follows:


Must have a SERIAL port
Must have a processor frequency rating of 1.8 GHz or higher
Must have at least 1 GB of RAM; more is highly desirable
Must have a USB 2.0-compatible port
Must be running Microsoft Windows XP


It is best to just purchase a used laptop via eBay or Craigslist that
meets these specifications, and use this computer SOLELY as a DEDICATED
computer for the MB STAR installation. It can be kept in the garage and
used for these purposes. It really doesn’t even have to be connected to
the Internet. One can also put the laptop on a dedicated cart, which
allows the computer, cables and a printer (if desired) to be rolled
around the workshop/garage next to specific cars. Although the cables
are quite long, it’s nice to have the computer next to the engine when
using it.


How to install John Deere Service Advisor 4 on Windows XP7810

2019-01-01 11:13:26 | 日記

You may fail to figure out how to correctly install this John Deere Service Advisor 4.0 software, coz the original Service Advisor Box contains 9 DVD inside.


5 brown color DVD that say is for 4.0 Construction and Forestry dvd labeled:
CF_EN201405_01
CF_EN201405_02
CF_EN201405_03
CF_EN201405_04
CF_EN201405_05


and 4 green color dvd labeled:
CF_JDIN_201405_01
1 of 4
CFJDIN40
CF_JDIN_201405_02
2 of 4
CFJDIN40
CF_JDIN_201405_03
3 of 4
CFJDIN40
CF_JDIN_201405_04
4 of 4
CFJDIN40


John Deere Service Advisor 4 install:


you must to declare path of those disks. personally i go to:


– file menu-Preferences: in Service Advisor preferences mask in seth data path insert:


from DVD DRIVE:
search button adn select drive letter of DVD CF_EN201405_XX or CF_JDIN_201405_XX


from folder from each DVD
ADD data path for each DVD
in each line hit Search and declare all path for each DVD folder
example:
NAME DATA PATH VERSION
main data path 1 C:\John Deere\CF_EN201405_01 CF_EN201405_01
main data path 1 C:\John Deere\CF_EN201405_02 CF_EN201405_02
main data path 1 C:\John Deere\CF_EN201405_03 CF_EN201405_03
main data path 1 C:\John Deere\CF_EN201405_04 CF_EN201405_04
main data path 1 C:\John Deere\CF_EN201405_05 CF_EN201405_05


and equal for other dvds. Service Advisor must to automaticaly detect this version and load data base from discs


(BIG THANKS to cquique07 from MH forum)


John Deere Service Advisor 4 on a machine with win 10 64bit:


1/you must have enough disk space to download the full set of February 2016 data base (52Gb); it comes with seven iso images and the SA4.0 image and a February 2015 update which you don’t need and of course the activator.


2/use an iso mounter software to mount the SA4.0 image to a virtual drive.


3/browse to the setup file in your virtual drive and run it as administrator


follow the steps (it will prompt for a username and password use those of your windows user account if you’re under 7-8 or 10 windows version)


it will take a while! don’t turn off the computer and don’t worry about the incompatibility messages that windows will show you during the installation process specially for the SQL 2005 server installation.


4/after completing the installation of the SA4.0 reboot the computer and set back the system time to mars 2016.


5/mount the first iso image of the data discs to a virtual drive, browse the sauce folder and run setup file as administrator; wait for it to complete the installation it will launch the SA 4.2.005 at this step you may have a message that the SA 4.2.005 is not capable of launching the search engine don’t worry close it and go to task manager (ctr+alt+sup)
click on services and look for the LightweightIDOL service if it’s stopped than run it.
6/run the activator as administrator and activate the Service Advisor; don’t use the prolongation tool at this step!.
7/now go to the task manager again and look for the SAupdater service and disable it.
8/re-open the Service Advisor, click the accept button for the license agreement, and configure the path for the data access you can use the mapping for a virtual drive choice to map each data disc image to a virtual drive it will take more than an hour to load all the data disk.
it will ask you for scheduling the update choose the end of the week and create the task.
9/Now close the SA, use the activator again but this time just use the prolongation tool choose 9000 days or whatever you want.
10/Look for the task scheduler and run it, choose the SAupdate task and modify the time for the task to begin to 2030 or whatever you want.
11/reboot the computer and set back the time machine to the actual time, launch SA and everything must work ok.


if you have any trouble than you messed something just clean up and reinstall.
Still fail to install John Deere Service Advisor software?
You can have John Deere Service Advisor full software:
John Deere Service Advisor 4.0 Agriculture
John Deere Service Advisor 2.8 CF (Construction and Forestry)
John Deere Service Advisor 4.0 CCE (Commercial and Consumer Equipment)


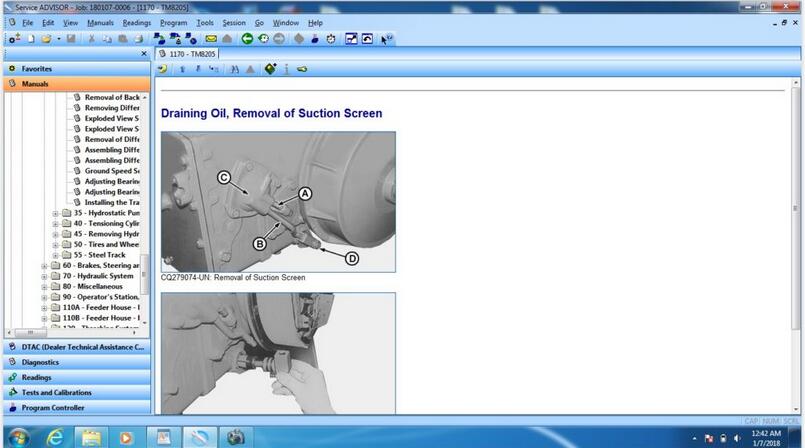
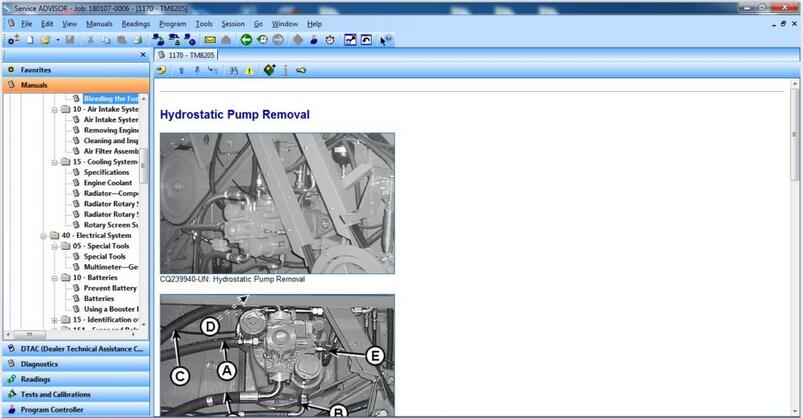
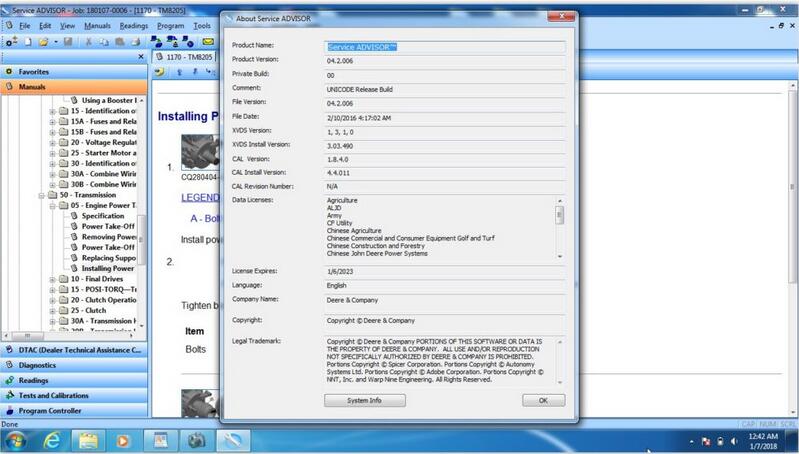
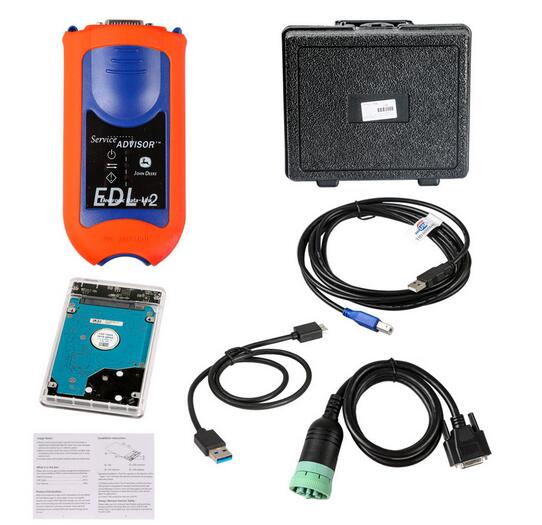
All is installed in a hard drive disk (HDD) before shipping and verified to work no issues through professionals. So when you received it, just replace/insert the HDD into your laptop (Windows XP, Win 7,Win 8 and Win 10- all ok), then you can use John Deere Service Advisor EDL V2 to view service manuals, use DTAC (Technical Assistance Center) data, make diagnostics, readings, tests and calibrations, re-program controllers, etc.


John-Deere-Service-Advisor-EDL-1 John-Deere-Service-Advisor-EDL-3 John-Deere-Service-Advisor-EDL-4 John-Deere-Service-Advisor-EDL-5 John-Deere-Service-Advisor-EDL-6 John-Deere-Service-Advisor-EDL-7 John-Deere-Service-Advisor-EDL-8