X-431 GDS

Launch X431 GDS , Launch GDS ,X-431 GDS

Xentry 03/2021 error “The data are faulty” Solution

2021-09-29 18:24:30 | 日記

Xentry 03/2021 can’t connect and error “The data are faulty”. During the past months, some users feedback this problem, and someone tested and worked out the solution.
V202106-MB-Star-Diagnostic


Solution:


I checked logs in C:\ProgramData\Mercedes-Benz\logs\Xentry and found the following:


Caused by: com.teradyne.ds.io.MissingPluginException: Could not load file:/C:/Program%20Files%20(x86)/Mercedes-Benz/Xentry/MB_PKW/Baureihe/BR_Templates/ModulEinstieg_Template.gmf


This file has been updated apparently by a recent addon as it now has a newer timestamp.


For me it worked to replace this file with an older copy:


C:/Program%20Files%20(x86)/Mercedes-Benz/Xentry/MB_PKW/Baureihe/BR_Templates/ModulEinstieg_Template.gmf


It looks like a recent addon overwrites this file with a newer version that causes this error message.


Hope it helps!


V202106 MB Star Diagnostic - Xentry 03/2021 error “The data are faulty” Solution – Xentry V202106


Good to know:


Xentry 06/2021 is already tested working fine and available at :


HDD version Win7 Win10


SSD Win7 Win10


https://mbstarscanner.blogspot.com/2021/08/xentry-032021-error-data-are-faulty.html

Launch X431 Guide Function to Set VW Passat 2013 DSG Transmission

2021-09-29 18:24:30 | 日記


After replacing DSG transmission, DSG clutch pack & DSG
mechatronic, the vehicle may get a fault code P175F00: transmission
basic setting not perform.


How to do DSG transmission basic setting?


The procedure is taking VW Passat 2013 as an example, applies to Launch X431 PAD V, X-431 Pad VIIX431 PRO V4.0, X431 Pro3 V4.0.


Having diagnosed systems for fault codes, go back to “Guided Functions”.


Fill in the vehicle basic characteristics including manufacturer, vehicle type, year, model, engine type, press “Start”.
launch-x431-guide-to-set-vw-passat-2013-dsg-transmission-1
launch-x431-guide-to-set-vw-passat-2013-dsg-transmission-2


Transmission electronics >> Guided functions >> J743 –
Mechatronic, basic setting >> Continue/ complete >>
Continue/ complete


launch-x431-guide-to-set-vw-passat-2013-dsg-transmission-3
launch-x431-guide-to-set-vw-passat-2013-dsg-transmission-4
launch-x431-guide-to-set-vw-passat-2013-dsg-transmission-5


Follow the instructions to operate:


Note: if the entire transmission is replaced, no basic setting is necessary.


To ensure proper communication between control modules, the installation info must be reset.


Continue/ complete >> 2. transmission basic setting >> Yes


launch-x431-guide-to-set-vw-passat-2013-dsg-transmission-6


Check Pre-Conditions:


More transmission selector lever to position P.


Apply parking brake.


Switch the engine off.


Switch the ignition on.


Press “Continue/ complete”.


Test requirements have been met.


Basic setting will continue.


Please wait the vehicle diagnostic tester automatically continues…


Basic setting active.


The basic setting is running, please wait…


Note:


During the basic setting, unusually loud gear shifting noises are noticed in the drive train.


Press “Continue/ complete”.


Start the engine…


Please wait…


The basic setting has been performed correctly.


Only when the ignition is switched off and on will the data in the mechatronic be stored.


Switch the ignition off.


Press “Continue/ complete”.


Wait for the control modules shutdown to complete.


Switch ignition on.


Note:


The basic setting is completed with the switching on of the ignition.


In the next test step a test drive for the adaptation of the adaptation values is to be performed.


launch-x431-guide-to-set-vw-passat-2013-dsg-transmission-7


Finally, let’s drive the vehicle to have a test.


It is normal, done!


launch-x431-guide-to-set-vw-passat-2013-dsg-transmission-8


Using Launch-X431 Diagnostic Tool to perform DSG transmission basic setting after replacement is easy to be done.


How to Restore ICOM Next with All LEDs Red and System LED Blink Red/Yellow

2021-09-08 15:38:41 | 日記

Problem with BMW ICOM Next: did an update on my motorcycle and everything went fine and today when I connect icom to OBD – all leds are just on with red color, system one is blinking red/yellow.


Please do exactly as follow:


1. Disconnect the ICOM Next device from the power supply or vehicle.
2. Go to the directory


C:\ProgramData\BMW\ISPI\data\TRIC\ICOMNext\ICOM-Image-xx-yy-zz.
Note: This directory is hidden. Please see [?00045002EN].
2.1. Copy the file ICOM_Next-rootfs-xxxxxx.tar.gz to the root directory of the USB flash drive.
2.2. Copy the file ICOM_Next-app-yyyyyy.tar.gz to the root directory of the USB flash drive.


Note:
– An ICOM_Restore.bin file is not available. Please use the files from the ICOM Next firmware package as described above.
– xxxxxx and yyyyyy in the file names represent the version numbers of the respective files.
– If the directory contains more than one ICOM-Image-xx-yy-zz folder, please choose the most recent one, i.e. the folder with highest number. The ICOM Next will then be ready to use without further updates.
– It is important that the files are copied to the root directory of the USB flash drive.


3. Connect the USB stick to the BMW Diagnostic Tool ICOM Next.
4. Press and hold the button located on the right-hand side of the ICOM Next, next to the OBD II cable connection socket.
5. Continue to hold the button, connect the device to the vehicle’s OBD II jack and keep the button pressed until the LEDs on the ICOM Next glow red.
6. Release the button and within five seconds, push the button three times. This starts the firmware update.
Note: The update may take several minutes. Do not disconnect the ICOM Next as long as any LED glows red.
7. When all LEDs on the ICOM Next have stopped glowing, the Emergency Firmware Update is complete. You can now disconnect the USB flash drive.
8. IMPORTANT: When the Emergency Firmware Update is finished, the ICOM Next must be connected to your network with a LAN cable in order to be reconfigured since all previous settings have been lost. If there is a “user.settings” file on the USB flash drive, it will be installed after the firmware update.


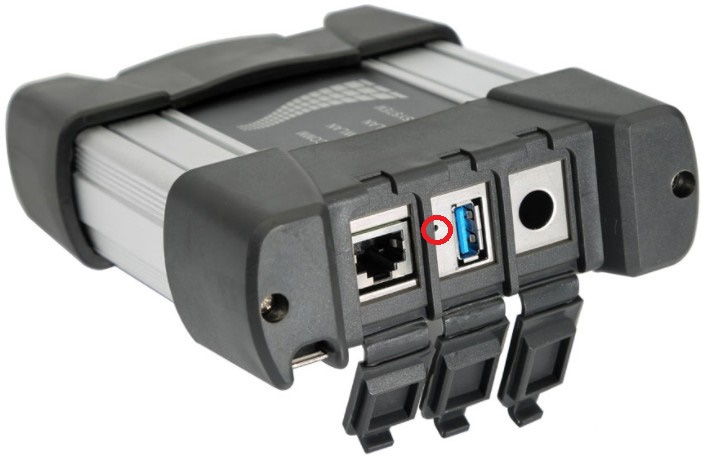
The RIGHT reset button on Original ICOM Next the button behind the tiny black hole! (in red circle).


Icom-Next-Reset-Button-1


WARNING!


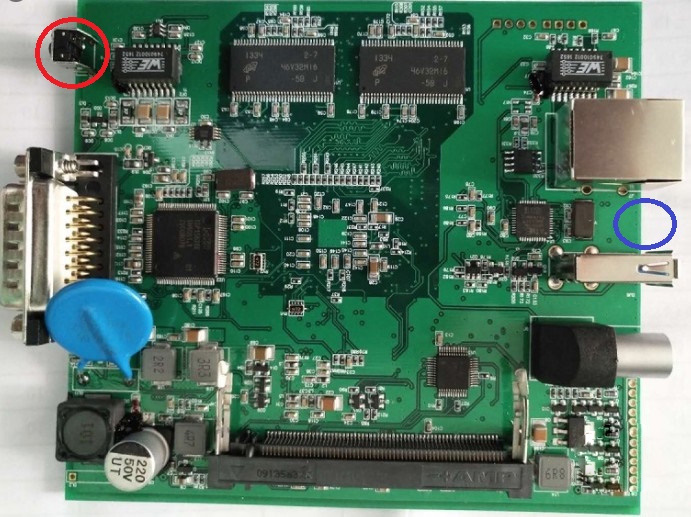
Not Orig ICOM NEXT has another reset button!!!!
The red circle is a NON OEM ICOM NEXT reset button, and the blue is the OEM ICOM NEXT reset button!!!!!


Icom-Next-Reset-Button-2


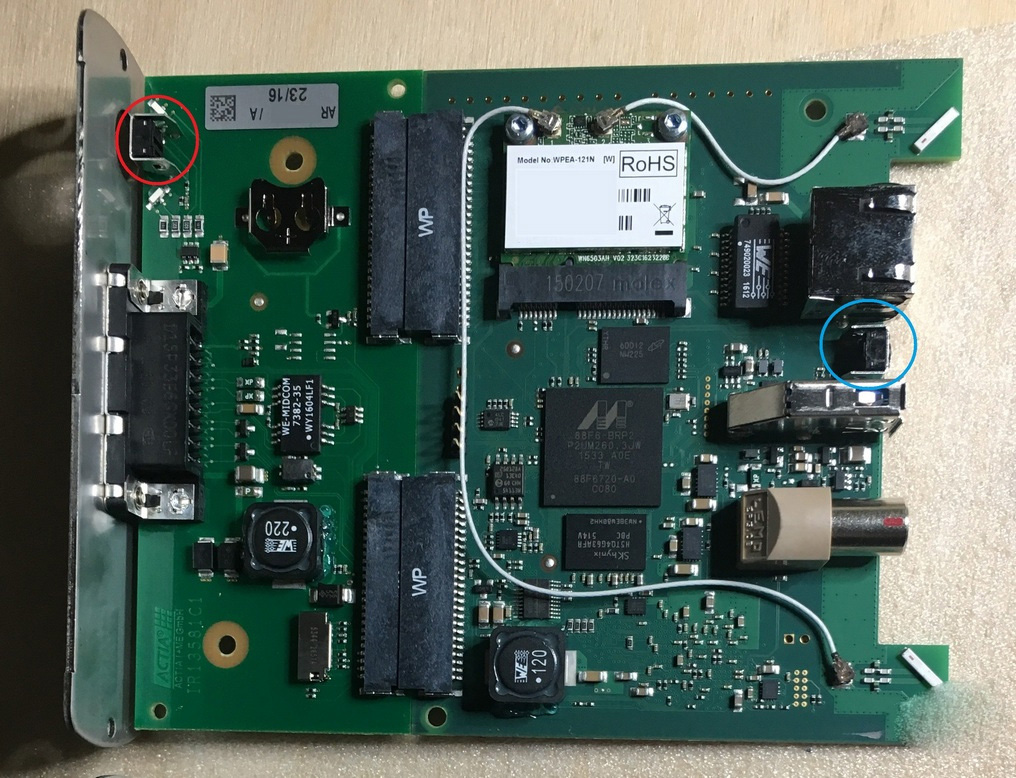
And there is one original ICOM NEXT PCB where a reset button in the blue circle! (NOT THE RED!!!)


Icom-Next-Reset-Button-3


Question: what icom_restore.bin is doing?


Answer: The existing restore.bin is for ICOM A or A2!


And here is one user’s success feedback: Yesterday out of a blue my ICOM Next OEM has stopped to work, ethernet can’t find IP address. In about 2 minutes ICOM was recovered and connected to the ethernet network. PS: He follow the above ICOM Next store procedure.


How to Adapt VAG ECU to Micronas / NEC cluster via Xhorse VVDI2

2021-09-08 15:31:16 | 日記

Problem: I have Xhorse VVDI2 programmer, I want to adapt PCR 2.1 and I get “security access failed. operation not completed.”


Solution: this is how to adapt PCR and similar


How to adapt ECU to Micronas / NEC cluster via Xhorse VVDI2.


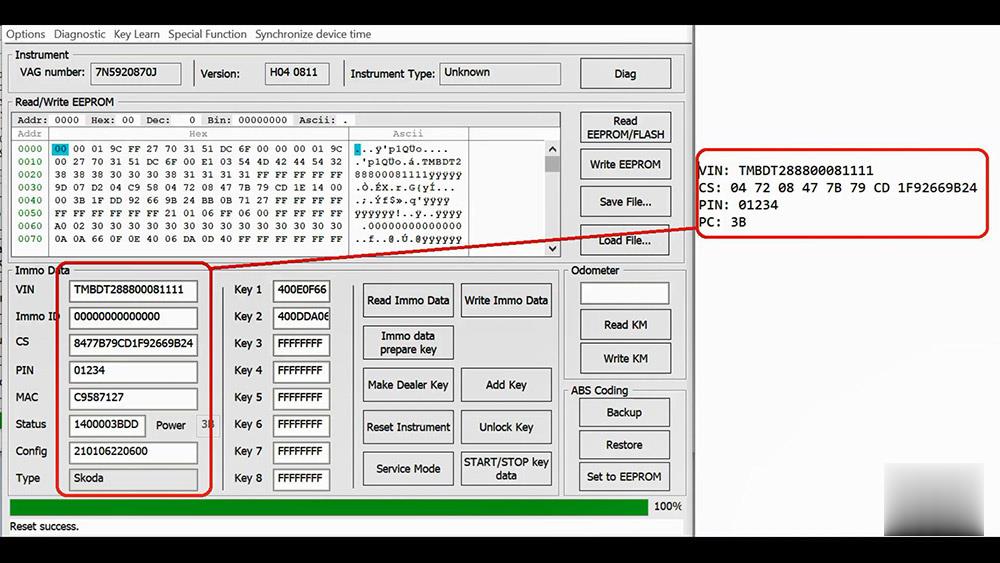
Vvdi2-Vag-Ecu-Adaptation-To-Cluster-1 (2)


Read cluster IMMO data and copy to TXT file


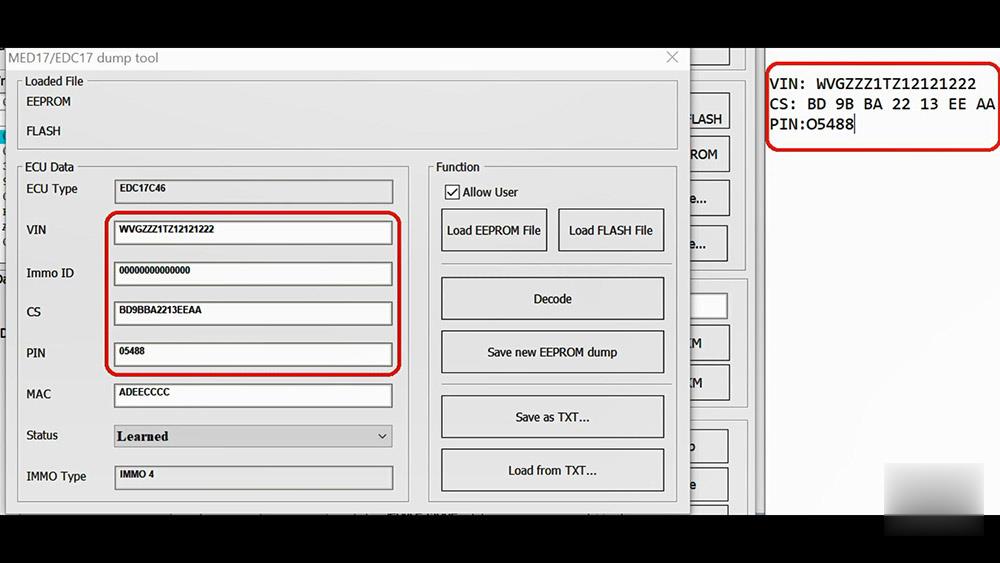
Vvdi2-Vag-Ecu-Adaptation-To-Cluster-2 (2)


Read IMMO data from ECU and paste to TXT file.


Vvdi2-Vag-Ecu-Adaptation-To-Cluster-3 (2)


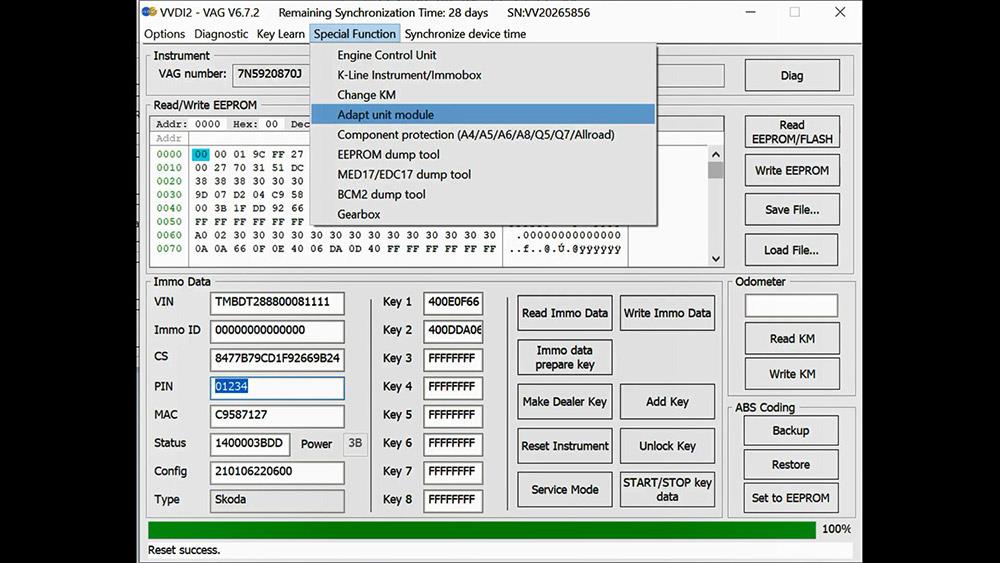
Go to adapt unit module


Vvdi2-Vag-Ecu-Adaptation-To-Cluster-4 (2)


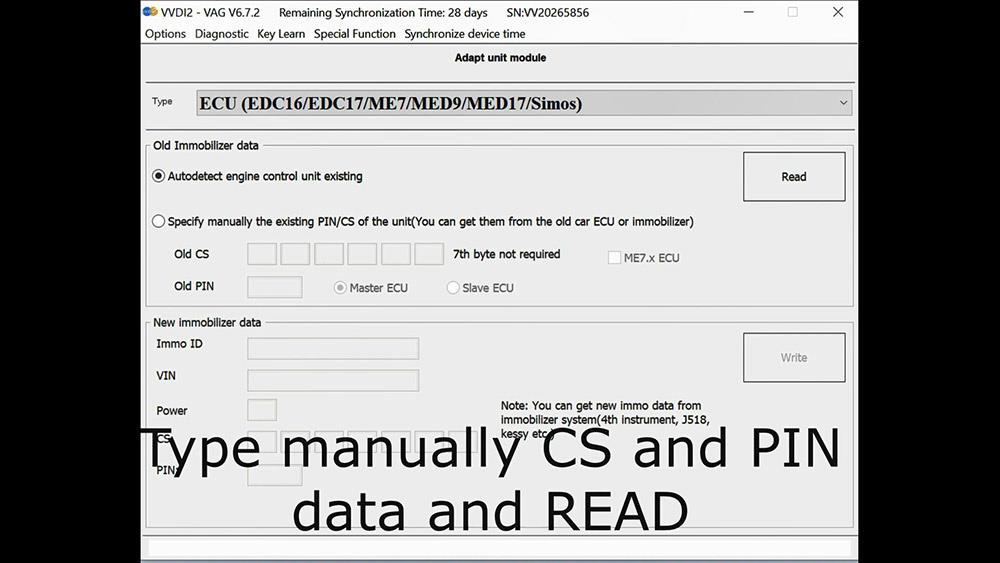
Select: ECU EDC16/17


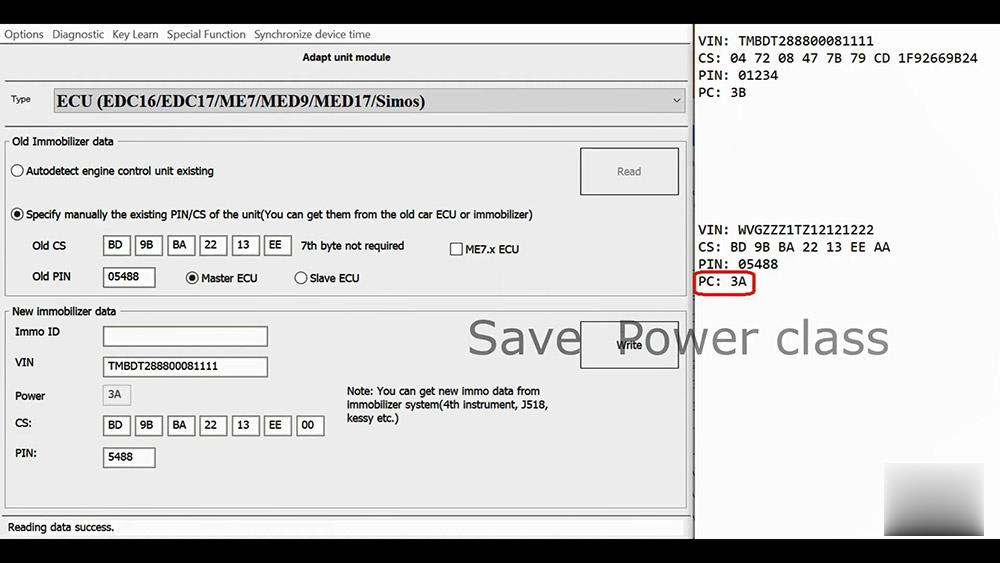
Type manually CS and PIN data and Read.


and wait till data read.


Vvdi2-Vag-Ecu-Adaptation-To-Cluster-5 (2)


Save power class


Vvdi2-Vag-Ecu-Adaptation-To-Cluster-6 (2)


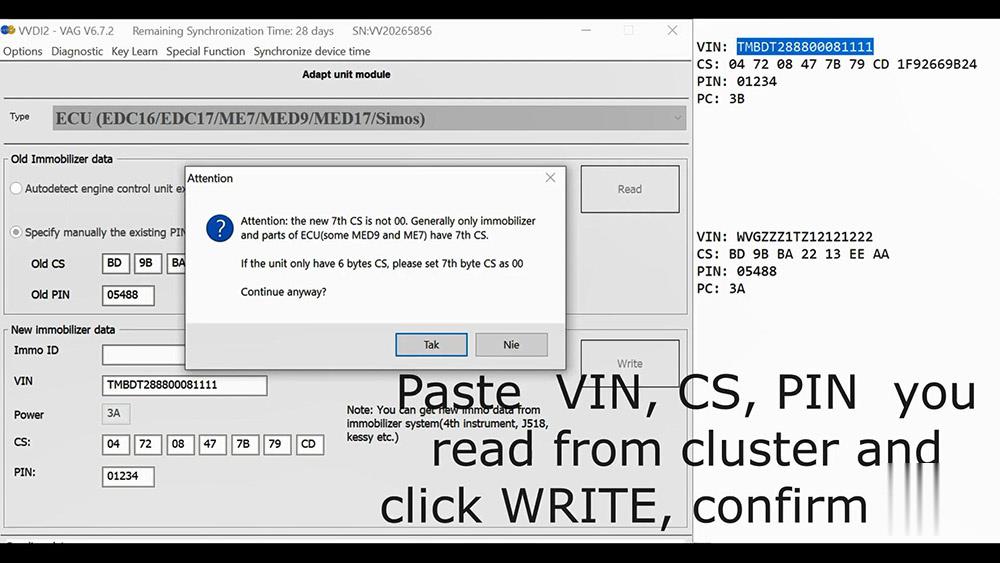
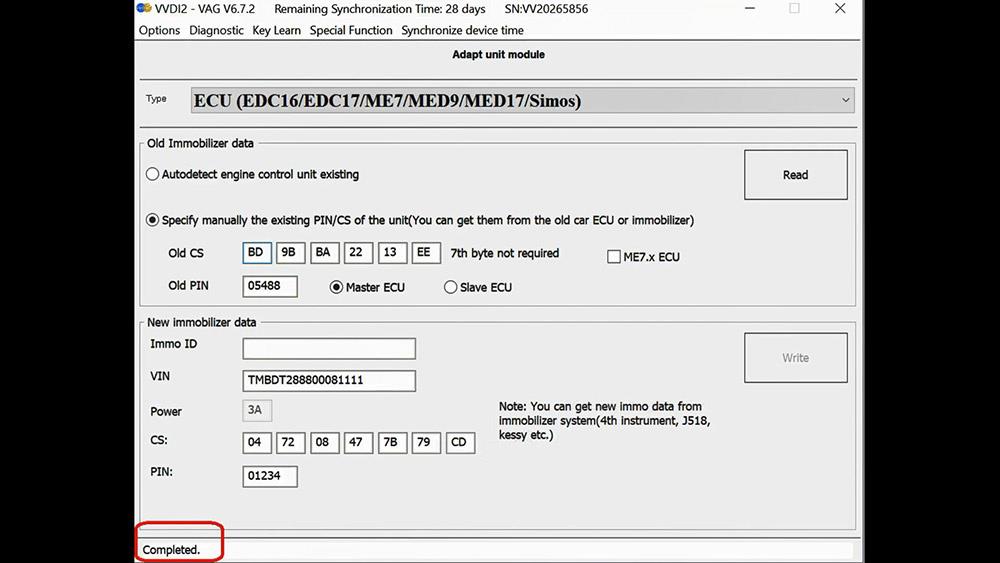
Paste VIN, CS, PIN, you read from cluster and click “Write”, confirm yes.


Completed.


Vvdi2-Vag-Ecu-Adaptation-To-Cluster-7 (2)


Vvdi2-Vag-Ecu-Adaptation-To-Cluster-8 (2)


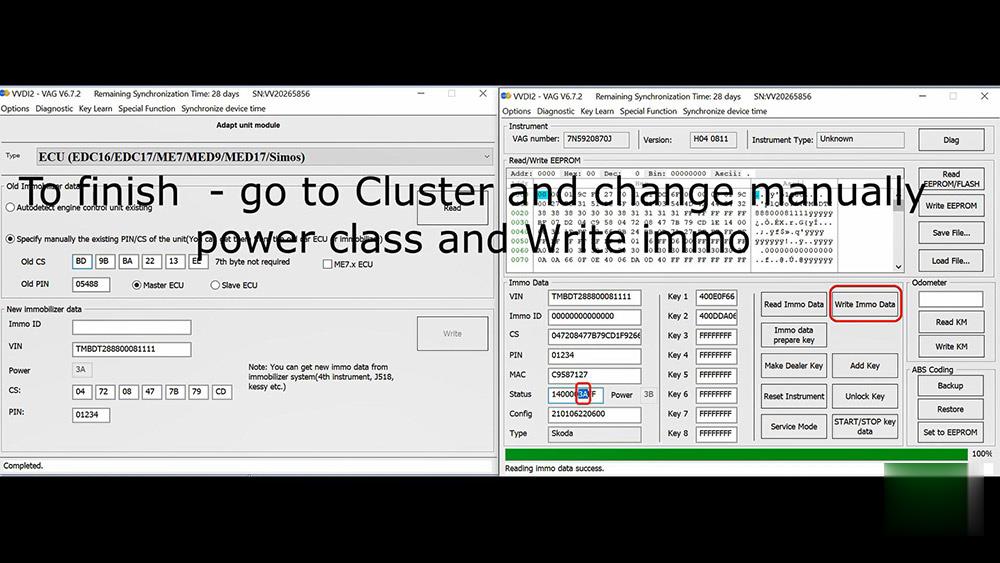
To finish – go to cluster and change manually power class and write immo.


Vvdi2-Vag-Ecu-Adaptation-To-Cluster-9 (2)


Enjoy!