I have had a diagnostic machine STAR C3 for a while and i decided to try and make it work, but every time i try to communicate with the car i get an error message saying :
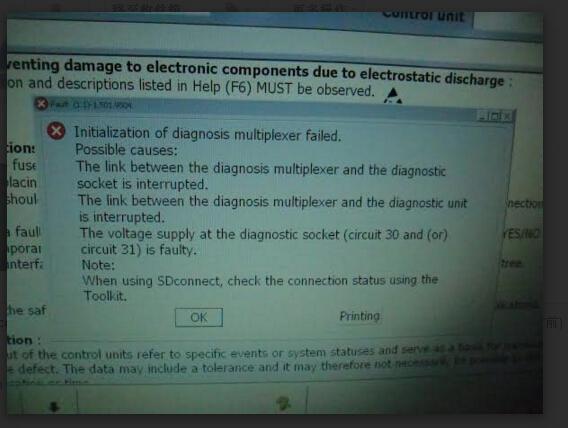
Fault (1.1)-1.501.9504
Initialization of diagnosis multiplexer failed. Possible causes: The link between the diagnosis multiplexer and the diagnostic socket is interrupted. The link between the diagnosis multiplexer and the diagnostic unit is interrupted. The voltage supply at the diagnostic socket (circuit 30 and (or) circuit 31) is faulty.
Error codes analysis:
error code 95xx: C3 mux settings is committed
error code 9551: means no C3 mux is connected
error code 9504: means Star C3 is connected and error in mux
error code 9500: means C3 is connected but error in COM settings to COM2
error code 99xx: means C4 mux settings is committed
So the error is 9504 means mux is read by software and mux is burned
But C3 mux is working on 3 main communication objects:
1- CanBus
2- K-line
3- L-line
your mux may still work if one circuit is burned like CanBus circuit burned but still you have other 2 working on K-line and L-line
Detailed possibilities of unsuccessful communication:
1 COM port setup improperly or broken COM serial on the laptop
2 New models that old STAR C3 cannot support
3 Something wrong with C3 diagnostic mux
4 Something wrong with cables
Thus, OBD2TOOL advice is to check your mux on other laptop, OR you may find your COM serial on your laptop is broken or do opposite check other mux on your laptop to find what is wrong. if all is ok, that is two possible occasions:
1 the model cannot not be supported by Star c3 and you should buy SD Connect C4
2 the software can not run ok and you can try new V2020.03 Star C3 Software