ATtiny402でOLEDの表示テストをします。
OLEDは、秋月電子の0.96インチ128×64ドットのもので、コントローラは、SSD1306です。
まず、Arduino UNOで<SSD1306AsciiAvrI2c.h >というライブラリで表示テストをしてみるとメモリを4KBほど使ってしまいました。ATtiny402ではこのライブラリでうまく表示できるかどうかもわからないので、ライブラリを使わないで表示テストをすることにしました。
以前、PIC16F1827でOLEDの表示テストをしたことがあります。記事はこちら。この時のプログラムは、JR3TGS局の記事を参考にしてというかコピーさせていただいています。今回もコピーさせていただきました。(Arduino用に編集しました)また、フォントもコピーさせていただきました。ありがとうございます。
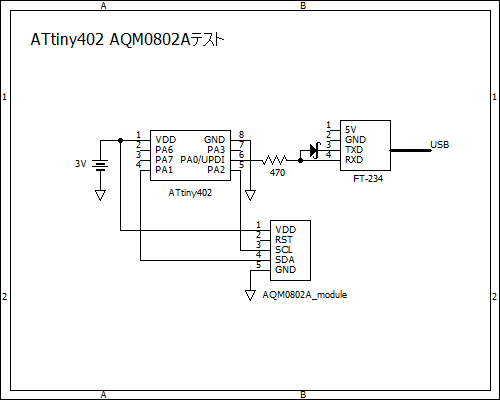
回路図です。電源は、3V(電池2本)とし、FT-234のRXDとTXDだけを接続してUPDIでプログラムを書き込みます。
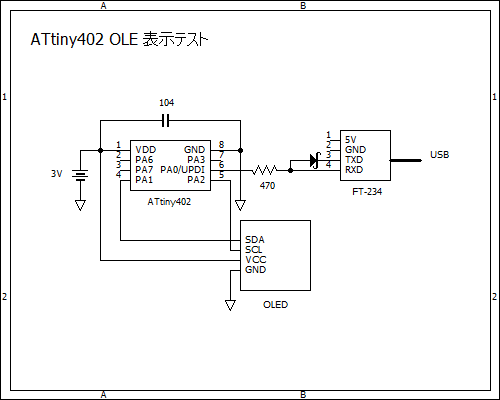
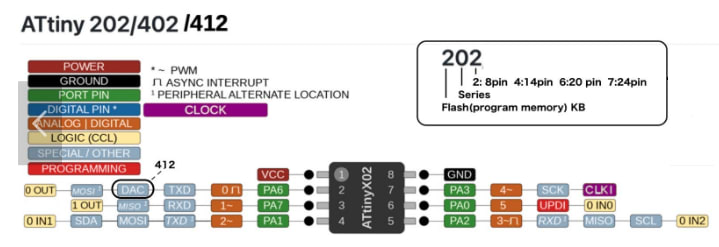
OLEDはI2C接続用なので、SDAとSCLをPA1とPA2に接続します。I2C用のプルアップ抵抗はOLEDモジュールに内蔵されているのでつけていません。
スケッチです。
6x8dot用のフォントは、JR3TGS局の記事のものをfont6.hとし、12x16dot用のフォントはfont12.hとして、スケッチと同じフォルダに保存しておきます。
---------------------------------------------------------------------
/*
* ATtiny402 OLED test
* 2023.09.16
* JH7UBC Keiji Hata
*/
#include <Wire.h>
#include "font6.h"
#include "font12.h"
uint8_t Page;
uint8_t Column;
uint8_t Low_col;
uint8_t Hi_col;
uint8_t Size;
//コマンド1bye送信
void oledCommand(uint8_t cmd){
Wire.beginTransmission(0x3C);
Wire.write(0x80);
Wire.write(cmd);
Wire.endTransmission();
}
//データ1byte送信
void oledData(uint8_t data){
Wire.beginTransmission(0x3C);
Wire.write(0xC0);
Wire.write(data);
Wire.endTransmission();
}
//OLED初期化
void oledInit(){
oledCommand(0x8D); //Set charge pump
oledCommand(0x14); //Enable charge pump
oledCommand(0xAF); //Display ON
}
//OLED画面消去
void oledClear(){
Wire.beginTransmission(0x3C);
Wire.write(0x00);// Control byte Co=0, D/C#=0
Wire.write(0x20);// Set memory addressing mode
Wire.write(0x00);// Horizontal addressing mode
Wire.write(0x21);// Set column address
Wire.write(0x00);// Column start address 0
Wire.write(0x7F);// Column end address 127d
Wire.write(0x22);// Set page address
Wire.write(0x00);// Page start address 0
Wire.write(0x07);// Page end address 7d
Wire.endTransmission();
for(int i=0;i<1024;i++){
oledData(0x00);
}
}
// 6x8dotフォントの表示開始位置指定
void font6_posi(uint8_t page, uint8_t column){
uint8_t low_col;
uint8_t hi_col;
Size = 0; // printf で使用するputch のフォントサイズ指定
Page = page; // ページ情報をfont12用にグローバル変数に保存しておく
Column = column; // カラム情報をfont12用にグローバル変数に保存しておく
page = page + 0xB0; // ページ情報をコマンドにする為に 0xB0 を加算
low_col = column & 0x0F;
column = column >>4;
hi_col = column + 0x10;
Wire.beginTransmission(0x3C);
Wire.write(0x00);// Control byte Co=0, D/C#=0
Wire.write(0x20);// Set memory addressing mode
Wire.write(0x02);// Page addressing mode
Wire.write(page);// Set page start addres
Wire.write(low_col);// Set lower column start address
Wire.write(hi_col); // Set higher column start address
Wire.endTransmission();
}
void font12_posi(uint8_t page, uint8_t column){
uint8_t low_col;
uint8_t hi_col;
Size = 1; // printf で使用するputch のフォントサイズ指定
Page = page; // ページ情報をfont12用にグローバル変数に保存しておく
Column = column; // カラム情報をfont12用にグローバル変数に保存しておく
page = page + 0xB0; // ページ情報をコマンドにする為に 0xB0 を加算
low_col = column & 0x0F;
column = column >> 4;
hi_col = column + 0x10;
Wire.beginTransmission(0x3C);
Wire.write(0x00); // Control byte Co=0, D/C#=0
Wire.write(0x20); // Set memory addressing mode
Wire.write(0x02); // Page addressing mode
Wire.write(page); // Set page start addres
Wire.write(low_col);// Set lower column start address
Wire.write(hi_col); // Set higher column start address
Wire.endTransmission();
}
//6x8dotフォントの1文字表示
void chr6(uint8_t c){
uint8_t i;
c = c - 0x20;
Wire.beginTransmission(0x3C);
Wire.write(0x40);// Control byte Co=0, D/C#=1 (The following data bytes are stored at the GDDRAM)
for(int i=0;i<6;i++){
Wire.write(font6[c][i]);
}
Wire.endTransmission();
}
void chr12(uint8_t c) // 12x16dotフォントの1文字表示関数
{
uint8_t i;
uint8_t temp;
c = c + 6 - 0x30;
Page = Page + 0xB0;
Low_col = Column & 0x0F;
temp = Column >> 4;
Hi_col = temp + 0x10;
Wire.beginTransmission(0x3C);
Wire.write(0x00); // Control byte Co=0, D/C#=0
Wire.write(0x20); // Set memory addressing mode
Wire.write(0x02); // Page addressing mode
Wire.write(Page); // Set page start addres
Wire.write(Low_col);// Set lower column start address
Wire.write(Hi_col); // Set higher column start address
Wire.endTransmission();
Wire.beginTransmission(0x3C);
Wire.write(0x40); // Control byte Co=0, D/C#=1 (The following data bytes are stored at the GDDRAM)
for(i=0; i<12; i++)
{
Wire.write(font12[c][i]);
}
Wire.endTransmission();
Page = Page + 1; // グローバル変数ペーシ情報 Page を次の lower 12bytes 描画の為に 1 進める
Wire.beginTransmission(0x3C);
Wire.write(0x00); // Control byte Co=0, D/C#=0
Wire.write(0x20); // Set memory addressing mode
Wire.write(0x02); // Page addressing mode
Wire.write(Page); // Set page start addres
Wire.write(Low_col);// Set lower column start address
Wire.write(Hi_col); // Set higher column start address
Wire.endTransmission();
Wire.beginTransmission(0x3C);
Wire.write(0x40); // Control byte Co=0, D/C#=1 (The following data bytes are stored at the GDDRAM)
for(int i=12; i<24; i++){
Wire.write(font12[c][i]);
}
Wire.endTransmission();
Page = Page - 1 - 0xB0; // グローバル変数ページ番号 Page を次の1文字描画の為、進めたページ番号を元に戻す (0xB0はコマンドをページ情報に戻す為)
Column = Column + 12; // グローバル変数カラム情報を次の次の1文字描画の為、12アドレス進める
}
//文字列表示
void printStr(char *s){
while(*s){
if(Size){
chr12(*s++);
}else{
chr6(*s++);
}
}
}
void setup(){
Wire.begin();
oledInit();
oledClear();
font6_posi(0,20);
printStr("Hello World!");
font12_posi(3,0);
printStr("0123456789");
}
void loop() {
}
---------------------------------------------------------------------
このスケッチでフラッシュメモリ2828バイト(69%)、RAMは101バイト(39%)を使っています。
フォントの表示開始位置は、下の図のようになります。
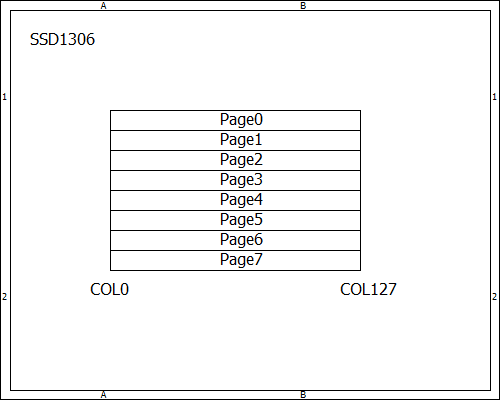
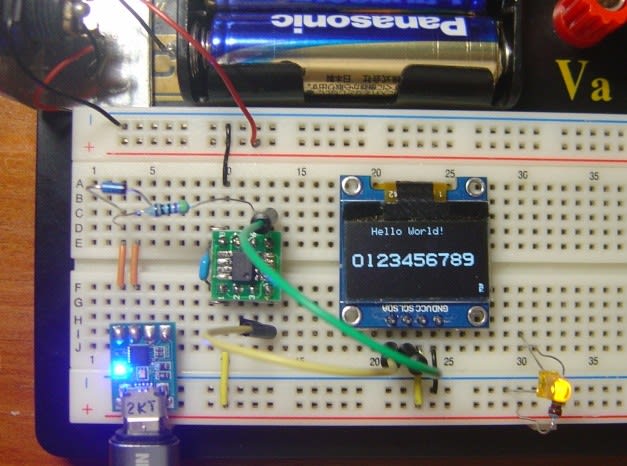
ブレッドボードです。Page0,column20から6x8dotフォントで「Hello World!」が、Page3,column0から12x16フォントで「0123456789」を表示しました。
