I wanted to do something different today, which started with me
taking my wife to Kamakura in the morning.
What I had in mind is shown in the following image.

They are my habanero scoopers, short at 97 mm, and they have
small bores. I made, perhaps, a dozen of them before. Today's
problem was, "How the hell did I make them!", really.
The short and thin item at the bottom is a picker, and
you can see one fork done, and I have got another
20 or so, to be sanded.
Well, that is an aside, and today's issues were manyfold!
Having made them before does not mean much, unless,
you remember how. So, in a way today, I had to start
from scratch!
Now, take a look at the following image. Bores have been
created in the work pieces of six.

Yo must do this, before anything else you do! Because,
you have to align the bore centre to the centre line
of the work pieces. If you have formed the stems before
this operation, you will regret it very much!
In all this, I think I was driven by my instinct
to the final stage, which you have seen as IMAGE 1.
What follows is showing you stem formation.

It is not realistic at all to transcribe their top
profiles, using a template. This is because templates are
not perfect, not even symmetrical, if best made.
Of course, true to say that human eyes cannot easily
recognise the lack of synmmetry. Nonetheless, they are there!
By far the easiest way to form the stems, to match the
bores, is to use those alminium pieces shown here in the photo.
They are, cross-sectionwise, shaped in the form of L.
They can be placed on the workpieces and used to draw
equi-distant lines from the edges.
That, of course, assumes, that those bores have been
allinged to the centre line of the work pieces.
However, that is where my dexterity comes in.
If you cannot put the bores in the centre, then why
bother to continue with these tricky operations?
You are not going to belive this, but, I can easily
recognise true vertical and true horizontal lines,
of course, with reference to properly established
reference lines. And, that ability helps, in centreing the bores.
What is shown below is an interim picture.

You can see that there are new redundancies, as well as
the target work pieces, on their way to becoming
my habanero scoopers!
They will remain redundant, unless you can think of something
useful with them. One of these short pieces was made
into a picker, as shown in the first image.
That is about the only way I can think of...
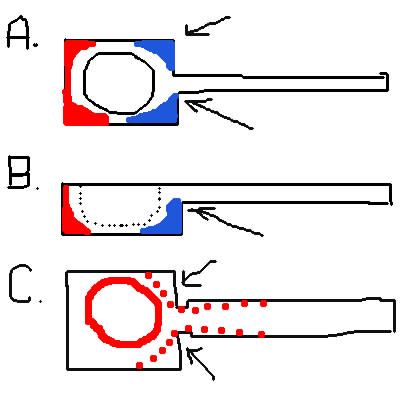
Now, take a look at the following illustration. This is
really showing you the difficulties that follow, from
the image above.
You want them to be nice and shapely, in the end...
However, it is simply difficult. For a start, they are
small, difficult for hold onto during sanding.
To reach your goals, you need to loose mass, and
in A, the red area is OK. With the stem pointing
upward, you can loose the red area, fairly easily.
That is the same with the ide profile, shown in B.
Difficulties come in in the blue areas. Throughout,
the machine used is my belt sander.
Loosing the blue areas is the most challenging part
of this operation, because, not shown in A nor B,
there are discontinuities, as shown by the arrows in C.
Negotiating these discontinuities is the paramount
problem, and I do not want to go into the details, but,
they can be removed, eventually.
I think I have had enough for now.


taking my wife to Kamakura in the morning.
What I had in mind is shown in the following image.

They are my habanero scoopers, short at 97 mm, and they have
small bores. I made, perhaps, a dozen of them before. Today's
problem was, "How the hell did I make them!", really.
The short and thin item at the bottom is a picker, and
you can see one fork done, and I have got another
20 or so, to be sanded.
Well, that is an aside, and today's issues were manyfold!
Having made them before does not mean much, unless,
you remember how. So, in a way today, I had to start
from scratch!
Now, take a look at the following image. Bores have been
created in the work pieces of six.

Yo must do this, before anything else you do! Because,
you have to align the bore centre to the centre line
of the work pieces. If you have formed the stems before
this operation, you will regret it very much!
In all this, I think I was driven by my instinct
to the final stage, which you have seen as IMAGE 1.
What follows is showing you stem formation.

It is not realistic at all to transcribe their top
profiles, using a template. This is because templates are
not perfect, not even symmetrical, if best made.
Of course, true to say that human eyes cannot easily
recognise the lack of synmmetry. Nonetheless, they are there!
By far the easiest way to form the stems, to match the
bores, is to use those alminium pieces shown here in the photo.
They are, cross-sectionwise, shaped in the form of L.
They can be placed on the workpieces and used to draw
equi-distant lines from the edges.
That, of course, assumes, that those bores have been
allinged to the centre line of the work pieces.
However, that is where my dexterity comes in.
If you cannot put the bores in the centre, then why
bother to continue with these tricky operations?
You are not going to belive this, but, I can easily
recognise true vertical and true horizontal lines,
of course, with reference to properly established
reference lines. And, that ability helps, in centreing the bores.
What is shown below is an interim picture.

You can see that there are new redundancies, as well as
the target work pieces, on their way to becoming
my habanero scoopers!
They will remain redundant, unless you can think of something
useful with them. One of these short pieces was made
into a picker, as shown in the first image.
That is about the only way I can think of...
Now, take a look at the following illustration. This is
really showing you the difficulties that follow, from
the image above.

You want them to be nice and shapely, in the end...
However, it is simply difficult. For a start, they are
small, difficult for hold onto during sanding.
To reach your goals, you need to loose mass, and
in A, the red area is OK. With the stem pointing
upward, you can loose the red area, fairly easily.
That is the same with the ide profile, shown in B.
Difficulties come in in the blue areas. Throughout,
the machine used is my belt sander.
Loosing the blue areas is the most challenging part
of this operation, because, not shown in A nor B,
there are discontinuities, as shown by the arrows in C.
Negotiating these discontinuities is the paramount
problem, and I do not want to go into the details, but,
they can be removed, eventually.
I think I have had enough for now.




※コメント投稿者のブログIDはブログ作成者のみに通知されます