


Today started with retrieving yestrday's pieces
from the coating shed, then I spent a few hours
removing the polyps.
This is inevitable, because saturation, or near
saturation means surfaces were runny, anyway.
So, instead of going for type C coating,
I simply type A coated the two baby feeders and
the chopstics I had repaired yesterday. Baby feeders to
catch up with the rest of the pieces, waiting to be
coated with C. I do not know what to do with the
chopstics, but I will see...
Imagewise, I have not got many today. Take a look at the
first of those below.
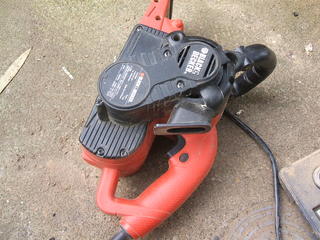
This is the belt sander I use everyday, being looked at
sideways. Can you see a small oval shaped dark piece,
two thirds of the way up the orange coloured grip?
This is a piece you have to press down for continous
operation of the sander. If continuous operation is
underway, then this bit is kept depressed.
Well today, it was not to be, and I had to take the
whole thing apart to remove the dusts inside the machine,
preventing the normal operation. That is why it was
removed from the bed.
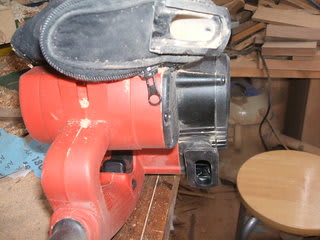
During the course of this I noticed something. And,
I will try and show you the same opening with the next
image, but, actually, this image shows what I am talking
about better. At the top of the grip, see a horizontal
opening? This opening is normally covered with a small sack,
which is not shown here and will be seen, sitting atop
the machine, placed on the bench. This outlet is a mystery to me.
I have taken the whole thing apart, completely, several times
in the recent past.
There is no fan, inside the sander. And yet, once operated,
quite a strong air current with dusts bursts out from this opening.
Dusts are accumulated in the sack, to be got rid of from time to
time. Now, going back to the mulfunction of my belt
sander, I am convinced that the culplit is the fine dusts.
I am inclined to think that if those fine dusts are released
into free space, with much reduced exhaust resistance, of the
sack, they might not end up in those important contacts points
in the system. It is only a guess and may well be a wishful
thinking. In any event, I have removed the sack.

Above, just showing you the flat area of the sander, along which
belts run over at speeds which I want, with my latest
aquistion of the speed controller.
See, there are two rollers at either end of the flat. The gap between
the smaller roller and the flat is very useful, and I may talk about
it later, essentially, the gap between them can dip and
may be used for delicate sanding operations.
With above, the dark thing sitting on top of the
orange thing is the sack.
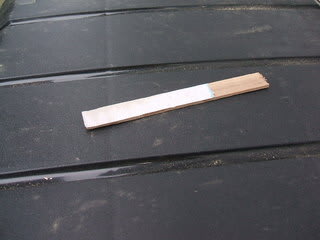
Above?, this is merely a new gap sweeper I made today,
for cleaning up the mess created by the gap forming operation
for my picker knife forks.
So, where do I stand at the end of the day?
Well, edge rounding by the machine is complete,
60%?, perhaps. Tommorrow, coating apart, all of my time
will be spent on hand sanding the machine sanded
edges, of my picker knife forks. After that, how the hell
would I know!

from the coating shed, then I spent a few hours
removing the polyps.
This is inevitable, because saturation, or near
saturation means surfaces were runny, anyway.
So, instead of going for type C coating,
I simply type A coated the two baby feeders and
the chopstics I had repaired yesterday. Baby feeders to
catch up with the rest of the pieces, waiting to be
coated with C. I do not know what to do with the
chopstics, but I will see...
Imagewise, I have not got many today. Take a look at the
first of those below.
This is the belt sander I use everyday, being looked at
sideways. Can you see a small oval shaped dark piece,
two thirds of the way up the orange coloured grip?
This is a piece you have to press down for continous
operation of the sander. If continuous operation is
underway, then this bit is kept depressed.
Well today, it was not to be, and I had to take the
whole thing apart to remove the dusts inside the machine,
preventing the normal operation. That is why it was
removed from the bed.
During the course of this I noticed something. And,
I will try and show you the same opening with the next
image, but, actually, this image shows what I am talking
about better. At the top of the grip, see a horizontal
opening? This opening is normally covered with a small sack,
which is not shown here and will be seen, sitting atop
the machine, placed on the bench. This outlet is a mystery to me.
I have taken the whole thing apart, completely, several times
in the recent past.
There is no fan, inside the sander. And yet, once operated,
quite a strong air current with dusts bursts out from this opening.
Dusts are accumulated in the sack, to be got rid of from time to
time. Now, going back to the mulfunction of my belt
sander, I am convinced that the culplit is the fine dusts.
I am inclined to think that if those fine dusts are released
into free space, with much reduced exhaust resistance, of the
sack, they might not end up in those important contacts points
in the system. It is only a guess and may well be a wishful
thinking. In any event, I have removed the sack.
Above, just showing you the flat area of the sander, along which
belts run over at speeds which I want, with my latest
aquistion of the speed controller.
See, there are two rollers at either end of the flat. The gap between
the smaller roller and the flat is very useful, and I may talk about
it later, essentially, the gap between them can dip and
may be used for delicate sanding operations.
With above, the dark thing sitting on top of the
orange thing is the sack.
Above?, this is merely a new gap sweeper I made today,
for cleaning up the mess created by the gap forming operation
for my picker knife forks.
So, where do I stand at the end of the day?
Well, edge rounding by the machine is complete,
60%?, perhaps. Tommorrow, coating apart, all of my time
will be spent on hand sanding the machine sanded
edges, of my picker knife forks. After that, how the hell
would I know!


※コメント投稿者のブログIDはブログ作成者のみに通知されます