


I now have thirty odd folks, made of oak,
almost all of them...

They all look nice, at 140 mm length. With all these
small pieces, both top and side profiles are formed
by my disk sander.
You could form top profiles, using a jigsaw, but it
is quicker to use a sander. The most problematic
process is cutting into the rectangular block of wood
with a rotating rooter bit. A schematic is shown below.

In A, here, the blue disk is the crosssection of the bit,
red line showing you the rotational direction and the bit
is advanced into the workpiece by rotating a handle.
Now, all woods have regular and anti-regular grain
patterns down the whole length of the trees they come from.
To all intents and purposes you simply do not care, which.
This is because if the blades on the bit are cutting along,
say, into the regular grain direction, and in this illustration,
top dotted lines. The lower dotted lines are inevitably
anti-regular, with respect to the blade rotation.
So, altogether, you have ruffled surfaces as shown in B
of this illustration. A big red arrow is popinting to
these ruffled bits and pieces.
You must remove them, carefully, and what is bellow is
showing you how I do this operation.
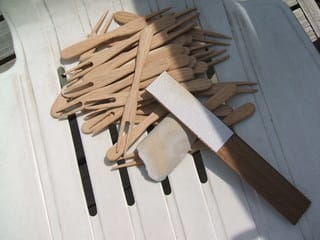
Can you see a half white and half dark piece? This is my
jig. I glued a piece of my sanding paper on top of a thin
slice of wood. This is pretty effective, because the mass
you want to loose is very limited. The folks here are
half way to eventual completion, but not just yet, even with
those in the first image of today.
The crotch areas will have to be rounded, you do not need to,
but, that is my obsession, anyway, with another of rotating
bit, a ruby sander bit, shaped like a rugby ball.
With my wife away in Abashiri, I did not know what to
have for lunch. So, I decided to set up my Dutch oven, as shown
below, for baking potatoes and an onion.

I meant to have them for lunch, but in the end I had them,
just before the raven's song! Insertion of a simple iron
bar made dramatic changes, as follows.

All this mess, and wasted time! With my clay stove, the air
intake was up against the wind, fine, but my Dutch oven
sitting squarely on the entire rim of the stove, there was
no effective air outlet! This piece of iron bar was of
great help in increasing the temperature!
So much so, my onion, shown below, has effectively evaporated!

You can see the outer shape, but there is nothing in it!
Potatoes survived the heat increased, and tasted OK, a bit burnt.
I will need a mesh at the bottom to stop direct contacts!
What shall I do tommorrow?
almost all of them...
They all look nice, at 140 mm length. With all these
small pieces, both top and side profiles are formed
by my disk sander.
You could form top profiles, using a jigsaw, but it
is quicker to use a sander. The most problematic
process is cutting into the rectangular block of wood
with a rotating rooter bit. A schematic is shown below.
In A, here, the blue disk is the crosssection of the bit,
red line showing you the rotational direction and the bit
is advanced into the workpiece by rotating a handle.
Now, all woods have regular and anti-regular grain
patterns down the whole length of the trees they come from.
To all intents and purposes you simply do not care, which.
This is because if the blades on the bit are cutting along,
say, into the regular grain direction, and in this illustration,
top dotted lines. The lower dotted lines are inevitably
anti-regular, with respect to the blade rotation.
So, altogether, you have ruffled surfaces as shown in B
of this illustration. A big red arrow is popinting to
these ruffled bits and pieces.
You must remove them, carefully, and what is bellow is
showing you how I do this operation.
Can you see a half white and half dark piece? This is my
jig. I glued a piece of my sanding paper on top of a thin
slice of wood. This is pretty effective, because the mass
you want to loose is very limited. The folks here are
half way to eventual completion, but not just yet, even with
those in the first image of today.
The crotch areas will have to be rounded, you do not need to,
but, that is my obsession, anyway, with another of rotating
bit, a ruby sander bit, shaped like a rugby ball.
With my wife away in Abashiri, I did not know what to
have for lunch. So, I decided to set up my Dutch oven, as shown
below, for baking potatoes and an onion.
I meant to have them for lunch, but in the end I had them,
just before the raven's song! Insertion of a simple iron
bar made dramatic changes, as follows.
All this mess, and wasted time! With my clay stove, the air
intake was up against the wind, fine, but my Dutch oven
sitting squarely on the entire rim of the stove, there was
no effective air outlet! This piece of iron bar was of
great help in increasing the temperature!
So much so, my onion, shown below, has effectively evaporated!
You can see the outer shape, but there is nothing in it!
Potatoes survived the heat increased, and tasted OK, a bit burnt.
I will need a mesh at the bottom to stop direct contacts!
What shall I do tommorrow?


※コメント投稿者のブログIDはブログ作成者のみに通知されます