パエ-リャ

木製カトラリ-

Spiky and all the rest of it

2008-05-25 17:27:26 | Weblog
Yesterday, I talked about my SPIKY, a very versatile
tool for forming concave surfaces. As with anything else,
however, there are rules.

You just cannot apply SPIKY anywhere you like on the
initial flat surface, underneath which a concave is to be
formed.

Take a look at the following illustration.


A refers to it. You must start down in the middle, in an area
in red. This is because Spiky is a rotating sphere and is
trying constantly to ride over the rim area outside the

dotted area in green. This is detrimental, if that happens,
as it leaves a fairly deep scurr in its wake. It becomes awfully
messy to mend these scurrs.

In the worst case the recess into the concave must be reduced,
renderig some of the spoons utterly useless.

What you must do is to dig a trench in the red area, as deep as
the concave recess, or very nearly. That will provide you with
the hold you need with the rotating Spiky.

Effectively, you go for a territorial expansion, towards the rims
by pressing the Spiky on the walls of the concave as it is
gradually widened.

Watch out for Spiky's ride-over tendency!

And, you do that initially between the two dotted
lines in red. Areas outside these red lines must be
treated with extreme care, later on in the territorial

expansion.

Incidentally, B and C refer, respectively, to straight
stem and bent stem spoons.

I now refer to another illustration below. This is because
operating with Spiky is not an event-free uniform digging for
concave surfaces.

There are two spots on the way to an eventual concave.
These spots are illustrated as per below.


Once again, areas in red designate those two spots.
When these areas are ground by Spiky, you must press
Spiky onto the concave surface towards outside the

spoon. Other two corners are easy to negotiate, but,
at these two places in red hold ing of Spiky becomes
difficult and unstable. You need to do it yourself,

if you want to be asbosuletely sure about the reason.

B and C refer to the scurrs left over by Spiky and the
flappers. They are illustrated as per below. A is the Spiky
and B is the flappers.

Strictly speaking they are normally refered to as flap
foils, but, I call them simply flappers. Flapper wings are
abrasive enough and do not leave deep scurrs.


Anyway, in the first illustration, B is showing you the deep
scurrs left by Spiky, which are parallel to the grain of
the wood.

C is the scurrs left by the flappers, perpendicular to the
grain and thin and shallow, easy enough for paper sanding
to obliterate them, later in the operation.

I think this is good enough for the day, but before I go,
I will show you today's output and test pieces I used.


Sorry, no test pieces, just a chopstick container.
As you can see disk magnets are in place and chopsticks
are placed in the trench anti-paralell simply because

the trenches are shallow, in order to make the whole thing compact.
I may talk about this topic later. OK, I go now!


パエ-リャ 6

2008-05-25 17:27:04 | Weblog
Jamy, here is an assortment for today.

そんなの、電話帳に載ってるよ!
You will find it in yellow pages!

あんた、自分のせいでこんな事になったのよ!
you got yourself into this for your own falt!

それで十分だわ、間に合うわ、
That will do nicely!

見かけと同じならいいのに。。。
If it is all that it appears to be...

彼の健康状態、気をつけたほうがいいわよ!
His health needs watching!

ドウノコウノだっていう気がしてならないわ!
I cannnot get away from the feeling that dounokouno!

チャ-リ-、壁とテニスしてるわ!
He is playng tennis with a wall!

彼ら、遠慮して近づかなかったわ!
They kept at a respectful distance!

はしごを壁に立てかけてよ!
Rest the ladder against the wall!

荷押し車が、道をガラガラと進んでいた
a cart rumbled along the road

多少なりとも長い間
for a length of time

全然おかしくないわ!
How funny!

(電話)切られちゃったわ!
I was cutoff!

勇気を出して言ってみなよ!
Pick up your courage and say it!

それ、投げない方がいいわよ!
You should cling on to that!

名乗らなかったけど、誰かから電話があったわよ!
There was an annonymous call!

彼、来たところに戻っていったわ!
He made his way off back to where he came from!

Jamy, shall we call it a day? Take care!


Chopstick containers and concave surfaces

2008-05-24 17:57:11 | Weblog
Where do I start? I should perhaps show you the next photo.
Spoons are now complete, waiting for coatings. This is the
work I have been doing over the last few days.


You can see top profiles easily, but not the side
profiles, which have been ground out by the disk
grinder.

Funnily enough, I have no templates for these straight
soons, why?, I do not know, really. What are
straight spoons, anyway?

To put it in a nutshell, they are the spoons with straight
stems. Stems may have various shapes, largely ornamental,
but essentially the axis of the stems is straight.

So, at this stage of development you have what you want
in the end, minus the hollow volume of space for holding
whatever you want at your dining table.

Being a physicist, however, I refer to these hollow spaces
in terms of concave surface. So, really, spoon formation
at this stage is equivalent to forming best possible concave

surfaces in your workpieces. Incidentally, the other side is a convex
and is treated by both disk and belt sanders, as shown previously.

What is shown below is one of the tools I use to obtain concave
surfaces.


I call this tool SPIKY, as the soft iron shpere at the end of
the rotary device is covered with lots and lots of spikes.
This is the tool that removes the mass I do not want,

forming a rough concave surface with my workpieces. How actually to use the SPIKY is for tommorrow.

In the meantime, here are two more photos. The first of these is
one of my bean curd dissolvers. The second is my first attempt
at chopsick containers, and more on that later.


Dark looking disks are ferrite magnets, more on that later, too.


パエ-リャ 5

2008-05-24 17:56:58 | Weblog
Jamy, I hate your alias! I really do. You are just J too many!

Anyway, let us continue.

それ、買えば? で、幸せになれば良いのよ!
Buy it and be happy with it!

(洗剤の箱とかを開ける時のこと)
(指で)押し込んで、フタを引っ張りだすのよ
Press in and tear back the top!

勘弁してよ!
Give me a break!

それでも、未だ、やることは沢山あるわ!
That still leaves quite a lot of work to do!

前を良く見て!、前を見て!
Watch where you are going! , just watch!

(次は幽霊の話)
灰色の形は壁に溶け込んだ!
The grey figure melted into walls!

彼は仲介屋よ!
He is a fixit man! He is a middleman!

両方一緒はダメよ!
You cannot have it both ways!

それに関してはウンザリしてるわ!
I am fed up with it!

Jamy, I, of course, realsie that some of these are
rudimentary. However, imagine a young Japanese trying
voraciously to abosrb things.

ドウノコウノって、驚きだよね!
What surprises me is that dounokouno!

道路工事やってるわ!
There is a road work going on!

渋滞はないわ!
Traffic is runnning!

(天気予報)
雲の切れ目はないでしょう!
There will be no breaking of clouds!

わかった、直ぐに行くよ!
Yes, I will come over right away!

チャント、プロに直してもらわないとダメよ!
You must have them done professionally!

Jamy, I go now. Take care!


Top and side profiles and how they are formed

2008-05-23 17:34:23 | Weblog
Let us get started, then.

I very rarely work with connifers. I go for hardwoods,
such as oak, walnut, American black cherry, hard maple,
and birches.

The first thing you have to do is to cut out rectangular
blocks of wood, about the size of your artefacts, mostly
using a bandsaw, such as shown here.


This is a very versatile machine, able to cut to thickness
of up to 150 mm! The only snag is that the blades tend to
come to the end of their useful life, only after one or two

months of operation, much depending on how hard you use it.
Blade breakage is squarely due to metal fatigue, of course.

Anyway, I have an assortment of templates for top profiles.
They are then transcribed onto the rectangulr block, then cut out
again by the same bandsaw.

If the curuvature you are cutting along is not too
tight, then you will have perfect? top profiles, but,
if not you end up with something like what is shown below.


This image is showing you one of my templates on the
right, as well as my workpieces on their way to
desired top profile. As you can see the one of the

left remains to be cut at the point where curvature
is tightest. And, this is where my jigsaw comes in,
shown as below.


You may wonder what happens to other workpieces.
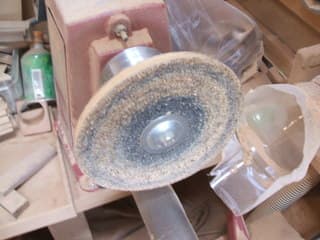
The corners are actually ground off by my disk
sander (grinder), as shown here.


This machine is superb. It has such an enormous
abrasive power. In terms of grain degrees, I should
think that it has 40. And, in fact, even the side profiles

are formed using the same machine. (It is quite
dangerous to cut out the side profiles using the
bandsaw!)

Time it takes to form a side profile? It depends,
of course, but my guess is that it is not more than
a few minutes per artefact.

It does produce a large amount of dusts, so I operate
my dusts sucker and the intake cone I made is also
shown in the same photo, something I made from a

large plastic bottle, which is then connected to
a fairly powerful vacuum cleaner, the outlet of
which is yet again released into a very large

volume of free (virtually, anyway) space I created
outside of my workshop. They are connected via
flexible tubes (pipes). I may talk about that in future.

I should imagine this is enough as a starter. I go now.


パエ-リヤ 4

2008-05-23 17:09:53 | Weblog
Jamy, I really hate your alias! Anyway,
here is an assortment for today.

これ、私からのプレゼントよ!
Here is my present to you!

彼、健康そうね!
He looks sharp and fit!

それで皆驚いたわ!
That took everyone by surpise!

何か落とし穴があるに違いないわ!
There is bound to be a catch!

Jamy, as you know I did 3 years for qualification
at a high school in central England, then I
read physics at Imperial College as undergrad,

then did all of my postgraduate work there too.

I am now moving on to the next notebook, which
I opened up on day one at Imperial College.

Not surprisingly, the very first goes like this!

実験をする前に、結果の値を予測しなさい!
Be able to see what values are likely before
you do your experiment!

樽のてっっぺん、漏れてるから直してね!
Repair the leaky faucet!

仮にドウノコウノしたら、どうなのさ?
If you do dounokouno, what then?

泳いでみなよ!
Have a swim!

私たち、偶然ナニナニを見ちゃったわ!
We had a chance sighting of NANINAI!

リスクを少なくしないとダメよ!
You have to cut down on the elements of risk!

彼、強い潮流にさらわれたの!
He was swept out by the strong current!

ドウノコウノだと、てっきり思っていたわ!
I would have thought that DOUNOKOUNO!

いつだってドウノコウノの可能性はあるわよ!
There is always a chance that DOUNOKOUNO!

(電車や地下鉄)
ここで乗り換えよ!
You have to change here!

今日はこれでお終いにしよう!
Let us call it a day!

Jamy, as said above I go now. Take care of your baby!
I really hate your ficticious name!


Spoon formation and an arsenal of tools

2008-05-22 17:55:47 | Weblog


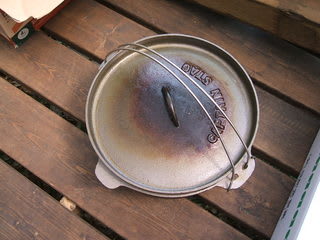
I am back now from my mountain cottage. Here are some
pics from my stay there with my mother. While there I bought a new
dutch oven, by now well seasoned as shown.

Second pic is the wooden deck I constructed last summer.
I will be constructing another structure for my mother
at the side of the house by next summer.

That may serve as my sleeping quarter as well as a
large storage place.

The first picture is an introduction to my spoon
making activities. I cannnot show you everything
in one go.

Suffice to say that the workpieces in the picture
are on their way to becoming tea scraping spoons.
A lot more on this and other subtopics.

You will be innundated with so much information
on spoon formation, as I call the process.

Anyway, all this morning was spent on taking my wife
to her regular Kamakura gathering and going out
on a bicycle to purchase the thinner for my

urathene coating. It has been heavily repleted, lately.

Tommorrow on I will be talking about the basic
principles involved in spoon formation, as I know it
from my experience.

I will be showing you the arsenal of my tools and
how they might be best utilised. It took me several
years to get to this stage of complete satisfaction

with my tools. Watch out!


パエ-リャ 3

2008-05-22 17:54:56 | Weblog
Jamy, I hate your name. I really do. Anyway, here is
an assortment of today's expressions at random.

夕食を一緒にする約束をした
We arranged to go out for a dinner

彼がどんな風に感じているか、彼らは知っていた
They knew the efects it is having on him!

服、後ろ前に着ているよ!
You are wearing it back to front!

靴下、裏表に履いてるよ!
you are wearing them inside out!

(煙いから)少し煙をはきだしなよ!
Let go of some smoke!

(髭剃りの刃の話)それって、良く切れないんだよね!
It does not give you a close enough shave!

一度やってみたけどね、好きじゃなかったよ!
Tried it once, did not like it1

闇雲に始めるのはよくないよ
It is no good to start straight in!

彼、熱心でしつっこかったわ!
He was keen and he kept on at me!

ドウノコウノって、普通幾ら位だったっけ?
What is the going rate for DOUNOKOUNO?

じたばたともがいて
flouncing up and down

Jamy, this is the lot for now, should suffice.

Take care!

Toast holders, penetration coating, wooden spoons

2008-05-13 17:02:41 | Weblog


It is very ironic that I will have to be away at my
mountain cottage with my mother for the next one
week or so, so soon after resumption of my loggings.

I never really thought about it. I may even pop back after
a few days, much depending on how the weather holds out.

On a separate issue, not having a spell checker with
this service is a blow. I make many mis-spellings.

I could use external editors and transplant my articles
into this environment, but I could not be bothered.
I am busy, anyway.

So, readers, I offer my profuse apologies in advance
re my mis-spellings.

Today's main topics are blade configurations and
coating of my artefacts. First, take a look at photo 4.

You see a very tight curvature where the stems are
narrowest. This has been a perrenial issue, how to negotiate
those sharp bendings with my bandsaw.

What you could do is shown in the next illustration
and I will tell you why this thought occurs to me
in relation to the schematic diagram of the blade

configuration.


Even with an 8 mm blade it is awfully difficult to
negotiate the portion in red. However, I can go jigsaw
only for this portion. The mere thought of using a jigsaw

for the entire circumference of the workpiece is
daunting, as the thickness is something like 15mm

or over. But, then, if the cutting length is short enough,
you can go jigsaw, easily. Green lines are, of course,
cut by the bandsaw.

As you can see there are other tight curvatures, and
dotted lines are actual cutlines. I can use my disk sander to
loose the mass left over with considerable ease.

Now, lte us take a look at blade configuration, which is
of extreme importance. The illustration below should
suffice.


1 and 1.1 are normal configuration of the bandsaw blade,
a little exergerated, of course. This is typically when I am
cutting my workpiece more or less along straight lines.

A and Bs are roller bearings, seen from above. 1.1 is telling you
that the blade is bent backward due to the pressure from the workpice
being cut. Actually, it is me, who is applying the pressure.

2 and 2.1 are saying what happens if you press ahead with
tight curvature cutting with the bandsaw blade. It is awfull!
Blade is twisted and bent backward, bringing in

unbearable stress on the blade, leading to premature
lifetime, leading to increased operational costs!

Enough for blade configuration and all that!

Next, let us take a look at the coating process.
The illustration below should give you an insight
into my coating process.

Apologies, somehow it has gone into the top of this page.

Anyway, I use polyurethane for coating my artefacts,
occasionally using WATOCO for those which do not
come into direct contact with foods.

My artefatcs are coated with 3 different polyurethane
coating materials. First three times spent with penetration
coating, as indicated by 1,2, and 3.

I then apply 7 surface protection coatings, then,
finally matting with chemical reaction with another
kind of polyurethane materials. I will talk about them

in the near future, anyway.

Part of the same illustration is showing how my artefatcs
are dried on a bed of nails. Problem with this mode of
drying is that you see small polyps forming where they

are in contact with the nails. They are shown in red.
First thing every morning, I remeove these polyps with a sharp cutter knife, and then apply wet sanding (in water!).

More on that later.

Other photos, yes, my gas mask, my toast holders, and today's spoons,
arranged in a circular manner. They look flat and thin, but they are not!
(not underneath) I will make hollows in them while staying at my mountain cottage.

3rd photo is my coating tool, I do not use anything else. Easy to throw away after coatings.

As I said earlier, my logging will be stopped as from
now and not resumed probably until a week laterr, I should think.