Coating continues. As usual on Thursdays I took my wife
to her regular gathering in Kamakura. So, again, my time
was limited.
Nonetheless, there are some outputs from today's
work. Take a look at the following.

A very deep concave surface has been formed, the roughing of
it taking something like 15 minutes, followed by
milder sanding, of course.
What follows is a piece of oak. Most of my afternoon was
spent on transforming this into 7 oak spoons. I will show
intermeddiate pictures, as well.

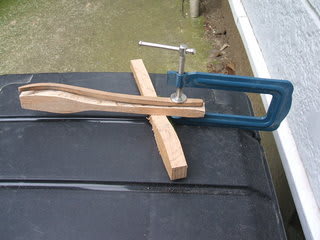
This one is showing one of my side templates attached
by a cramp to the side of the spoon-to be, for marking.

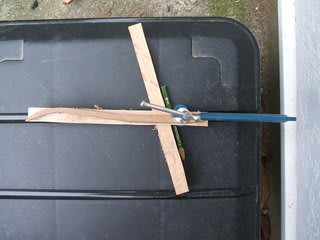
This was taken at an angle, so, I will show you the top view,
as per bellow.

Until very recently, the side profile of the template
was trascribed on both side of the spoon-to be and
held there by my fingers.
Wth the cramp, the whole thing is easier, and by
choosing the proper side of reference during the
mass removal with the disk sander,
I can now get away with transcription only on one side!
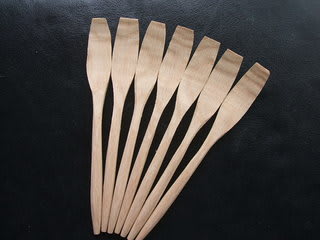
The end result for today as shown bellow, concave
surfaces will be formed tommorrow!

Here is my aditional output for today.

You may ask what these are. This time, I know the answer,
at least what I mean them to be. They are curd smashers.
Edges are not yet rounded, I will do that tommorrow.
What are they useful for? Well, I am a cutlery artist,
so I should imagine that you can use one of these for pressing
anything that does not want to diffuse easily in your cooking.
A typical example being bean curd made easy into your soup!
Your bean curd will be pressed out through these 3 gaps,
becoming easier to dissolve in your liquid!
So much for now.


to her regular gathering in Kamakura. So, again, my time
was limited.
Nonetheless, there are some outputs from today's
work. Take a look at the following.

A very deep concave surface has been formed, the roughing of
it taking something like 15 minutes, followed by
milder sanding, of course.
What follows is a piece of oak. Most of my afternoon was
spent on transforming this into 7 oak spoons. I will show
intermeddiate pictures, as well.

This one is showing one of my side templates attached
by a cramp to the side of the spoon-to be, for marking.

This was taken at an angle, so, I will show you the top view,
as per bellow.

Until very recently, the side profile of the template
was trascribed on both side of the spoon-to be and
held there by my fingers.
Wth the cramp, the whole thing is easier, and by
choosing the proper side of reference during the
mass removal with the disk sander,
I can now get away with transcription only on one side!
The end result for today as shown bellow, concave
surfaces will be formed tommorrow!

Here is my aditional output for today.

You may ask what these are. This time, I know the answer,
at least what I mean them to be. They are curd smashers.
Edges are not yet rounded, I will do that tommorrow.
What are they useful for? Well, I am a cutlery artist,
so I should imagine that you can use one of these for pressing
anything that does not want to diffuse easily in your cooking.
A typical example being bean curd made easy into your soup!
Your bean curd will be pressed out through these 3 gaps,
becoming easier to dissolve in your liquid!
So much for now.


