Conchita, do you know something?
I forget things, easily, well, fairly easily...
Take a look at what follows. These are simple, two pronged
forks. How do you make them?

I have come this far instinctively. How then would you force them
into their final shapes? As they stand at the moment they are of
the same constant thickness.

For that matter, something like above... Again at this stage
they are of the same constant thickness all the way down
their lengths.
Why all this stupid question? It is just that I do not remember
the details after this stage. Granted, I have done these
many times by now, but still details are elusive...
One thing I definitely know is that with these I will have to
transcribe side profiles. I do that, then what? Do I go
bandsaw again? Do I go jigsaw?, or both?

I tried both in the end and as I did the whole process
came back to me slowly...
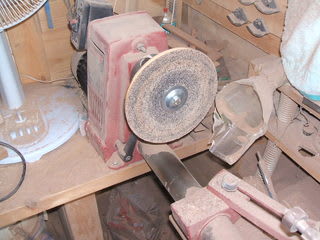
As I suspected most of external form shaping is done by
the disk sander, shown above. I think I need to document
these detailed procedures...

So, I went disk sander for the concave surface of the spoon
shown above. You have to thin down on the area you wish to
make concave, and above image is showing you the result.

Shown above is the final shape. Quite how concaving is done,
I will tell you in a sec.

Anyway, see the top profile? The corners of this
spoon are rather angular, not my taste really, but that is
what I was asked to do.

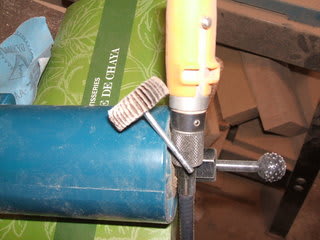
Here, I had a very shallow concave to form. Again, I was
not exactly sure which of the two tools to use. The right
answer was the above shpere with spikes.

An alternative would have been the flapper, seen here
to the left of the spiky sphere. There are proc and cons.
The spiky is very abrasive, but powerful.
The flapper is smooth carving, but less powerful.
It is when you are faced with a very thin piece
to make a concave in that you develop some doubts.

Anyway, above is used to smoothe out the edges of the
stem, a very useful tool, and cheap, too! It is a throw
away tool.

Smae really went to my forcs. Here, I took advantage of the
side profile meant for the spoon. This is OK, because
all these curvatures are more or less the same.

This is a very large machine. It is a grind cutter and
I will take this to my cottage tommorrow. I will be using
it a lot when I construct my workshop (large one), starting
with soft iron pipes normally used for scaffolding. This
has been lying around in my coating shop and it has been
a pain in the neck.

So has been this, standing right at the entrance to my
workshop. I will take this, too. It will be useful
when I cut timbers for structural strength of my large
workshop.
Conchi, as I told you I will be away in the mountain
for a few days starting from tommorrow. No further logging
until my return here.
Take care!


I forget things, easily, well, fairly easily...
Take a look at what follows. These are simple, two pronged
forks. How do you make them?

I have come this far instinctively. How then would you force them
into their final shapes? As they stand at the moment they are of
the same constant thickness.

For that matter, something like above... Again at this stage
they are of the same constant thickness all the way down
their lengths.
Why all this stupid question? It is just that I do not remember
the details after this stage. Granted, I have done these
many times by now, but still details are elusive...
One thing I definitely know is that with these I will have to
transcribe side profiles. I do that, then what? Do I go
bandsaw again? Do I go jigsaw?, or both?

I tried both in the end and as I did the whole process
came back to me slowly...
As I suspected most of external form shaping is done by
the disk sander, shown above. I think I need to document
these detailed procedures...

So, I went disk sander for the concave surface of the spoon
shown above. You have to thin down on the area you wish to
make concave, and above image is showing you the result.

Shown above is the final shape. Quite how concaving is done,
I will tell you in a sec.

Anyway, see the top profile? The corners of this
spoon are rather angular, not my taste really, but that is
what I was asked to do.

Here, I had a very shallow concave to form. Again, I was
not exactly sure which of the two tools to use. The right
answer was the above shpere with spikes.

An alternative would have been the flapper, seen here
to the left of the spiky sphere. There are proc and cons.
The spiky is very abrasive, but powerful.
The flapper is smooth carving, but less powerful.
It is when you are faced with a very thin piece
to make a concave in that you develop some doubts.

Anyway, above is used to smoothe out the edges of the
stem, a very useful tool, and cheap, too! It is a throw
away tool.

Smae really went to my forcs. Here, I took advantage of the
side profile meant for the spoon. This is OK, because
all these curvatures are more or less the same.

This is a very large machine. It is a grind cutter and
I will take this to my cottage tommorrow. I will be using
it a lot when I construct my workshop (large one), starting
with soft iron pipes normally used for scaffolding. This
has been lying around in my coating shop and it has been
a pain in the neck.

So has been this, standing right at the entrance to my
workshop. I will take this, too. It will be useful
when I cut timbers for structural strength of my large
workshop.
Conchi, as I told you I will be away in the mountain
for a few days starting from tommorrow. No further logging
until my return here.
Take care!


