It is still too warm these days!
And, the games are there to watch, eating into
half of my normal working hours!
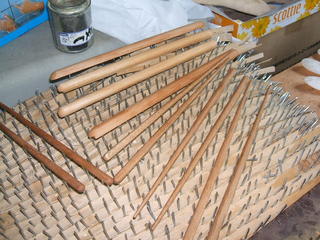
Take a look at the following photo.

Here, you find two chopstics containers, just
recently completed, along with some chopstics.
The issue here is this. What will happen if these containers are
properly coated? I do not have the answer...
Will they open up easily? You can only try...
I cannot coat them all, and these are therefore for
experimental purposes, really. I will see what it will be
like.
See next.

And, see yet next.

All of these were subjected to coating today, the very
first of penetration coatings. You see some photos of those
bellow.


In above, the containers are there to be seen.

Here are the shortest ones...

Apart from the coating, here on follow some on
today's output.

, meaning that I only completed only a single pair of chopstics!
all in addition to some butter knives!


What is above all about? It is a simple piece of thin
and redundant wood. I have problems, these days, trying
to pick up "somen" noodles from the plate.
They are too slippery, for ordinary chopstics and what I have in
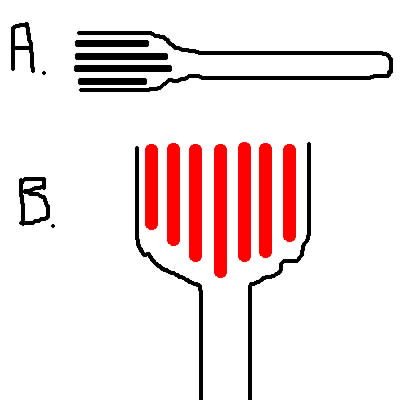
mind is something like as depicted in the next illustration.

Yes, I have something like a comb in mind, with a lot of
pointing members...
Anyway, I have not quite yet finished with the chopstics
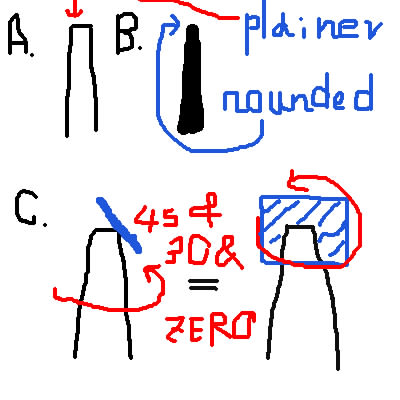
fabrication. Take a look at the next image. This is in relation
to the tip formation.

You narrow down on the picking ends, but the very ends
are flat at the top, as you see with A. You must ronud them.
The rounded tip is shown as B. How you actually round the
tips is depicted with C. Basically, you rotate your stick,
and while doing that, you apply your sanding paper, typically
at the grain level of 240, or 320, applied at the tip,
initially at 45 degrees, gradually, to 30 degrees, and then,
zero degree.
The blue line on the left is the paper and that on the right
is a piece of the paper, seen dead on. The strategy here is
that you also rotate the piece of the sanding paper as shown.
That is, the chopstic axis rotates, and the sanding paper
also does the winding motion at angles to the sharp and
circular edges, all trying to get the best rounded tip head!
You may say it is only about simple chopstics, but I can
and must say that there are issues to be looked at with care!


Am I making myself clear at all? I am no longer sure...
All that there is to it is tricky, and is that
what I mean?


And, the games are there to watch, eating into
half of my normal working hours!
Take a look at the following photo.

Here, you find two chopstics containers, just
recently completed, along with some chopstics.
The issue here is this. What will happen if these containers are
properly coated? I do not have the answer...
Will they open up easily? You can only try...
I cannot coat them all, and these are therefore for
experimental purposes, really. I will see what it will be
like.
See next.

And, see yet next.

All of these were subjected to coating today, the very
first of penetration coatings. You see some photos of those
bellow.


In above, the containers are there to be seen.

Here are the shortest ones...

Apart from the coating, here on follow some on
today's output.

, meaning that I only completed only a single pair of chopstics!
all in addition to some butter knives!


What is above all about? It is a simple piece of thin
and redundant wood. I have problems, these days, trying
to pick up "somen" noodles from the plate.
They are too slippery, for ordinary chopstics and what I have in
mind is something like as depicted in the next illustration.

Yes, I have something like a comb in mind, with a lot of
pointing members...
Anyway, I have not quite yet finished with the chopstics
fabrication. Take a look at the next image. This is in relation
to the tip formation.

You narrow down on the picking ends, but the very ends
are flat at the top, as you see with A. You must ronud them.
The rounded tip is shown as B. How you actually round the
tips is depicted with C. Basically, you rotate your stick,
and while doing that, you apply your sanding paper, typically
at the grain level of 240, or 320, applied at the tip,
initially at 45 degrees, gradually, to 30 degrees, and then,
zero degree.
The blue line on the left is the paper and that on the right
is a piece of the paper, seen dead on. The strategy here is
that you also rotate the piece of the sanding paper as shown.
That is, the chopstic axis rotates, and the sanding paper
also does the winding motion at angles to the sharp and
circular edges, all trying to get the best rounded tip head!
You may say it is only about simple chopstics, but I can
and must say that there are issues to be looked at with care!


Am I making myself clear at all? I am no longer sure...
All that there is to it is tricky, and is that
what I mean?


