Today, I did not do anything in terms of new cutlery pieces.
The day started with wet sanding and drying and coating again,
taking up so much of my time...


On top of that my daughter went back to the very north, and
I took her to the station. As my son is in the very south,
they are both students, they will be apart over the
distance of some 4,000 km, again! What a crazy family we actually are!
Making use of the rest of the afternoon, I started working
on calligraphy brushes stand for my wife. All of the brushes
have a small ring on the end and that prompted me to make
use of one of the redundant peices, which was an wedge, in its
original state. I saw it down the length of it with my
bandsaw. Take a look.

You can see that a long stick is pointing upward, and that
is exactly what you want to hang things on it. What follows
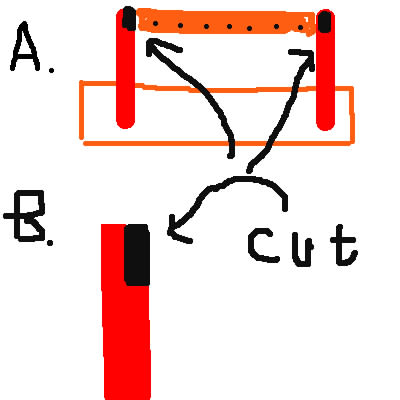
is a schematic.

Look at C and D, and with the above photo the stick is
perpendiular to the surface. How do you ensure that?
As in C, you make a cut, paralell to the side on the
left, and flip over the separated wedge underneath
the main block.
Put together, they form a flat piece, with parallell
surface both above and bellow, and that is exactly
what you need to make your holes perpendicular to the
upper surface! Clever, is it not? Green bars indicate
the pegs.
What follows shows you the result.

Can you see that the two pieces forming what you want, and the
stick (or the peg to be) pointing upward?
Now, what might be the grand scheme? Obviously, you do not
want to spend hours and hours on a simple artefact like this.
On the other hand making each member strictly vertical and
horizontal is a must. Take a look at the following illustration.

By far the easiest way to errect a vertical supporting
structure is to make use of a round piece of rod, and you make
a hole with sufficient depth, and you just stick it in!
Next image shows you the base block, with enough mas, and
sitting a top is the bit that I will be using tommorrow
for hole making.
You may say that the base block is too bulky? Who cares!
You need to support up to 8 soaky brushes with the
supporting pillars.
It is my gut-feeling that you need something like this
to support the super-structure...

What about the pillars? See bellow.

You obviously need a step with each piller, and above shows that
my milling machine has done the job. The horizontal bar with
8 or 9 pegs will be placed on these steps and glued!
I might even use a few reinforcing screws...
Anyway, that is the lot for today...


The day started with wet sanding and drying and coating again,
taking up so much of my time...


On top of that my daughter went back to the very north, and
I took her to the station. As my son is in the very south,
they are both students, they will be apart over the
distance of some 4,000 km, again! What a crazy family we actually are!
Making use of the rest of the afternoon, I started working
on calligraphy brushes stand for my wife. All of the brushes
have a small ring on the end and that prompted me to make
use of one of the redundant peices, which was an wedge, in its
original state. I saw it down the length of it with my
bandsaw. Take a look.

You can see that a long stick is pointing upward, and that
is exactly what you want to hang things on it. What follows
is a schematic.

Look at C and D, and with the above photo the stick is
perpendiular to the surface. How do you ensure that?
As in C, you make a cut, paralell to the side on the
left, and flip over the separated wedge underneath
the main block.
Put together, they form a flat piece, with parallell
surface both above and bellow, and that is exactly
what you need to make your holes perpendicular to the
upper surface! Clever, is it not? Green bars indicate
the pegs.
What follows shows you the result.

Can you see that the two pieces forming what you want, and the
stick (or the peg to be) pointing upward?
Now, what might be the grand scheme? Obviously, you do not
want to spend hours and hours on a simple artefact like this.
On the other hand making each member strictly vertical and
horizontal is a must. Take a look at the following illustration.

By far the easiest way to errect a vertical supporting
structure is to make use of a round piece of rod, and you make
a hole with sufficient depth, and you just stick it in!
Next image shows you the base block, with enough mas, and
sitting a top is the bit that I will be using tommorrow
for hole making.
You may say that the base block is too bulky? Who cares!
You need to support up to 8 soaky brushes with the
supporting pillars.
It is my gut-feeling that you need something like this
to support the super-structure...

What about the pillars? See bellow.

You obviously need a step with each piller, and above shows that
my milling machine has done the job. The horizontal bar with
8 or 9 pegs will be placed on these steps and glued!
I might even use a few reinforcing screws...
Anyway, that is the lot for today...


