日曜日はギャラリーもお休みだったので、一日模型を作っていました。
本日ギャラリー最終日です。夕方にお邪魔できるかもしれません。

リヤにはスペアタイヤをマウント。高さを押さえるため少し台座を削りました。

インパネにはいろいろ色をさしてみました。なかなか良いモールドですね。スイッチ類が細かいです。

フロントもエッチングやステアリングシャフト等を追加。このあたりはカウルで隠れますが。

シャーシはこれで見納め。

タイヤを取り付けるとみっちりとした雰囲気です。

ボディとタイヤ以外すべてメタルパーツなので、むちゃくちゃ重いですよ。

この状態でかなり力つきますが。

ボディカウルにウィンドウを取り付けて、シャーシに接着しました。
室はこれが大変で、この分割線に隙間が開いて、接着が持たない。
エポキシではつかないので、無理やり瞬着で押さえつけました。

この眺めは素晴らしいですね。

フロントセクションも美しいです。
このあとのカウル合わせが山場で、ぽろぽろ部品はずれるは、最後にはカウル固定用に後付けしたミニチュアコネクターが折れてしまって投げ出したくなりました。
何度か試行錯誤して、そこに金属線を埋め込んで、ちょっと見栄えは悪くなりましたが合体は出来ました。

ライト類は相変わらず素晴らしい出来です。スモールライト(ウィンカー?)はクリヤーパーツのふたを気が向いたら作りましょう。

リヤの灯火類は、スワロフスキーのようなタイプでクリヤーパーツの裏にメッキが仕込んであるもの。これは良いアイデアです。4灯とも赤なのですが、キットは赤白だったため、2灯は赤く塗りました。

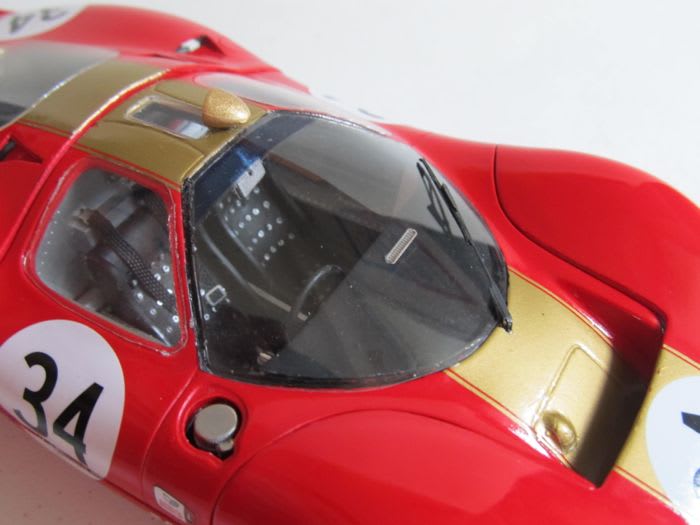
エッチングのワイパーを取り付けて完成。
バイザー部分は自作デカールです。

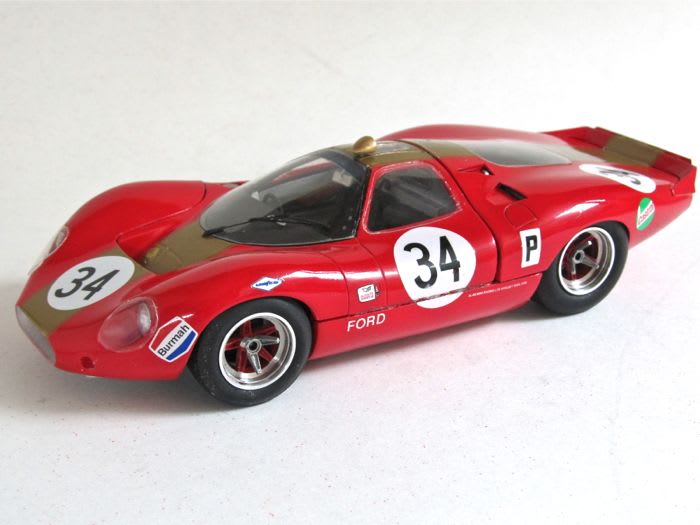
間が空きましたが、のべ10日ちょっとで完成でしょうか。ずいぶんじたばたしてちょっと汚くなりましたが、完成した姿は格別です。

サイドシルを巻き込むように削り込んだ他はほぼ素組。前後カウルの固定方法に悩みました。
前後ともミニチュアコネクターを仕込んであります。

このフォルムはなかなか。臓物には手こずりましたが、やはり最後のカウルの勘合が大変でした。

この伸びやかなフォルムがP68ならではの見所ですね。

ぜひともこちらのキットをお持ちの方は、組みたててみることをお勧めします。
キットの状態のままではこの満足を味わえませんので。失敗もありましたが出来上がってほっとしました。

リヤスタイルの美しいクルマです。

この眺めがハイライトですね。

長い製作記におつきあいありがとうございました。

次号スポーツカーズモデリング、英国車特集で取り上げる予定です。
フロントのスモールライトのカバーはその後装着しました。

次号は7月下旬もしくは8月はじめの発行予定です。
お楽しみに!
本日ギャラリー最終日です。夕方にお邪魔できるかもしれません。

リヤにはスペアタイヤをマウント。高さを押さえるため少し台座を削りました。

インパネにはいろいろ色をさしてみました。なかなか良いモールドですね。スイッチ類が細かいです。

フロントもエッチングやステアリングシャフト等を追加。このあたりはカウルで隠れますが。

シャーシはこれで見納め。

タイヤを取り付けるとみっちりとした雰囲気です。

ボディとタイヤ以外すべてメタルパーツなので、むちゃくちゃ重いですよ。

この状態でかなり力つきますが。

ボディカウルにウィンドウを取り付けて、シャーシに接着しました。
室はこれが大変で、この分割線に隙間が開いて、接着が持たない。
エポキシではつかないので、無理やり瞬着で押さえつけました。

この眺めは素晴らしいですね。

フロントセクションも美しいです。
このあとのカウル合わせが山場で、ぽろぽろ部品はずれるは、最後にはカウル固定用に後付けしたミニチュアコネクターが折れてしまって投げ出したくなりました。
何度か試行錯誤して、そこに金属線を埋め込んで、ちょっと見栄えは悪くなりましたが合体は出来ました。

ライト類は相変わらず素晴らしい出来です。スモールライト(ウィンカー?)はクリヤーパーツのふたを気が向いたら作りましょう。

リヤの灯火類は、スワロフスキーのようなタイプでクリヤーパーツの裏にメッキが仕込んであるもの。これは良いアイデアです。4灯とも赤なのですが、キットは赤白だったため、2灯は赤く塗りました。

エッチングのワイパーを取り付けて完成。
バイザー部分は自作デカールです。

間が空きましたが、のべ10日ちょっとで完成でしょうか。ずいぶんじたばたしてちょっと汚くなりましたが、完成した姿は格別です。

サイドシルを巻き込むように削り込んだ他はほぼ素組。前後カウルの固定方法に悩みました。
前後ともミニチュアコネクターを仕込んであります。

このフォルムはなかなか。臓物には手こずりましたが、やはり最後のカウルの勘合が大変でした。

この伸びやかなフォルムがP68ならではの見所ですね。

ぜひともこちらのキットをお持ちの方は、組みたててみることをお勧めします。
キットの状態のままではこの満足を味わえませんので。失敗もありましたが出来上がってほっとしました。

リヤスタイルの美しいクルマです。

この眺めがハイライトですね。

長い製作記におつきあいありがとうございました。

次号スポーツカーズモデリング、英国車特集で取り上げる予定です。
フロントのスモールライトのカバーはその後装着しました。

次号は7月下旬もしくは8月はじめの発行予定です。
お楽しみに!


