


最初に、Windows Server 2012 ファイルサーバー側に 格納場所を作っておきます。
事前に Windows Server 2012 にユーザー登録をしておきます。(やり方は省略します。)
続いて、データ格納フォルダーを作成し(ここでは、PCの名前を元に ”G41TM Data”フォルダの下に"ドキュメント"、"ビデオ"、"ピクチャ" を作成)共有設定をしておきます。

以下の様に、Windows Server 2012 側に受け皿ができました。

次に、Window10 マシン側から、フォルダーの移動を行います。
対象フォルダ(ここでは "ピクチャ")を右クリックし「プロパティ」から「場所」タブを開きます。

「移動」をクリックし、移動先に Windows Server 2012 の ”ピクチャ” を選択します。

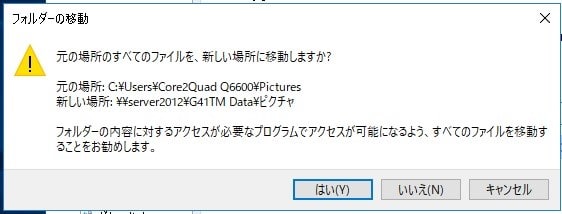
画面下の「適用」をクリックします。

全てのファイルを移動するか聞いてきますので、「はい」をクリック。
以上で完了です。
再度、”ピクチャ” のプロパティを開いてみます。

場所が ネットワーク上の Server に移動していることが確認できました。
但し、このような設定を行うと、このマシンを起動する前に Windows Server 2012 を起動しておかないと、エラーになる可能性があるので、注意が必要です。。。
事前に Windows Server 2012 にユーザー登録をしておきます。(やり方は省略します。)
続いて、データ格納フォルダーを作成し(ここでは、PCの名前を元に ”G41TM Data”フォルダの下に"ドキュメント"、"ビデオ"、"ピクチャ" を作成)共有設定をしておきます。
以下の様に、Windows Server 2012 側に受け皿ができました。
次に、Window10 マシン側から、フォルダーの移動を行います。
対象フォルダ(ここでは "ピクチャ")を右クリックし「プロパティ」から「場所」タブを開きます。
「移動」をクリックし、移動先に Windows Server 2012 の ”ピクチャ” を選択します。
画面下の「適用」をクリックします。
全てのファイルを移動するか聞いてきますので、「はい」をクリック。
以上で完了です。
再度、”ピクチャ” のプロパティを開いてみます。
場所が ネットワーク上の Server に移動していることが確認できました。
但し、このような設定を行うと、このマシンを起動する前に Windows Server 2012 を起動しておかないと、エラーになる可能性があるので、注意が必要です。。。


※コメント投稿者のブログIDはブログ作成者のみに通知されます