


以下が準備したUSBアダプターと、それに収めたHDDです。

続いて、Windows Server 2012R2 のダッシュボードから「サーバーバックアップのセットアップ」を行った様子を紹介します。

ここで「サーバーバックアップのセットアップ」をクリック。

右下の「クリックしてサーバーバックアップをセットアップ」をクリック。

次からは以下のウイザードが立上るので、それに従っていきます。

先ほど接続した、USB経由のHDDが選択できるようになっています。
このドライブにチェックを入れ「次へ」


ここは再フォーマットするしか選択肢はないので「はい」をクリック。

ここでは、バックアップドライブに名前を付けます。(任意でOK)
続けます。
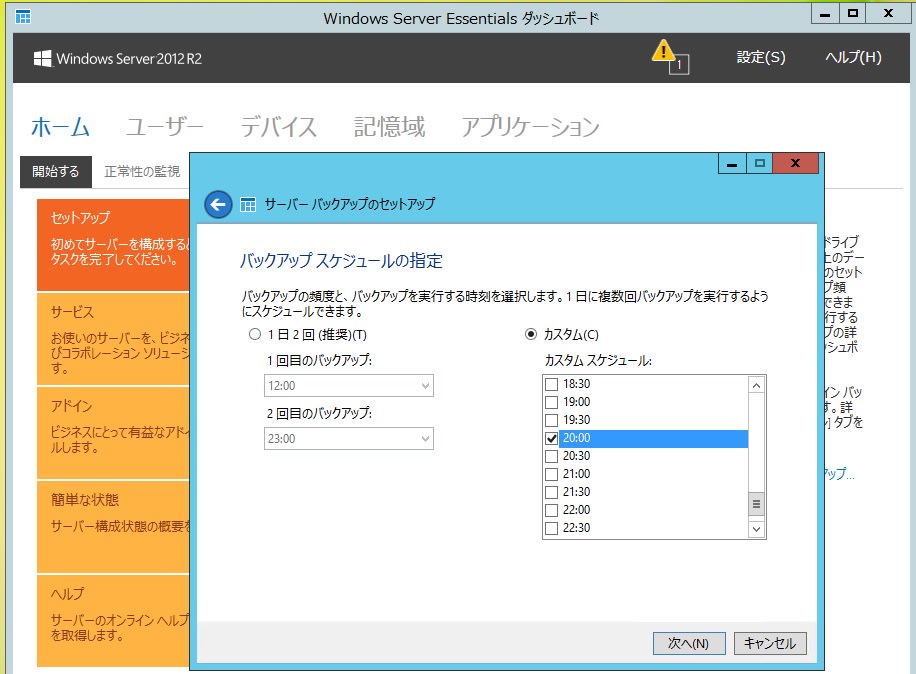
バックアップのスケジュールを入力。ホームユースですので1日に1回で十分、「カスタム」で時間を設定。

ここでは、バックアップするドライブ・フォルダーを指定できますが、データ格納ドライブは容量がでかいので(とても500GBには収まりません)、チェックを外しOSのみバックアップするようにしました。

再度、バックアップの設定内容を確認してきますので、問題なければ「設定の適用」をクリック。

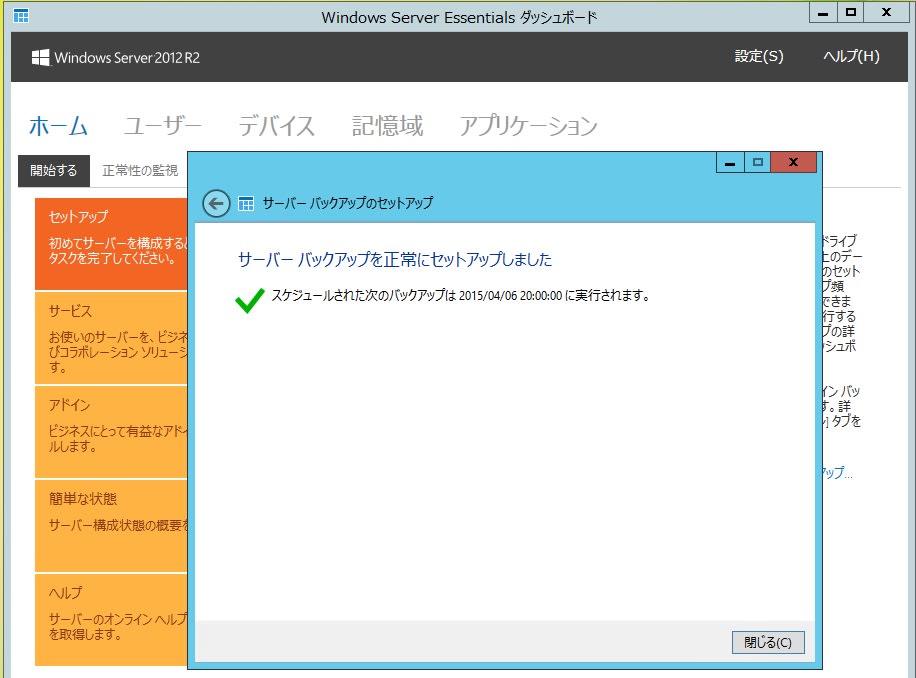
以上でバックアップのセットアップは完了です。(バックアップそのものは、すぐに行うのであれば手動操作が必要です)
もとの各種セットアップ画面に戻ると、

「サーバーバックアップのセットアップ」の項目に、グリーンのチェックが入っています。これでようやく全ての項目にチェックが入りました。
続いて、Windows Server 2012R2 のダッシュボードから「サーバーバックアップのセットアップ」を行った様子を紹介します。
ここで「サーバーバックアップのセットアップ」をクリック。
右下の「クリックしてサーバーバックアップをセットアップ」をクリック。
次からは以下のウイザードが立上るので、それに従っていきます。
先ほど接続した、USB経由のHDDが選択できるようになっています。
このドライブにチェックを入れ「次へ」
ここは再フォーマットするしか選択肢はないので「はい」をクリック。
ここでは、バックアップドライブに名前を付けます。(任意でOK)
続けます。
バックアップのスケジュールを入力。ホームユースですので1日に1回で十分、「カスタム」で時間を設定。
ここでは、バックアップするドライブ・フォルダーを指定できますが、データ格納ドライブは容量がでかいので(とても500GBには収まりません)、チェックを外しOSのみバックアップするようにしました。
再度、バックアップの設定内容を確認してきますので、問題なければ「設定の適用」をクリック。
以上でバックアップのセットアップは完了です。(バックアップそのものは、すぐに行うのであれば手動操作が必要です)
もとの各種セットアップ画面に戻ると、
「サーバーバックアップのセットアップ」の項目に、グリーンのチェックが入っています。これでようやく全ての項目にチェックが入りました。


※コメント投稿者のブログIDはブログ作成者のみに通知されます