2019-01-21
機体の塗装です。
前処理はファインサーフェイサーL ホワイトを吹きます。
そして赤色の部分をマスキングし、機体色のC128灰緑色を吹きます。
先に赤を塗装しておけば、これで完了でしたが、今回は手間のかかる方法でやってみます。
赤を塗装するためのマスキングをしてC3レッド 光沢を吹きます。
マスキングを剥がして確認します。

マスキングをミスした部分が見つかりました。
部分マスキングをして機体色を吹きなおします。
そして翼端をC2ブラック光沢で塗装。
今日はここまで。
後は主脚、尾脚、翼端灯、風防の塗装・取付け、墨入れなどで完成です。
2019-01-19
エンジン部分の組立です。
何時もはやらないのですが、今回初めてプラグコードを再現してみます。
コードはエナメル線を使います。
突起部分に瞬着で端部を接着しようとしましたが上手くできません。
0.5mmキリで穴をあけてエナメル線を通すことにしました。

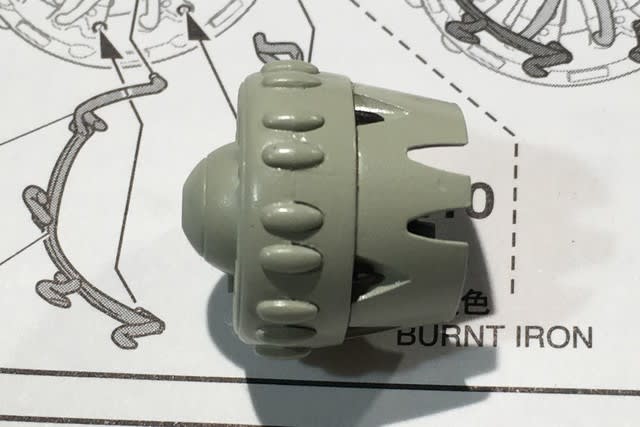
エンジン及びカウル内面はC33つや消しブラックを塗装後、マスキングしてカウル表面をMr.カラーC128灰緑色 半光沢を吹きます。

👆塗り忘れです。
一息入れ、再塗装です。
カウルの接続部など気になる点も有ったので、接着してからブルタックでマスキングして塗装する事にします。

機体と翼の接合です。
成型が良いので、カチッと接合できます。 
今日はここまで。
機体の塗装は明日以降になります。
2019-01-17
やっと製作開始です。
先ず主要パーツを切り出して仮組みします。
嵌め合い等、特に問題なく組みあがりそうです。
零戦以前の機体で、流石に小さいです。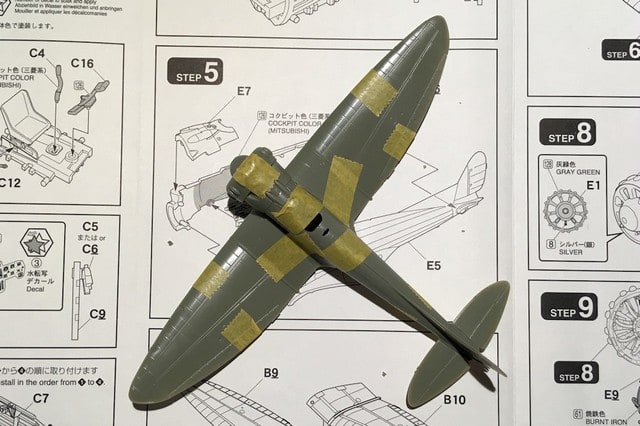

概略確認が出来たので、コックピットから組み立て始めます。
コックピット色はMr.カラーC126 コクピット色 (三菱系) 半光沢を指示通りにエアブラシで吹きます。
組立図では計器盤はデカール貼り用と塗装用が用意されていますが、今回は塗装用の計器枠彫刻のあるものにデカールを貼ることにします。
ソフターを混ぜたマークセッターを塗って、ドライヤーで馴染ませます。
更にソフターで凸凹面に馴染ませます。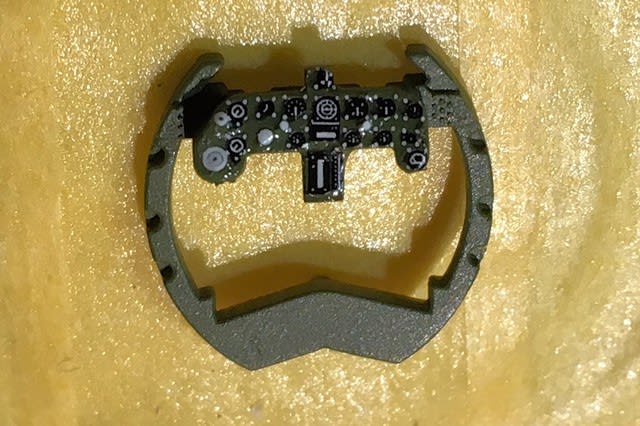
シートベルトはマスキングテープでそれらしく再現します。
機体内面もコックピット色で塗装しておきます。
コックピットを機体にセットして仮組みします。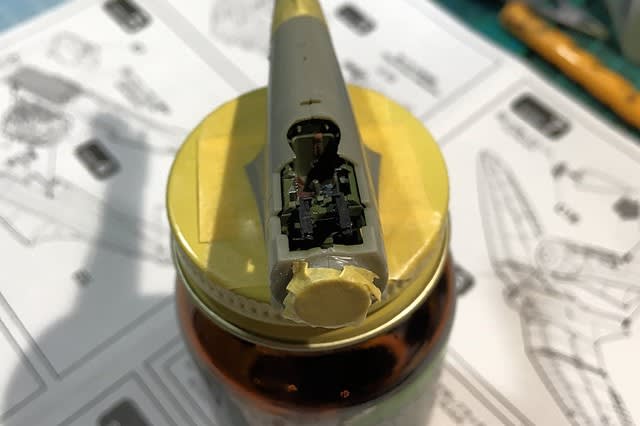

こんな具合なので、コックピットの殆どは見えなくなります。
2019-01-09
昨年完成していたタイガーⅠをArduino+PS3版に改修します。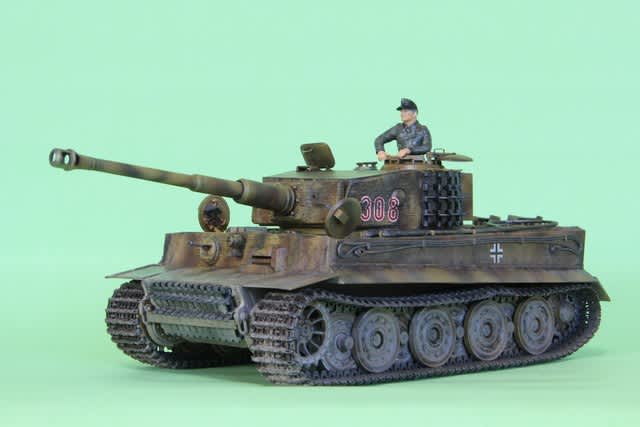
改修理由は機能アップです。
砲身上下可動と発光、機銃発光、ヘッドライト点滅、テールランプ点灯、そして速度可変、旋回のコントロールの操作性アップです。

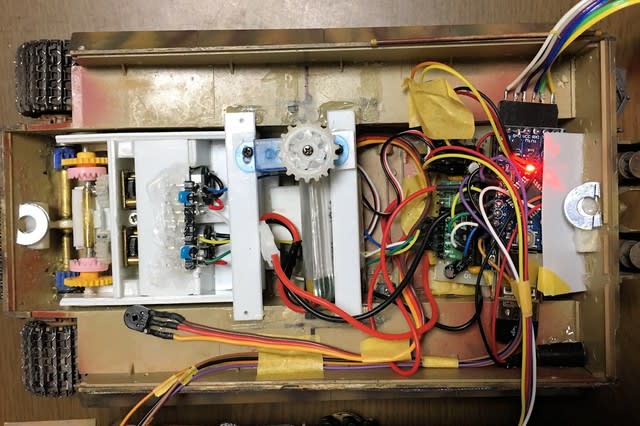
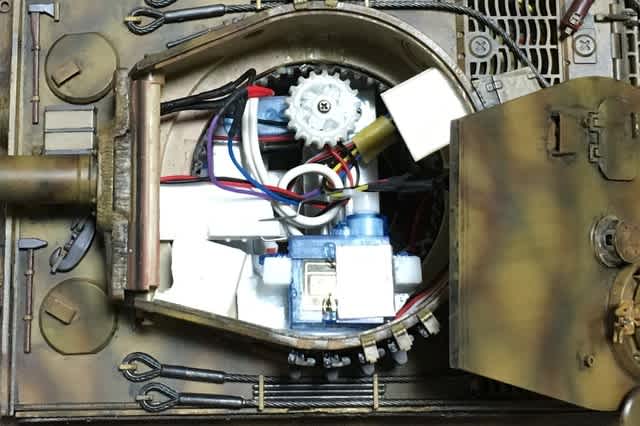
先に、この仕様で製作したT34/85より内部が広いのでユニット搭載は楽です。
使用するArduinoはPro MIni 5V 16MHzです。
Nanoに比べてUSBポートが無いので短いです。
更にミニUSBホストシールドがPro Mini専用なので接続が楽です。
しかし、このミニUSBホストシールドにはVBUS以外は5Vをかけてはいけないとの事です。
とは言え、Nanoとの接続も何とか使えているので、Vccには3.3Vを印可して凌ぐことにします。
(電源は3.7Vリポバッテリなので、3.3Vはダイオードを1個介して接続します。)
換装を進める中で、サーボモータSG90を接続すると電源が落ちます。
小型のRC450の接続では大丈夫そうなので、原因を確定できていませんがRC450で進めます。
モータドライバはDRV8835を使います。
前回、上手く使いこなせかったのですが、何とか速度制御もできるようにスケッチを見直しました。
TB6612よりコンパクトで接続も2本少なくできるので助かります。
赤外線発光LEDはトランジスタを入れて出力アップしました。(射程距離アップです)
スケッチはタイガーⅠ用にカスタマイズします。
走行速度、サーボの可動範囲、回転方向などメカとのマッチングをスケッチ側で調整しました。
記録のためにスケッチと回路図を残します。
(規定以外での使用をしているところもありますので注意が必要です。)
- /* PS3BT_arduino_pro mini_tank_DRX8835_IRw_TIGER1specS
- モータドライバはDRX8835
- 砲撃時のリコイルアクション
- irremote PIN3 赤外線発光(砲撃)システム
- A0ピンに赤外線受光モジュール出力を接続し、被弾処理を追加
- 主砲発光はA1を使用
- IRremote Ver.0.1
- Arduino 1.8.7
- */
- #include <SoftwareSerial.h>
- #include <DFPlayer_Mini_Mp3.h>
- SoftwareSerial mySerial(A2, A3); // DFPlayer TX,RX
- #include <PS3BT.h>
- #include <usbhub.h>
- #ifdef dobogusinclude
- #include <spi4teensy3.h>
- #endif
- //#include <Usb.h> // needed by Arduino IDE
- #include <USB_Host_Shield_GPIO.h> // GPOUTピンで主砲LEDを発光させるため
- MaxGPIO max;
- USB Usb;
- BTD Btd(&Usb);
- PS3BT PS3(&Btd);
- //PS3BT PS3(&Btd, 0x00, 0x1B, 0xDC, 0xF2, 0x54, 0x32); //for Dongke A
- /*シリアルモニタにBluetooth DongleのアドレスがSerial.printされる。
- 書き出された6個のコードをスケッチを変更し、
- ドングルを指した状態でArduinoに書き込む(電源は切らない)
- ドングルを抜いてUSBケーブルでPS3コントローラを接続する(電源は切らない)
- ケーブルを抜いてドングルを指し直す(Arduinoを再起動する)
- PS3コントローラのPS ボタンを押してペアリングする。
- */
- #include <IRremote.h>
- IRsend irsend;
- int RECV_PIN = A0 ; //赤外線受光部をPIN A0に
- IRrecv irrecv(RECV_PIN);
- decode_results results; //受信信号を格納する
- const long sign_hit = 0x4CB0FADD;
- int cnt = 0 ;
- #include <VarSpeedServo.h>
- VarSpeedServo myservo;
- VarSpeedServo myservo_1;
- int servo_pos = 50;
- const int servo_sp = 10;
- const int servo1_sp = 1;
- int ch = 0;
- int pos_y;
- int pos_x;
- int pos_ry;
- int pos_rx;
- int motor_speed;
- int PWMA = 5; // A入力2/AENABLE 左モータ AIN2
- int PWMB = 6; // B入力2/BENABLE 右モータ BIN2
- int AIN1 = 4; // A入力1/APHASE 左モータ AIN1
- int BIN1 = 7; // B入力1/BPHASE 右モータ BIN1
- //const int LED_1 = A2; //主砲
- const int LED_2 = 2; //機銃
- const int LED_3 = A1 ; //ブレーキランプ
- const int LED_8 = 8 ; //ヘッドライト
- const int SVCH1 = A4; //servo 1
- const int SVCH2 = A5; //servo 2
- void setup() {
- irrecv.enableIRIn(); // Start the receiver
- pinMode(RECV_PIN, INPUT) ; // 赤外線受信モジュールに接続ピンをデジタル入力に設定
- pinMode(PWMA, OUTPUT);
- pinMode(PWMB, OUTPUT);
- pinMode(AIN1, OUTPUT);
- pinMode(BIN1, OUTPUT);
- pinMode(LED_2, OUTPUT);
- pinMode(LED_3, OUTPUT);
- pinMode(LED_8, OUTPUT);
- pinMode(SVCH1, OUTPUT);
- pinMode(SVCH2, OUTPUT);
- myservo.attach(SVCH1); //servo1 砲身上下
- myservo.write(servo_pos);
- myservo_1.attach(SVCH2); //servo2 砲塔旋回
- myservo_1.write(90);
- myservo_1.detach();
- Serial.begin (115200);
- mySerial.begin (9600);
- mp3_set_serial (mySerial); //set softwareSerial for DFPlayer-mini mp3 module
- mp3_set_volume (25); //max=30
- while (!Serial); // Wait for serial port to connect - used on Leonardo, Teensy and other boards with built-in USB CDC serial connection
- if (Usb.Init() == -1) {
- Serial.print(F("\r\nOSC did not start"));
- while (1); //halt
- }
- Serial.print(F("\r\nPS3 Bluetooth Library Started"));
- }
- void loop() {
- Usb.Task();
- if (irrecv.decode(&results)) { // 受信コードの値が
- if (results.value == sign_hit) { // 0x4CB0FADDだったら被弾
- //Serial.println("HIT!");
- Hit();
- }
- irrecv.resume();
- }
- if (PS3.PS3Connected) {
- pos_ry = PS3.getAnalogHat(RightHatY);
- if (pos_ry < 10 && servo_pos < 100 ) { // UP
- //if (pos_ry > 235 && servo_pos < 179 ) { // UP
- servo_pos++;
- myservo.write(servo_pos, servo_sp, true);
- } else if (pos_ry > 245 && servo_pos > 35 ) { //DOWN
- servo_pos--;
- myservo.write(servo_pos, servo_sp, true);
- } else if (PS3.getButtonClick(SQUARE)) { //CENTER
- servo_pos = 50;
- myservo.write(servo_pos, servo_sp, true);
- }
- //砲塔旋回
- pos_rx = PS3.getAnalogHat(RightHatX);
- if (pos_rx > 245) { //右旋回
- myservo_1.attach(SVCH2); //servo2 砲塔旋回
- myservo_1.write(180, servo1_sp);
- } else if (pos_rx < 10) { //左旋回
- myservo_1.attach(SVCH2); //servo2 砲塔旋回
- myservo_1.write(0, servo1_sp);
- } else { //停止
- myservo_1.write(90, 255);
- myservo_1.detach();
- }
- //砲撃 + リコイル
- if (PS3.getButtonClick(R1) && ch == 0 ) {
- int khz = 38; // 38kHz carrier frequency for the NEC protocol
- unsigned int irSignal[] = {4100, 1000, 2050, 2050, 1000}; // vs BATTLE TANK jr T-72 40MHz
- // AnalysIR Batch Export (IRremote) - RAW
- irsend.sendRaw(irSignal, (sizeof(irSignal) / sizeof(irSignal[0])), khz);
- //irsend.sendRaw(data buf, length, hertz)
- irrecv.enableIRIn(); // 受信を再開する
- mp3_play(15);
- max.write(0, HIGH); //主砲発光
- //delay(220);
- motor_run(200, 1, 200, 1, 1);
- ch = 5000; //約2秒間は砲撃不可
- delay(80);
- motor_run(0, 0, 0, 0, 1);
- delay(60);
- max.write(0, LOW); //主砲消灯
- motor_run(100, 0, 100, 0, 1);
- delay(200);
- motor_run(0, 0, 0, 0, 1);
- delay(140);
- } else {
- if (ch > 0) {
- ch--;
- }
- }
- //銃撃
- if ( PS3.getButtonClick(L1)) {
- mp3_play(10);
- for ( int i = 0; i < 5 ; i++) {
- digitalWrite(LED_2, HIGH);
- delay(80);
- digitalWrite(LED_2, LOW);
- delay(120);
- }
- }
- //ヘッドライト
- if (PS3.getButtonClick(RIGHT)) { //点灯
- digitalWrite(LED_8, HIGH);
- }
- if (PS3.getButtonClick(LEFT)) { //消灯
- digitalWrite(LED_8, LOW);
- }
- //走行コントロール
- pos_y = PS3.getAnalogHat(LeftHatY);
- pos_x = PS3.getAnalogHat(LeftHatX);
- //左スティックがセンター付近は停止(ブレーキ)
- if (pos_x >= 117 && pos_x <= 137 && pos_y >= 117 && pos_y <= 137) {
- motor_run(0, 0, 0, 0, 1);
- }
- //前進
- else if (pos_y < 117 && pos_x > 117 && pos_x < 137) {
- //左スティック中央(127)から最上部(0)の値をモーターのスピード0から255に変換
- motor_speed = map(pos_y, 117, 0, 0, 255);
- motor_run(motor_speed, 0, motor_speed, 0, 0);
- }
- //後進
- else if ( pos_y > 137 && pos_x > 117 && pos_x < 137) {
- motor_speed = map(pos_y, 137, 255, 0, 255) ;
- motor_run(motor_speed, 1, motor_speed, 1, 0);
- }
- //前進右旋回
- else if ( pos_y < 117 && pos_x > 137) {
- motor_speed = map(pos_y, 117, 0, 0, 255);
- motor_run(motor_speed, 0, 0, 0, 0);
- }
- //前進左旋回
- else if ( pos_y < 117 && pos_x < 117) {
- motor_speed = map(pos_y, 117, 0, 0, 255);
- motor_run(0, 0, motor_speed, 0, 0);
- }
- //後進右旋回
- else if ( pos_y > 137 && pos_x > 137) {
- motor_speed = map(pos_y, 137, 255, 0, 255);
- motor_run(motor_speed, 1, 0, 0, 0);
- }
- //後進左旋回
- else if ( pos_y > 137 && pos_x < 117) {
- motor_speed = map(pos_y, 137, 255, 0, 255);
- motor_run(0, 0, motor_speed, 1, 0);
- }
- //右超信地旋回
- else if ( pos_y > 117 && pos_y < 137 && pos_x > 137) {
- motor_speed = map(pos_x, 137, 255, 0, 255);
- motor_run(motor_speed, 0, motor_speed, 1, 0);
- }
- //左超信地旋回
- else if ( pos_y > 117 && pos_y < 137 && pos_x < 117) {
- motor_speed = map(pos_x, 117, 0, 0, 255);
- motor_run(motor_speed, 1, motor_speed, 0, 0);
- }
- }
- }
- void motor_run(int D0, int D1, int D2, int D3, int D4) {
- /* D0 : モータスピード(左)
- D1 : モータA(左)1 = HIGH / 0 = LOW
- D2 : モータスピード(右)
- D3 : モータB(右)1 = HIGH / 0 = LOW
- D4 : LED_3 ON/OFF 1 = HIGH / 0 = LOW
- */
- analogWrite(PWMA, D0);
- digitalWrite(AIN1, D1);
- analogWrite(PWMB, D2);
- digitalWrite(BIN1, D3);
- digitalWrite(LED_3, D4);
- }
- // ====被弾====
- void Hit() {
- mp3_play(17);
- motor_run(255, 1, 255, 0, 0);
- delay(150);
- motor_run(0, 0, 0, 0, 1);
- delay(100);
- motor_run(200, 0, 200, 1, 0);
- delay(200);
- motor_run(0, 0, 0, 0, 1);
- delay(50);
- cnt++;
- if ( cnt >= 5 ) {
- motor_run(0, 0, 0, 0, 0);
- mp3_play(18);
- for ( int i = 0; i < 15 ; i++) {
- digitalWrite(LED_8, HIGH);//ヘッドライト点灯
- delay(1000);
- digitalWrite(LED_8, LOW);//ヘッドライト消灯
- delay(1000);
- }
- //delay(30000); //復活までに30秒
- cnt = 0;
- } else {
- delay(1000);
- }
- }

2019-01-06
新年第一号はファインモールドの1/72 九試単座戦闘機 改修型にしました。
逆ガル翼と多数の突出部を持つカウリングなど特徴のある試作機の改修型との事です。
パーツ点数は47とデカールです。
RC化した過去の戦車のユニット載せ替えも考えているので、このキットの製作開始は少し先になりそうです。


