


男じゃないとわからない。パート4
バイク仲間でもある♪義従兄弟より製作依頼
勿論バイクのパーツ!
では無く…
まさかの「表札」w
表札と言えば 住まいの顔!
もてる技術の全てを注ぎ 製作させて頂きます(*`・ω・)ゞ
早速イメージ固めて作業開始!
まずはExcelで、それらしい書式をデザイン

材料はサイレンサーステーの余り→3mm厚
自身の技量と相談すると
文字を抜くのが、現実的な加工方法
ドリルで当たりをつけて


ヤスリでエッジを整える

一番難しそうな「S」と、簡単な「I」から挑戦!
Sが出来るなら製作出来るだろうし
Iすら難しいなら技量不足と判断
型紙を剥がし微調整
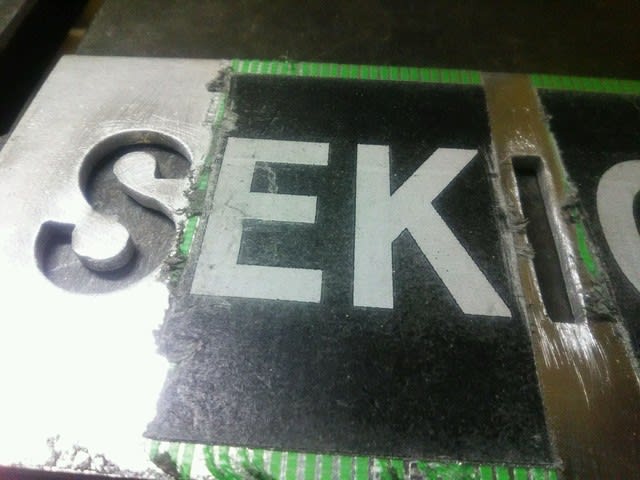
なんとか物に成りそう♪
後はコツコツと地道に進行
「K」も中々手強い

「G」も地味に手間だったが
後に控える「C」が楽に感じるだろう
抜く文字種に関係無く
1日2文字程度が、集中力の限界(^_^;)
コツコツ時間を見付けては作業し
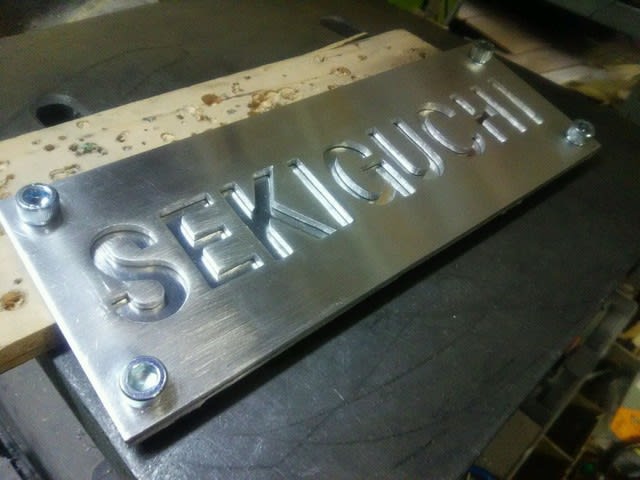
第一段階となる、文字抜き完了!

続いて第二段階「背板の製作」
抜いた文字板同様に3mm厚が理想だったが…
近所のホームセンターをハシゴするも
使いきりサイズは2mmまで…
3mm厚が望ましい理由は、背板本体にタップを切り文字板を 固定する為
単純にボルト&ナットでサンドイッチするならば2mmでも良いが
M6ボルトを使用する考えなので、ピッチを考えると2回転
少々トルク不足の不安があるが…やむなく妥協
他の補強策を考えながら進めていこう
さて、文字板を宛がいマーキングしCUT

養生テープを剥がし
Vブロックをガイドに、切り出し誤差を直接マーキング


グラインダーからの 軽く手仕上げで

ほぼ同寸

ワッシャーをガイドに、文字板へ罫書き/センターポンチまで

文字板と背板を重ね合わせて
まずは、一か所M5まで穴あけ

文字板をキャンセルし、背板へM6のタップを切る

文字板の穴は、φ6.3まで広げる

再び重ね合わせボルトで固定
補助的にズレを抑止し→残り3カ所も同様の作業


4隅を固定して
重ね合わせた状態でエッジを整える

これで 第二段階終了と言ったところかな♪
エッジング/削り出しも終えたので
最終仕上げは、 隠れ家で(^-^)
化粧板(カバー)となるアクリル板を切りだし

裏板と現物合せで穴あけ

3パーツの構成

うっかりドリルの電池が切れていたので
充電中に、文字板と背板の仕上げも完了

表札なので、T-MAXのチェーンガード同様に
落ち着いたヘアライン仕上げ
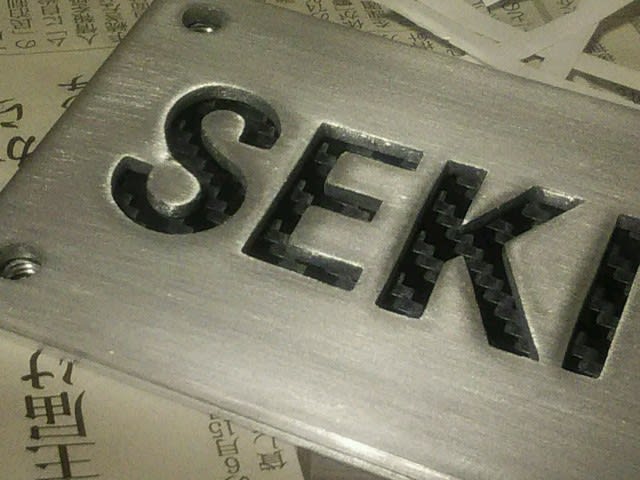
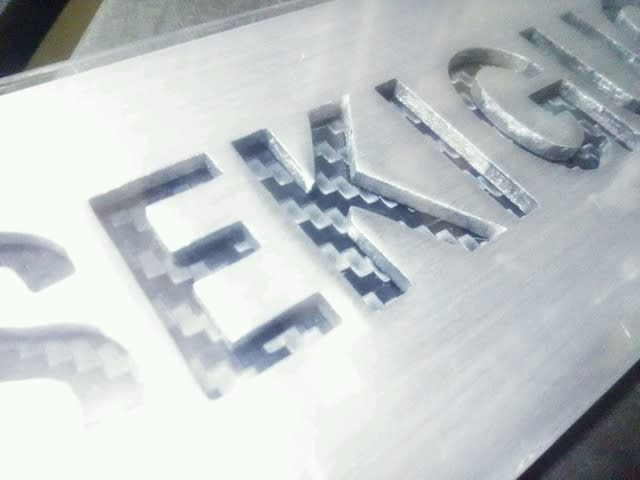
背板にカーボンシートを貼り付け
タップ回りは、誤って崩す事ないように ざっくりカット

文字板の裏へは、補助的に(と言うにはガッツリw)
両面テープを貼り付け

重ね合わせ
立体感の演出と、文字をパキっと見やすくする狙い
(表札ですからね 見やすくないと!)
さあ最終Assy!
雨水等が流れ落ちる様に
文字板/化粧板の間に、ワッシャーを挟み込み
→1mmの隙間を作る
耐候性を考え、ユニクロは却下
電蝕まで考えるとステンレスも却下
シリコンワッシャーを選択!
組み立て時にも、緩衝性が有り良いかな♪っ~と…
あ゙…!Σ( ̄□ ̄;)
割れたwww

敗因は、ハンドドリルによる加工誤差と
M6のビットしか持ってないので
丸棒ヤスリでザックリ内径を広げた事
クリアランスが狭かった…
単純にアクリルと言う材質の特性も(-_-;)
諸々 踏まえて工作室で作り直し

材料も、多くのカウルスクリーンに採用されている
こだわりのw ポリカーボネイトへ変更

今度こそ完成!

みんな大好きカーボンを あしらい
文字の視認性も良い感じ
マシニングワッシャーもシックなチタン仕上げをチョイス

バイクを構成する材料を用いた
バイク乗りによる バイク乗りの為の表札(*´ω`*)
名付けて「走り屋仕様w表札」 労作です!
無事納品!気に入ってもらえて良かった(^^♪

このクォリティ 男じゃないとわからない?
ところで…
見切れているXSRが気になりますよね?
え?気にならない?
いやいや 気になりますよねw
サービスショットw

お!センス良いね~

うぉ!NITRON

アクラポもマッチしてる~

いつも纏まりのある車体に仕上げるよな~

やっぱりXSRって素敵(^^♪
ご訪問ありがとうございます!!
地味にランキング参加中。お気持ちでクリックをm(_ _)m
↓
 にほんブログ村
バイク仲間でもある♪義従兄弟より製作依頼
勿論バイクのパーツ!
では無く…
まさかの「表札」w
表札と言えば 住まいの顔!
もてる技術の全てを注ぎ 製作させて頂きます(*`・ω・)ゞ
早速イメージ固めて作業開始!
まずはExcelで、それらしい書式をデザイン
材料はサイレンサーステーの余り→3mm厚
自身の技量と相談すると
文字を抜くのが、現実的な加工方法
ドリルで当たりをつけて
ヤスリでエッジを整える
一番難しそうな「S」と、簡単な「I」から挑戦!
Sが出来るなら製作出来るだろうし
Iすら難しいなら技量不足と判断
型紙を剥がし微調整
なんとか物に成りそう♪
後はコツコツと地道に進行
「K」も中々手強い
「G」も地味に手間だったが
後に控える「C」が楽に感じるだろう
抜く文字種に関係無く
1日2文字程度が、集中力の限界(^_^;)
コツコツ時間を見付けては作業し
第一段階となる、文字抜き完了!
続いて第二段階「背板の製作」
抜いた文字板同様に3mm厚が理想だったが…
近所のホームセンターをハシゴするも
使いきりサイズは2mmまで…
3mm厚が望ましい理由は、背板本体にタップを切り文字板を 固定する為
単純にボルト&ナットでサンドイッチするならば2mmでも良いが
M6ボルトを使用する考えなので、ピッチを考えると2回転
少々トルク不足の不安があるが…やむなく妥協
他の補強策を考えながら進めていこう
さて、文字板を宛がいマーキングしCUT
養生テープを剥がし
Vブロックをガイドに、切り出し誤差を直接マーキング
グラインダーからの 軽く手仕上げで
ほぼ同寸
ワッシャーをガイドに、文字板へ罫書き/センターポンチまで
文字板と背板を重ね合わせて
まずは、一か所M5まで穴あけ
文字板をキャンセルし、背板へM6のタップを切る
文字板の穴は、φ6.3まで広げる
再び重ね合わせボルトで固定
補助的にズレを抑止し→残り3カ所も同様の作業
4隅を固定して
重ね合わせた状態でエッジを整える
これで 第二段階終了と言ったところかな♪
エッジング/削り出しも終えたので
最終仕上げは、 隠れ家で(^-^)
化粧板(カバー)となるアクリル板を切りだし
裏板と現物合せで穴あけ
3パーツの構成
うっかりドリルの電池が切れていたので
充電中に、文字板と背板の仕上げも完了
表札なので、T-MAXのチェーンガード同様に
落ち着いたヘアライン仕上げ
背板にカーボンシートを貼り付け
タップ回りは、誤って崩す事ないように ざっくりカット
文字板の裏へは、補助的に(と言うにはガッツリw)
両面テープを貼り付け
重ね合わせ
立体感の演出と、文字をパキっと見やすくする狙い
(表札ですからね 見やすくないと!)
さあ最終Assy!
雨水等が流れ落ちる様に
文字板/化粧板の間に、ワッシャーを挟み込み
→1mmの隙間を作る
耐候性を考え、ユニクロは却下
電蝕まで考えるとステンレスも却下
シリコンワッシャーを選択!
組み立て時にも、緩衝性が有り良いかな♪っ~と…
あ゙…!Σ( ̄□ ̄;)
割れたwww
敗因は、ハンドドリルによる加工誤差と
M6のビットしか持ってないので
丸棒ヤスリでザックリ内径を広げた事
クリアランスが狭かった…
単純にアクリルと言う材質の特性も(-_-;)
諸々 踏まえて工作室で作り直し
材料も、多くのカウルスクリーンに採用されている
こだわりのw ポリカーボネイトへ変更
今度こそ完成!
みんな大好きカーボンを あしらい
文字の視認性も良い感じ
マシニングワッシャーもシックなチタン仕上げをチョイス
バイクを構成する材料を用いた
バイク乗りによる バイク乗りの為の表札(*´ω`*)
名付けて「走り屋仕様w表札」 労作です!
無事納品!気に入ってもらえて良かった(^^♪
このクォリティ 男じゃないとわからない?
ところで…
見切れているXSRが気になりますよね?
え?気にならない?
いやいや 気になりますよねw
サービスショットw
お!センス良いね~
うぉ!NITRON
アクラポもマッチしてる~
いつも纏まりのある車体に仕上げるよな~
やっぱりXSRって素敵(^^♪
ご訪問ありがとうございます!!
地味にランキング参加中。お気持ちでクリックをm(_ _)m
↓


