


If you don't know how to make EQ6pro to pieces and assemble it again into original shape, you should see this page first.
(It is in Japanese but I think you can do it looking to the pictures, step by step.)
It is not that difficult to belt drive EQ6pro.
But you have to be aware that number of teeth of worm-shaft gear is 47.

You use pulley in place of gear (wheel).
As far as I know, there is no pulley which has 47 teeth.
To belt drive EQ6pro, you use pulley which has 48 teeth.
2GT, 48 teeth pulley, belt width 6mm, bore diameter 12mm.

Using pulley of 48 teeth (in place of 47 teeth) means you can't use Synscan controller.
You have to use EQ direct cable or ONSTEP controller.
ONSTEP controller

In case you are using EQ direct cable, you have to change parameters.
Open "EQMOD folder" and click "Setup EQASCOM".
You will get this window.
See Mount Option.
Select "Custom" in the pull tab.
Click tool button on the right.

Select EQ6pro/Atlas (4:1) in the pull tab for both RA and DEC.
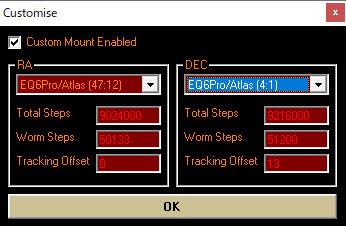
Now you are ready to control belt drived EQ6pro.
Gear on stepping motors have 12 teeth.

You have to get 2GT timing pulley 12 teeth, belt width 6mm, bore diameter 5mm.

2GT, 48 teeth pulley, belt width 6mm, bore diameter 12mm.
2GT timing belt width 4mm, length 160mm or 162mm.
(photo below: 164mm belt was too long)

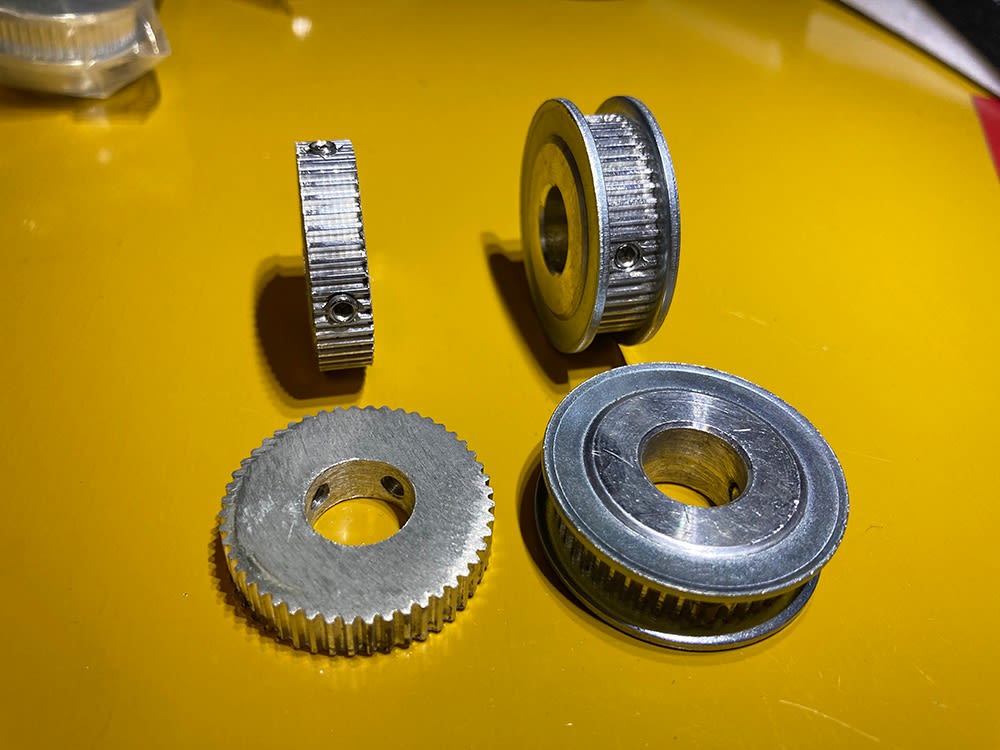
You have to cut off edges of 2GT 48 teeth pulley like this.
(The pulley in the photo below is not the one I used finally.)

Pulley in the right is the original pulley.
Pulley in the left is what we want.
You have to take off the original worm-shaft 47 teeth gear.
But I think you will have a problem at this step.
I had difficulty in taking off worm-shaft from its position.

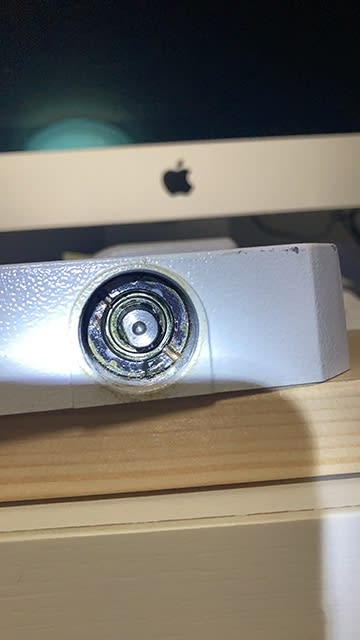
It was this ring.
This ring fix the end of worm-shaft.
You have to loosen and remove this ring to take off worm-shaft from its position.
It was very difficult to loosen this ring.
It was fixed so hard (with glue like LOCTITE).
You have to have Lens wrench to loosen the ring.

If you couldn't loosen it (like me), boil it !
I'm not joking.

I think a threadlocker (like "LOCTITE") is applied to the ring.
It is written on the description of threadlocker that if you have difficulty loosening threadlocker applied screw, heat it up to 100 degree celsius.

Then, you'll be able to loosen the ring to take off worm-shaft.

You fix the 2GT 48 teeth pulley to worm-shaft in place of 47 teeth gear.

Space for 47 teeth gear wheel is a little narrow to place 2.5GT 48 teeth pulley.
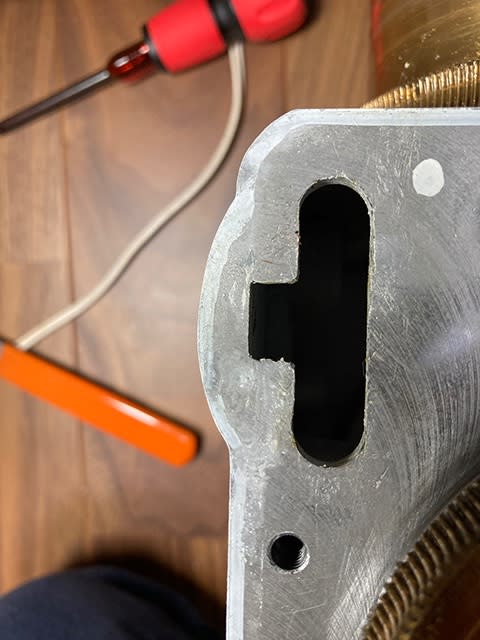
I used metal file to widen the width of the space.


After you placed worm-shaft back to its position and screw the ring to fix a ball bearing at the end of worm-shaft, there is one thing you have to be careful.
If you screw the ring too tight, worm-shaft won't rotate.
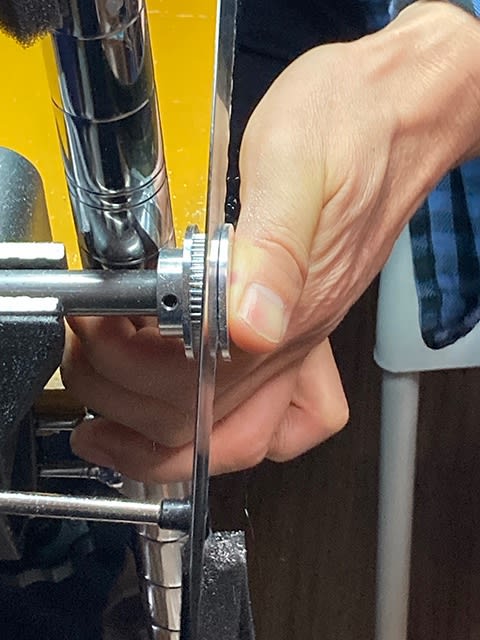
You can touch 48 teeth pulley by putting your hand in the case where (RA and DEC) stepping motors were in place.
You touch 48 teeth pulley with your finger tip to be sure that pulley rotates.
Next you tighten the ring until you can not rotate pulley.
Then loosen the ring for a little bit so the pulley can rotate.
That is the right place for the ring.

Finally you'll have to get stepping motors (RA and DEC) back to their position.
I used fishing line to guide timing belt to 12 teeth pulley on stepping motors.
It took me time to get timing belt on 12 teeth pulley properly.
If you got the belts on the pulley, you fix stepping motors in position to pull the belts tight.

That's all.
You can see the assembling process hereafter in the below page.
EQ6 movement improved very much after belt drive.
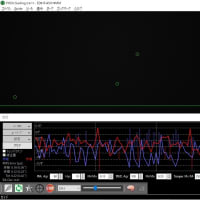
Below is a calibration graph of PHD2 of course of belt drive EQ6pro.

PHD2 Guide graph of belt drive EQ6pro.
Look at the unit of longitudinal axis and RMS Error.
Largest value of longitudinal axis is 1" and RMS Error is 0.18 pixel.
I can't expect more to my EQ6pro.

Backlash results.
It was not as good as I expected.
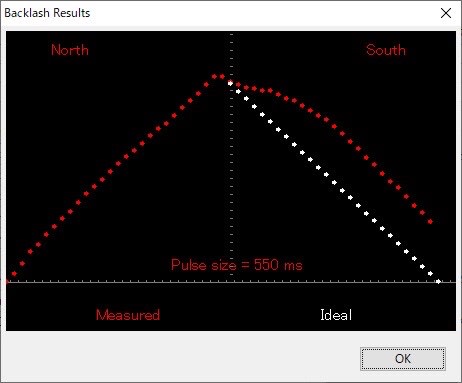
EQ6pro is known for its large amount of backlash.
I have another story to make this backlash more smaller.
But it's not in English at the moment.
2023/12/08 山梨 ベルトドライブ化したEQ6proのバックラッシュ測定 野外リモートデスクトップでコタツでぬくぬく天体観測大作戦 How to overhaul EQ6pro


いきなり英語で表記されて驚きました。
翻訳機能のリセットで解決しました。(´▽`) ホッ
なるほど感心することの多い赤道儀のメンテ方法がカキこしてある
HPと今更ながらに感心します。(^0^;
ウォームシャフトの端を固定するリングですが、(^0^)の場合は
何と!可笑しいな?と思ったらこれがいつのまにか緩んでいて、
その後にカニメレンチで締めましたが再度緩みました。
仕方がないのでメーカに調整に出したら、どうも他の手段で
解決したらしく、保証の範囲で正常に戻った感じです。(^0^)
その後は異常なく動いておりますが、コントローラが2度3度と
壊れて、旧型を知人から譲り受けて動いており、これも困るのでつ。(~ ~;
また、先日は数ヶ月振りに出動となったら、いきなりのギヤ鳴り
がして、それでも動いてましたが観測後に今一度試運転しました。
所謂慣らし運転を数十分やってみたら、今のとこギヤ鳴りしません。(^0^;;
思うに、潤滑油が切れたホイルの場所が在って、そこにオイルが
他から回って何とかなったのではないかと思います。(^0^v
この赤道儀はかなり頑丈に出来てもおり、先発のSEⅡとは違います。
信頼性も高いと思うのですが、取扱説明書が不親切で必要な事が
載ってないので、すべて他の機種に右に習へで設定しました。(^0^;
改造も。。と思いますがデジタル制御に慣れていないので、
今少しまんまでやってみます。
その時は猫五郎さんのHPが一番役に立つと思います。(^0^v
だいぶ使い込んでる機体ですから、メンテしてみてください。
予定が合えばご一緒しますよ。
ただ、デリケートな機会であることは間違いないので、分解後の微調整のひと手間はあると思います。
コントローラーについても、今ならEQdirectケーブル、amazonで2130円で売ってます。
改造は必要ないです。
パソコンが必要になりますが、慣れますよ!