


2021-10-30
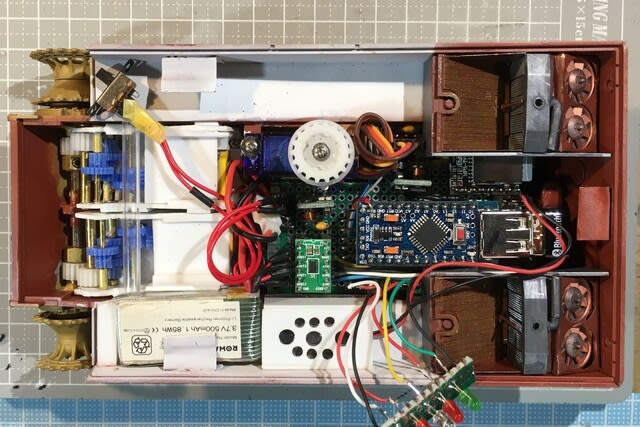
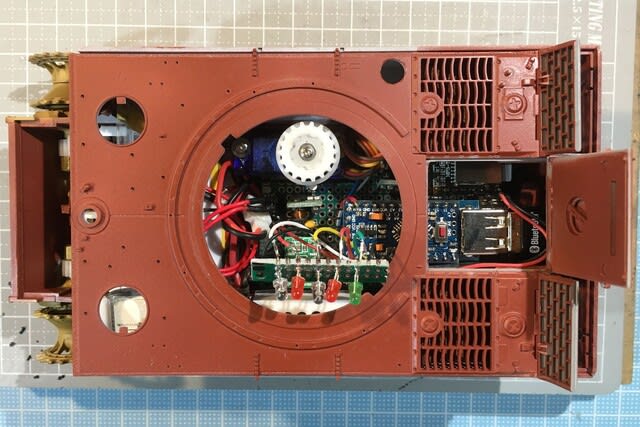
この二日間はティーガーⅠのRC可動コントロール基板を製作していました。
▼何とか空きスペースにパーツを収納できました。
電源スイッチの取り付け場所はまだ決めていません。
今のところ、いい場所が見つかっていません。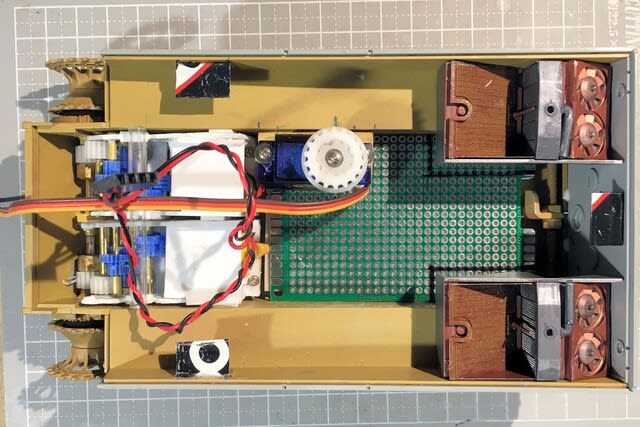

▼回路図です。
画像をクリックすると拡大します
▼Arduinoのスケッチです。
最終的にはリコイルアクションは砲身のみにして、今回は車体のアクションはやめる予定です。
PS4BT_arduino_pro_mini_tank_DRV8835_MP3_Tiger1_Dragon_ver01c.ino
1: /* PS4BT_arduino_pro mini_tank_DRV8835_MP3_Tiger1_Dragon_ver01c
2: 2021-10-30
3: Arduino1.8.13
4: 最大30720バイトのフラッシュメモリのうち、スケッチが25496バイト(82%)を使っています。
5: 最大2048バイトのRAMのうち、グローバル変数が1306バイト(63%)を使っていて、
6: ローカル変数で742バイト使うことができます。
7:
8: Arduino pro min + ミニUSBホストシールド2.0 + PS4コントローラ
9: 効果音はDFPlayer Mini
10: モータドライバはDRV8835
11:
12: 砲撃時のリコイルアクション砲身のみ
13: 主砲、機銃、ヘッドライト、ブレーキランプはミニUSBシールドのGPOUTピン0,1,2,3
14:
15: 【操作手順】
16: SHARE+PSボタンでペアリング開始。白色インジケータランプ高速点滅。
17: 戦車の電源投入。
18: インジケータランプ青色点灯でペアリング完了。
19:
20: 【走行コントロール】
21: コントローラーの左スティック上下で前後進、
22: 右スティックの左右でステアリングを制御。
23: ステアリングを振っていくと回転軸側が減速していき(緩旋回から信地旋回)、
24: 一杯に倒すと回転軸側は停止。(信地旋回)
25: 左スティック中央で右ステアリングを一杯に振ると超信地旋回(速度50%)
26: 停止時にブレーキランプ点灯ミニUSB GPOUT- 3ピン
27:
28: 【砲身上下】右スティック上下で砲身上下。R3ボタンでセンター。
29: 【砲塔旋回】左スティック左右で砲塔旋回。離した位置で止まる。
30: 【主砲】R1ボタンで主砲発射ミニUSB GPOUT- 0ピン
31: 【機銃】L1ボタンで機銃射撃ミニUSB GPOUT- 1ピン
32: 【ヘッドライト】RIGHTボタンを押して点灯、LEFTボタンを押して消灯。ミニUSB GPOUT- 2ピン
33: 【車間表示灯】UPボタンを押して点灯、DOWNボタンを押して消灯。ミニUSB GPOUT- 4ピン
34: */
35:
36: #include <PS4BT.h>
37: #include <usbhub.h>
38: #ifdef dobogusinclude
39: #include <spi4teensy3.h>
40: #endif
41: #include <SPI.h>
42:
43: USB Usb;
44: //USBHub Hub1(&Usb); // Some dongles have a hub inside
45: BTD Btd(&Usb); // You have to create the Bluetooth Dongle instance like so
46:
47: /* You can create the instance of the PS4BT class in two ways */
48: // This will start an inquiry and then pair with the PS4 controller - you only have to do this once
49: // You will need to hold down the PS and Share button at the same time,
50: // the PS4 controller will then start to blink rapidly indicating that it is in pairing mode
51: PS4BT PS4(&Btd, PAIR);
52:
53: // After that you can simply create the instance like so and then press the PS button on the device
54: //PS4BT PS4(&Btd);
55:
56: bool printAngle, printTouch;
57: uint8_t oldL2Value, oldR2Value;
58:
59: //#include <Usb.h> // needed by Arduino IDE
60: #include <USB_Host_Shield_GPIO.h> // GPOUTピンで主砲LEDを発光させるため
61: MaxGPIO max;
62:
63: #include <VarSpeedServo.h>
64: VarSpeedServo myservo_1;
65: VarSpeedServo myservo_2;
66: VarSpeedServo myservo_3;
67:
68: int servo1_pos = 75; //servo1 砲身上下
69: int servo3_pos = 50; //servo3 砲身リコイル
70: const int servo1_sp = 7; //砲身上下スピード
71: const int servo2_sp = 5; //砲塔回転スピード
72: const int servo4_sp = 25; //姿勢制御スピード
73:
74: int ch = 0;
75: int pos_y;
76: int pos_x;
77: int pos_ry;
78: int pos_rx;
79: int motor_speed;
80: int steering;
81: int PWMA = 5; // A入力2/AENABLE 左モータAIN2
82: int PWMB = 6; // B入力2/BENABLE 右モータBIN2
83: int AIN1 = 4; // A入力1/APHASE 左モータAIN1
84: int BIN1 = 7; // B入力1/BPHASE 右モータBIN1
85: int silent = 1;
86: int state = 0; //変数stateを設定
87: int state1 = 0;
88:
89: #include <SoftwareSerial.h>
90: #include <DFRobotDFPlayerMini.h>
91: SoftwareSerial mySerial(A2, A3); // DFPlayer TX,RX
92: DFRobotDFPlayerMini myDFPlayer;
93:
94: void setup() {
95: Serial.begin (115200);
96: #if !defined(__MIPSEL__)
97: while (!Serial); // Wait for serial port to connect - used on Leonardo,
98: //Teensy and other boards with built-in USB CDC serial connection
99: #endif
100: if (Usb.Init() == -1) {
101: Serial.print(F("\r\nOSC did not start"));
102: while (1); // Halt
103: }
104: Serial.print(F("\r\nPS4 Bluetooth Library Started"));
105:
106: pinMode(PWMA, OUTPUT);
107: pinMode(PWMB, OUTPUT);
108: pinMode(AIN1, OUTPUT);
109: pinMode(BIN1, OUTPUT);
110: myservo_1.attach(2); //servo1 砲身上下
111: myservo_1.write(servo1_pos, servo1_sp, true);
112: myservo_1.detach();
113: myservo_2.attach(3); //servo2 砲塔旋回
114: myservo_2.write(90);
115: //myservo_2.detach(); //centerセット時はコメントアウト
116: myservo_3.attach(8); //servo3 砲身リコイル
117: myservo_3.write(servo3_pos);
118: myservo_3.detach();
119:
120: delay(1000);
121:
122: mySerial.begin (9600);
123: myDFPlayer.begin(mySerial);
124: if (!myDFPlayer.begin(mySerial)) { //Use softwareSerial to communicate with mp3.
125: while (true);
126: }
127: myDFPlayer.volume(25); //Set volume value (0~30).
128: myDFPlayer.play(3); //エンジン始動
129: delay(2000);
130: //myDFPlayer.loop(5); //Loop 5th mp3 アイドリング
131: //delay(200);
132: }
133:
134: void loop() {
135: Usb.Task();
136: if (PS4.connected()) {
137: // myDFPlayer.play(5);
138: // delay(100);
139: if (PS4.getButtonClick(CIRCLE)) { //エンジン音停止
140: myDFPlayer.play(3); //エンジン始動
141: delay(100);
142: }
143:
144: //砲身上下
145: if ( PS4.getButtonClick(R3)) { //CENTER
146: myservo_1.attach(2);
147: myservo_1.write(servo1_pos, servo1_sp, true);
148: // myservo_1.detach();
149: }
150: pos_ry = PS4.getAnalogHat(RightHatY);
151: if (pos_ry < 10) { // UP
152: myservo_1.attach(2);
153: myservo_1.write(servo1_pos + 40, servo1_sp, true);
154: // myservo_1.detach();
155: } else if (pos_ry > 245) { //DOWN
156: myservo_1.attach(2);
157: myservo_1.write(servo1_pos - 22, servo1_sp, true);
158: // myservo_1.detach();
159: } else { //停止
160: myservo_1.detach();
161: }
162:
163: //砲塔旋回
164: pos_rx = PS4.getAnalogHat(LeftHatX);
165: if ( pos_rx > 230) { //右旋回
166: myservo_2.attach(3);
167: myservo_2.write(97);
168: } else if (pos_rx < 25) { //左旋回
169: myservo_2.attach(3);
170: myservo_2.write(83);
171: } else { //停止
172: //myservo_2.attach(3); //回転初めに一瞬反対側に回転するのでコメントアウトする
173: myservo_2.write(90);
174: myservo_2.detach();
175: }
176:
177: //砲撃+ リコイル
178: if (PS4.getButtonClick(R1) && ch == 0 ) {
179: myDFPlayer.play(2);
180: delay(100);
181: max.write(0, HIGH); //主砲発光
182: myservo_3.attach(8);
183: myservo_3.write(servo3_pos + 70, 255); //砲身リコイル
184: //myservo_3.wait();
185: delay(100);
186: //motor_run(180, 1, 180, 1, 1);
187: ch = 2000; //約2秒間は砲撃不可
188: delay(100);
189: //motor_run(0, 0, 0, 0, 1);
190: max.write(0, LOW); //主砲消灯
191: delay(100);
192: myservo_3.write(servo3_pos, 20);
193: //motor_run(100, 0, 100, 0, 1);
194: delay(200);
195: //motor_run(0, 0, 0, 0, 1);
196: myservo_3.wait();
197: delay(640);
198: myservo_3.detach();
199: } else {
200: if (ch > 0) {
201: ch--;
202: }
203: }
204:
205: //銃撃
206: if ( PS4.getButtonClick(L1)) {
207: myDFPlayer.play(10);
208: delay(100);
209: for ( int i = 0; i < 5 ; i++) {
210: max.write(1, HIGH); //機銃発光
211: delay(80);
212: max.write(1, LOW); //機銃消灯
213: delay(120);
214: }
215: }
216:
217: //ヘッドライト
218: if (PS4.getButtonClick(RIGHT)) {
219: max.write(2, HIGH); //点灯
220: }
221: if (PS4.getButtonClick(LEFT)) {
222: max.write(2, LOW); //消灯
223: }
224:
225: //車間表示灯
226: if (PS4.getButtonClick(UP)) {
227: max.write(4, HIGH); //点灯
228: }
229: if (PS4.getButtonClick(DOWN)) {
230: max.write(4, LOW); //消灯
231: }
232:
233: //走行コントロール
234: pos_y = PS4.getAnalogHat(LeftHatY);
235: pos_x = PS4.getAnalogHat(RightHatX);
236:
237: //左スティックがセンター付近は停止(ブレーキ)
238: if (pos_x >= 102 && pos_x <= 152 && pos_y >= 102 && pos_y <= 152) {
239: motor_run(0, 0, 0, 0, 1);
240: }
241:
242: //前進
243: if (pos_y <= 102 && pos_x >= 102 && pos_x <= 152) {
244: motor_speed = map(pos_y, 102, 0, 0, 255);
245: motor_run(motor_speed, 0, motor_speed, 0, 0);
246: }
247:
248: //後進
249: else if ( pos_y >= 152 && pos_x >= 102 && pos_x <= 152) {
250: motor_speed = map(pos_y, 152, 255, 0, 255) ;
251: motor_run(motor_speed, 1, motor_speed, 1, 0);
252: }
253:
254: //前進右緩旋回、信地旋回
255: //else if ( pos_y <= 102 && pos_x > 152 && pos_x <= 245) {
256: else if ( pos_y <= 102 && pos_x > 152) {
257: motor_speed = map(pos_y, 102, 0, 0, 255);
258: steering = motor_speed * (1.00 - (map(pos_x, 152, 255, 0, 255) / 255.00));
259: motor_run(motor_speed, 0, steering, 0, 0);
260: }
261:
262: //前進左緩旋回、信地旋回
263: //else if ( pos_y <= 102 && pos_x < 102 && pos_x >= 10) {
264: else if ( pos_y <= 102 && pos_x < 102) {
265: motor_speed = map(pos_y, 102, 0, 0, 255);
266: steering = motor_speed * (1.00 - (map(pos_x, 102, 0, 0, 255) / 255.00));
267: motor_run(steering, 0, motor_speed, 0, 0);
268: }
269:
270: //後進右緩旋回、信地旋回
271: //else if ( pos_y >= 152 && pos_x > 152 && pos_x <= 245) {
272: else if ( pos_y >= 152 && pos_x > 152 ) {
273: motor_speed = map(pos_y, 152, 255, 0, 255);
274: steering = motor_speed * (1.00 - (map(pos_x, 152, 255, 0, 255) / 255.00));
275: motor_run(motor_speed, 1, steering, 1, 0);
276: }
277:
278: //後進左緩旋回、信地旋回
279: //else if ( pos_y >= 152 && pos_x < 102 && pos_x >= 10) {
280: else if ( pos_y >= 152 && pos_x < 102 ) {
281: motor_speed = map(pos_y, 152, 255, 0, 255);
282: steering = motor_speed * (1.00 - (map(pos_x, 102, 0, 0, 255) / 255.00));
283: motor_run(steering, 1, motor_speed, 1, 0);
284: }
285:
286: //右超信地旋回
287: else if (pos_x > 245 && pos_y >= 102 && pos_y <= 152) {
288: motor_speed = 128;
289: motor_run(motor_speed, 0, motor_speed, 1, 0);
290: }
291:
292: //左超信地旋回
293: else if (pos_x < 10 && pos_y >= 102 && pos_y <= 152) {
294: motor_speed = 128;
295: motor_run(motor_speed, 1, motor_speed, 0, 0);
296: }
297:
298: else { //停止(ブレーキ)
299: motor_run(0, 0, 0, 0, 1);
300: }
301:
302:
303: }
304: }
305:
306: void motor_run(int D0, int D1, int D2, int D3, int D4) {
307: /* D0 : モータスピード(左)
308: D1 : モータA(左)1 = HIGH / 0 = LOW
309: D2 : モータスピード(右)
310: D3 : モータB(右)1 = HIGH / 0 = LOW
311: D4 : LED_3 ON/OFF 1 = HIGH / 0 = LOW
312: */
313: analogWrite(PWMA, D0);
314: digitalWrite(AIN1, D1);
315: analogWrite(PWMB, D2);
316: digitalWrite(BIN1, D3);
317: //digitalWrite(LED_3, D4);
318: if (D4 == 1) {
319: max.write(3, HIGH); //ブレーキ点灯
320: } else {
321: max.write(3, LOW); //ブレーキ消灯
322: }
323: }
324:
コメントありがとうございます。
参考になっているとのこと、恐縮です。
RC化はArduinoとUSBホストシールド、USBドングルなどで実行していますが、最近はESP32を利用しています。
この方が低価格で実現できるのでお勧めです。