アームチェアの制作はその後も淡々と続いています。

座板に後ろ脚を組む切り込みを入れ

周りを曲線に沿ってバンドソーで切り

鉋で削ります。
良く切れる小鉋は、木口も節も関係なくさくさくと削れます。
材の固定は万力を使います。

この万力、幅が230mmもある大型。
1年以上前にインターネットオークションで見つけ購入しておいたのですが、大きすぎてそのままでは作業台に付かないため使わずにいました。
今回、いろいろ考えた結果、補強の脚を付け作業台の幕板をぶち抜くという強硬手段で作業台に取り付けました。
結果は上々、材をしっかり固定してくれます。
その上、

レバーを押すとワンタッチで開閉ができるという優れものです。
次は傘木

墨付けをして、まず、後ろ脚のほぞが入るほぞ穴をあけ

バンドソーで切断し

内側を鉋で削り

治具を使って角鑿盤で、放射状に背のほぞ穴をあけます。

作業は前回と同じことの繰り返しですが、前回の教訓を生かして、少しでも完成度をあげたいと思っています。
座板に後ろ脚を組む切り込みを入れ
周りを曲線に沿ってバンドソーで切り
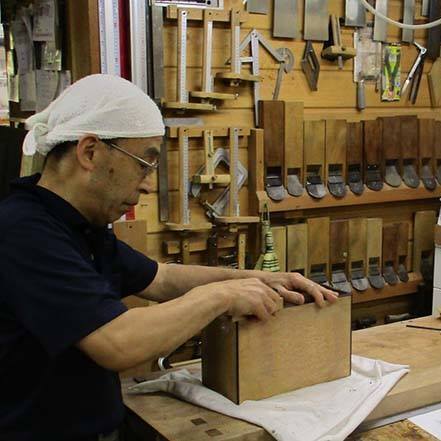
鉋で削ります。
良く切れる小鉋は、木口も節も関係なくさくさくと削れます。
材の固定は万力を使います。
この万力、幅が230mmもある大型。
1年以上前にインターネットオークションで見つけ購入しておいたのですが、大きすぎてそのままでは作業台に付かないため使わずにいました。
今回、いろいろ考えた結果、補強の脚を付け作業台の幕板をぶち抜くという強硬手段で作業台に取り付けました。
結果は上々、材をしっかり固定してくれます。
その上、
レバーを押すとワンタッチで開閉ができるという優れものです。
次は傘木
墨付けをして、まず、後ろ脚のほぞが入るほぞ穴をあけ
バンドソーで切断し
内側を鉋で削り
治具を使って角鑿盤で、放射状に背のほぞ穴をあけます。
作業は前回と同じことの繰り返しですが、前回の教訓を生かして、少しでも完成度をあげたいと思っています。